


Key Takeaways
- Understand the Role: A professional drywall contractor handles everything from hanging sheets to the final smooth finish.
- Vetting is Crucial: Always check licenses, insurance, and past reviews before hiring.
- Cost Awareness: Prices vary based on finish levels, square footage, and complexity.
- Preparation Matters: Clearing the room and understanding the timeline helps the project run smoothly.
- Detailed Contracts: Ensure every detail, from materials to cleanup, is in writing.
Finding the right person to handle your walls can feel like a daunting task. Whether you are building a new home, finishing a basement, or just fixing a hole from that time moving the couch went wrong, you need a pro. The walls of your home are literally the canvas for your life. They hold your pictures, they insulate your rooms, and they define your space. That is why hiring the right drywall contractor is one of the most important decisions you will make during a renovation.
This guide isn’t just about finding a name in a directory. It is about understanding what these professionals do, how to talk to them, and how to ensure you get the smooth, perfect walls you dream of. We will walk you through the entire process, from the first search to the final coat of paint prep. Let’s dive in and make your renovation project a success.
What Exactly Does a Drywall Contractor Do?
Most people think putting up walls is just nailing up some boards. But there is an art and a science to it. A professional drywall contractor is a skilled tradesperson who specializes in the installation and repair of drywall (also known as sheetrock, gypsum board, or plasterboard). Their job is to take the bare bones of your house—the wooden or metal studs—and turn them into smooth, fire-resistant, and sound-dampening surfaces.
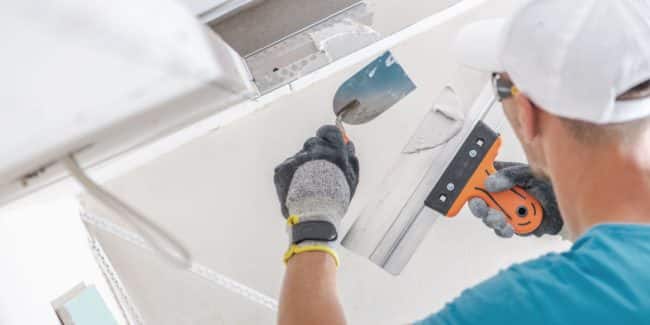
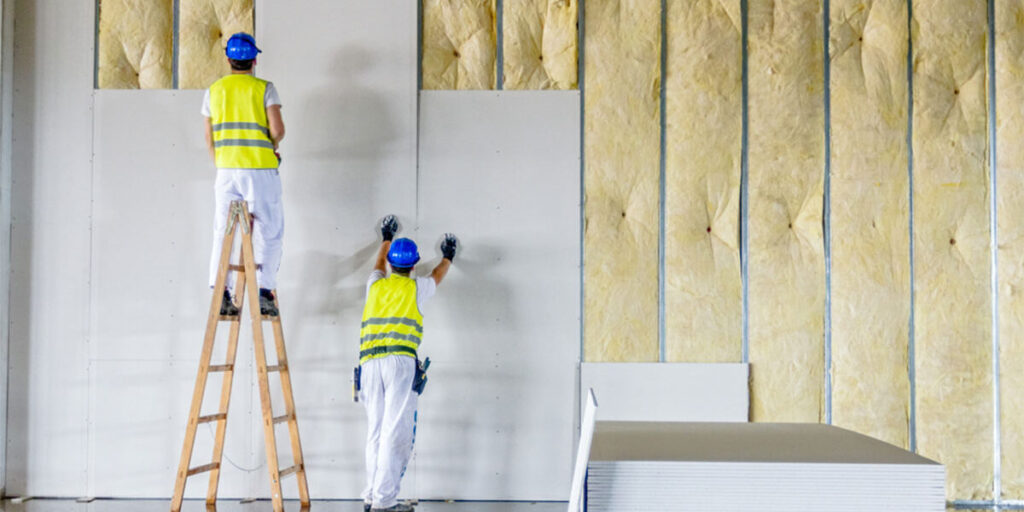
Their work involves several distinct stages. First, they measure and cut large panels of gypsum board to fit your specific space. This requires precision, especially around outlets, windows, and weird corners. Then, they hang these heavy sheets using screws or nails. But the real magic happens in the “finishing” phase. This is where they use paper or mesh tape and joint compound (mud) to hide the seams between the boards and cover the screw heads. It takes a steady hand and a lot of practice to make these seams invisible. Finally, they sand everything down to create a surface ready for paint or wallpaper.
The Difference Between Hanging and Finishing
It is important to know that “hanging” and “finishing” are two different skills, though most contractors do both. Hanging is the heavy lifting. It’s about physical strength and geometry. The goal is to get the boards up securely and with minimal gaps. If the hanging is done poorly, the finishing will be a nightmare.
Finishing, on the other hand, is where the artistry comes in. This involves applying wet compound, letting it dry, sanding it, and repeating the process—sometimes up to three or four times. A skilled drywall contractor knows exactly how much mud to apply so that it blends perfectly with the flat surface of the board. If you hire someone who isn’t skilled at finishing, you will see bumps, ridges, and visible tape lines once the paint goes on.
Why Hiring a Pro Beats DIY Every Time
We all love a good DIY project. Painting a room or building a bookshelf can be fun and rewarding. But drywall? That is a different beast entirely. It is heavy, dusty, and incredibly unforgiving. A single sheet of 4×8 drywall can weigh over 50 pounds. Lifting that up to a ceiling by yourself is not just hard; it’s dangerous.
Beyond the physical strain, the skill curve is steep. Achieving a smooth finish that doesn’t look wavy in the sunlight takes years of practice. When an amateur does it, you often end up with “butt joints” that bulge out or sanding marks that show through the paint. A professional drywall contractor has the tools—like stilts, banjos (taping tools), and power sanders—to do in two days what might take you two weeks. Plus, they clean up the massive amount of dust that is generated, sparing your lungs and your furniture.
Services Offered by a Drywall Contractor
When you call a pro, you should know exactly what services they can provide. It isn’t always just about putting up new walls. These experts offer a wide range of solutions for different home issues.
Installation for New Construction
This is the big job. If you are building a home or an addition, the contractor comes in after the framing, plumbing, and electrical work is done. They will sheet the entire area, tape it, and mud it. This is usually priced by the square foot and is the most straightforward type of job because the space is empty and accessible.
Remodeling and Additions
Remodeling is trickier. The contractor has to match new walls to old ones. They might need to deal with uneven framing in an older house or work around existing trim and flooring. A good drywall contractor knows how to blend the new work seamlessly so you can’t tell where the old room ends and the new one begins.
Repair and Patching
Life happens. Door knobs punch holes in walls, water leaks cause sagging ceilings, and kids get a little too rowdy. Repair work is a specific skill. The contractor has to cut out the damaged section, insert a new piece, and then—most importantly—match the texture of the surrounding wall. If your wall has an “orange peel” or “knockdown” texture, matching that pattern is an art form.
Popcorn Ceiling Removal
Many older homes have textured acoustic ceilings, often called “popcorn ceilings.” These are out of style and can be hard to clean. Many contractors specialize in scraping this texture off, skimming the ceiling with a thin coat of mud, and sanding it smooth for a modern look.
How to Find the Right Drywall Contractor
Starting your search can be overwhelming. You want someone reliable, affordable, and skilled. But where do you look? The best place to start is usually word of mouth. Ask friends, family, or neighbors who have had work done recently. If you see a renovation van in your neighborhood, note the number.
If personal recommendations aren’t an option, the internet is your friend. Search for “top rated drywall contractor near me” and look closely at the reviews. Don’t just look at the star rating; read the comments. Did they show up on time? Did they clean up? Was the final price the same as the quote? Sites like HomeAdvisor, Angi, and Yelp can be helpful, but remember that businesses often pay to be listed there.
Checking Credentials and Insurance
Never skip this step. A legitimate contractor should be licensed to work in your area. This means they have met local government standards. Even more importantly, they must have insurance. If a worker gets hurt in your home or if they accidentally drill into a water pipe and flood your basement, their general liability and workers’ compensation insurance protects you from paying for it. Ask to see proof of insurance before you sign anything.
The 5 Levels of Drywall Finishes
Did you know there are industry standards for how smooth a wall should be? These are called “Levels of Finish,” ranging from 0 to 5. Knowing this terminology will help you communicate exactly what you want to your drywall contractor.
Level 0: Temporary Construction
This is just the drywall sheets hung up on the studs. No tape, no mud. This is usually only used for temporary structures or dust barriers during construction.
Level 1: Fire Taping
This is used in areas that are hidden from view, like attics or service corridors. The contractor applies tape and mud only to the joints. It isn’t meant to look good; it’s meant to provide smoke and fire resistance.
Level 2: Garages and Warehouses
This involves a double coat of compound over tape and screw heads. It is usually used in garages or storage areas where appearance isn’t the main priority. You might see tool marks or ridges.
Level 3: Preparation for Heavy Texture
If you plan to use a heavy texture on your walls (like a heavy knockdown), a Level 3 finish is sufficient. The contractor applies a second coat of compound. It’s smooth enough for texture but not for flat paint.
Level 4: Standard Home Interior
This is the industry standard for most residential walls. It involves three coats of compound. It is perfect for flat or eggshell paints and light wall coverings. It looks smooth to the naked eye.
Level 5: The Premium Smooth Finish
This is the highest quality finish. After achieving Level 4, the drywall contractor applies a “skim coat”—a thin layer of joint compound over the entire surface of the wall. This is necessary if you are using high-gloss paint or if the wall will be hit by severe angled light, which highlights every tiny imperfection.
|
Level |
Best Used For |
Steps Involved |
|---|---|---|
|
Level 0 |
Temporary walls |
Hanging boards only |
|
Level 1 |
Attics, hidden areas |
Tape set in mud |
|
Level 2 |
Garages, storage |
One coat over tape |
|
Level 3 |
Heavy textures |
Two coats of compound |
|
Level 4 |
Standard paint/wallpaper |
Three coats of compound |
|
Level 5 |
Glossy paint, harsh lighting |
Skim coat over entire surface |
Understanding the Cost Factors
How much will this cost? That is the big question. Prices for a drywall contractor can vary wildly depending on where you live and the complexity of the job. Generally, contractors charge either by the square foot (for installation) or by the hour (for repairs).
Square Footage vs. Per Sheet Pricing
For large jobs, you will likely get a quote based on the square footage of the wall area. This usually includes materials (the boards, screws, tape, mud) and labor. Sometimes, for smaller jobs, they might charge “per sheet” installed. Remember, high ceilings or intricate architectural details like arches will increase the price because they take more time and skill.
Material Costs
Standard drywall is relatively cheap. But if you need specialty boards, the price goes up.
- Moisture-Resistant (Green Board): Used in bathrooms and kitchens.
- Mold-Resistant (Purple Board): Higher protection for damp areas.
- Fire-Resistant (Type X): Thicker, used in garages or furnace rooms.
- Soundproof Drywall: Much more expensive, used to dampen noise between rooms.
The Process: What to Expect During the Job
Knowing the workflow helps you manage your expectations. Here is a typical timeline for a standard room renovation.
- Prep Work: The contractor arrives and protects your floors with paper or plastic. They bring in the materials.
- Hanging: They cut and screw the boards to the studs. This creates a lot of noise but not too much dust yet.
- Taping: They apply tape to the seams and the first coat of mud.
- Drying: The mud needs to dry, usually overnight. Fans or heaters might be used.
- Second/Third Coat: They come back, lightly sand, and apply more layers of mud to smooth things out. This is repeated until the finish is right.
- Sanding: The final sanding creates a fine white dust. A good contractor uses vacuums to minimize this, but expect some dust to settle.
- Cleanup: They haul away scrap drywall and sweep up.
Red Flags to Watch Out For
Not every drywall contractor is created equal. Be wary if you notice these warning signs during the hiring process or the job itself.
- Asking for Full Payment Upfront: It is normal to ask for a deposit for materials, but never pay 100% before the work is done.
- No Contract: Always get a written agreement detailing the scope of work and the price.
- Lack of Tools: A pro shows up with professional gear. If they are mixing mud in a dirty bucket with a stick, you might have a problem.
- Poor Communication: If they don’t return calls or can’t explain the process clearly, it suggests they won’t be reliable on the job site.
Preparing Your Home for the Contractor
You can save money and time by prepping the area before the crew arrives. A drywall contractor is there to work on walls, not to move your antique china cabinet.
Clear the Room
Remove as much furniture as possible. If something is too heavy to move, push it to the center of the room and cover it with heavy plastic. The more space the workers have to move their ladders and scaffolds, the faster they can work.
Protect Your Belongings
Drywall dust is incredibly fine. It gets everywhere. Even if the contractor seals off the room, some dust might escape. Cover electronics and valuable items in adjacent rooms. Close doors to other parts of the house and stuff a towel under the crack.
Access and Parking
Ensure the contractors have a clear path from their truck to the work area. They will be carrying large, heavy sheets. Also, make sure they have a place to park their van or truck close to the entrance.
Questions to Ask Before Hiring
Interview at least three candidates. Here are the essential questions to ask to ensure you are hiring a competent drywall contractor.
- “How many years of experience do you have?”
- “Are you licensed and insured?”
- “Can you provide references from recent jobs?”
- “Does your quote include materials and cleanup?”
- “How long will the project take?”
- “Who will be on-site? Is it you or a subcontractor?”
- “What kind of dust control measures do you use?”
The Importance of a Written Contract
Never rely on a handshake. A contract protects both you and the drywall contractor. It should clearly state the start date, the estimated completion date, the total cost, and a payment schedule. It should also specify exactly what level of finish is expected. For example, if you want smooth walls, ensure the contract doesn’t say “standard finish” if that implies texture to them.
Include a “change order” clause. This defines how you will handle unexpected issues or changes you decide to make mid-project. If you decide to add a closet after they start, the contract should explain how the extra cost is calculated. This prevents arguments later on.
Drywall Repair: A Common Need
Sometimes you don’t need a whole room done; you just have a problem area. Water damage is the most common reason homeowners call a drywall contractor for repairs. If a pipe bursts or the roof leaks, drywall acts like a sponge. It swells, crumbles, and grows mold.
A pro will cut out the wet section well beyond the visible water line to ensure all mold is removed. They will then patch it. The hardest part of a repair is blending the paint. Even if the texture match is perfect, new paint often looks brighter than old, faded paint. Be prepared to paint the entire wall corner-to-corner for the best look.
Texture vs. Smooth Finish
Choosing between textured and smooth walls is a matter of taste and budget.
Smooth Finish
This is the modern standard. It looks clean, high-end, and elegant. However, it is more labor-intensive because every flaw shows. It requires a Level 4 or Level 5 finish, making it more expensive.
Textured Finish
Texture is great for hiding imperfections. Patterns like Orange Peel, Knockdown, or Skip Trowel can add character to a room. It is generally faster and cheaper to apply because the texture hides minor taping flaws. However, it can be harder to patch later if it gets damaged.
DIY vs. Professional Cost Benefit Analysis
Let’s look at the real cost. If you DIY, you pay for materials, tools (which you might only use once), and your time. If you make a mistake, you pay to fix it.
If you hire a drywall contractor, you pay for labor and expertise. While the upfront cash is higher, the value is in the result. A professional finish increases your home’s value. Poorly finished drywall looks cheap and can actually lower your home’s resale value. When you factor in the time you save and the quality of the final product, hiring a pro is usually the smarter financial move for any area larger than a small patch.
For more insights on home improvement and finding the right professionals for various tasks, you might find helpful resources at https://siliconvalleytime.co.uk/, which covers a variety of business and lifestyle topics.
Conclusion
Your walls surround you every day. They are the backdrop to your life. Investing in a skilled drywall contractor ensures that backdrop is flawless. By understanding the process, knowing what to ask, and preparing your home, you can ensure a smooth renovation experience. Don’t rush the hiring process. Check those references, get everything in writing, and soon enough, you’ll be enjoying perfectly smooth walls ready for your favorite color of paint.
Frequently Asked Questions (FAQ)
Q: How much does a drywall contractor cost per square foot?
A: Costs vary by region, but generally, you can expect to pay between $1.50 and $3.00 per square foot for installation and finishing. High-end finishes or complex rooms can cost more.
Q: Can I just install drywall over old drywall?
A: It is possible, but usually not recommended. It adds weight to the wall, shrinks the room slightly, and requires extending electrical outlets and door jambs. It is usually better to demo the old walls.
Q: How long does it take to drywall a room?
A: A standard 12×12 room usually takes a professional team about 3 to 4 days. This includes hanging (1 day) and multiple days for taping, mudding, and drying time between coats.
Q: Do drywall contractors paint the walls too?
A: Some do, but painting is often considered a separate trade. While some drywall contractor companies offer painting services, many will only leave the wall “paint-ready” (primed or sanded). Always ask beforehand.
Q: Is drywall dust dangerous?
A: It can be irritating to the lungs and eyes. It contains gypsum and silica dust. Professionals use masks and dust-collection systems. It is important to clean it up thoroughly before moving back into the room.
Q: What is the difference between Sheetrock and drywall?
A: There is no difference in the product itself. Drywall is the generic term for the building material. Sheetrock® is a specific brand name of drywall manufactured by the USG Corporation. It’s like the difference between “tissues” and “Kleenex.” For more details on the history and composition of this material, you can verify this on Wikipedia.


