


Key Takeaways
- Universal Compatibility: While designed for Apple, AirPods can connect to almost any Bluetooth-enabled device, including Android phones and Windows PCs.
- Seamless Switching: Learning how to connect airpods correctly to your iCloud account enables automatic switching between your iPhone, iPad, and Mac.
- Troubleshooting: Most connection issues can be solved by checking Bluetooth settings, charging the case, or performing a factory reset.
- Model Differences: The connection process is slightly different for AirPods Max compared to the in-ear models like AirPods Pro.
Getting a new pair of headphones is always exciting, but sometimes the technology can feel a little overwhelming. If you have just unboxed a shiny new pair of Apple earbuds, you are probably wondering exactly how to connect airpods to your favorite gadgets. Whether you are using an iPhone, an Android smartphone, a laptop, or even a gaming console, the process is usually straightforward, but it helps to have a clear guide. This article is your one-stop resource for everything you need to know about setting up your audio experience. We will walk you through every step, troubleshoot common problems, and ensure you get the best sound quality possible.
We know that technology should make life easier, not harder. That is why we have broken down this guide into simple, easy-to-understand sections. We will cover everything from the initial unboxing to advanced tips for power users. By the end of this article, you will be an expert on how to connect airpods to virtually anything that plays sound. So, grab your charging case, open the lid, and let’s get started on your journey to wireless audio freedom.
Understanding Your AirPods: Models and Features
Before we dive into the specific steps of how to connect airpods, it is helpful to know exactly what model you are working with. Apple has released several versions over the years, and while the connection process is similar, there are small differences. Knowing your model helps you understand which specific features, like Active Noise Cancellation or Spatial Audio, you should look for once you are connected.
AirPods Generation 1 and 2
These are the original design that started the wireless revolution. They have a long stem and a universal fit that rests in your ear rather than plugging it. The connection button is on the back of the charging case. These models are fantastic for everyday listening and are generally the easiest to set up. When you are learning how to connect airpods of this generation, you are relying on the H1 chip (in Gen 2) for fast pairing.
AirPods Pro (1st and 2nd Gen)
The Pro models introduce silicone ear tips for a customizable fit and Active Noise Cancellation. The setup process is nearly identical to the standard models, but you will have extra settings to configure afterward, such as the Ear Tip Fit Test. These are perfect for commuters or anyone who needs to block out the world to focus.
AirPods Max
This is Apple’s over-ear headphone option. Unlike the smaller earbuds, these do not have a charging case with a lid you flip open. Instead, they have a Noise Control button and a Digital Crown. Learning how to connect airpods Max involves taking them out of their Smart Case and holding them near your device, or pressing the noise control button to initiate pairing mode manually.
AirPods (3rd Generation)
This model bridges the gap between the standard version and the Pro version. They have a shorter stem and support Spatial Audio but do not have silicone ear tips. The case is shorter and wider, similar to the Pro case. Recognizing your specific model ensures you know exactly where the setup button is and what light indicators to look for.
How to Connect AirPods to Your iPhone
Connecting to an iPhone is what these earbuds were designed for. Apple calls this “magic pairing” because it really does feel like magic. If you have an iPhone, you are in luck because this is the easiest process of all. You do not need to dig through settings menus if everything goes according to plan. This seamless integration is a major reason why people choose Apple products.
The Initial Setup Process
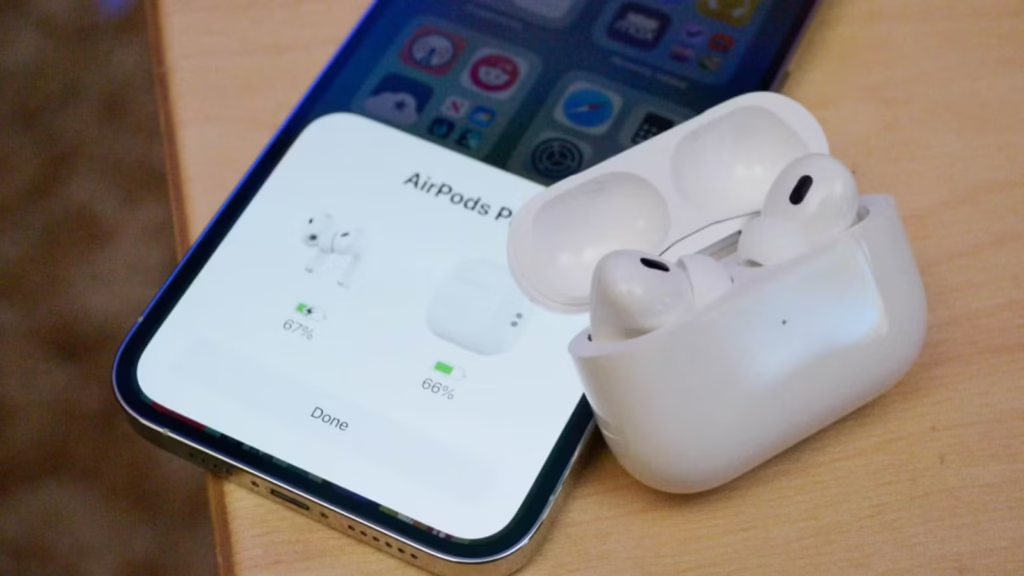
To start, make sure your iPhone is unlocked and on the Home Screen. Hold your charging case (with the earbuds inside) right next to your phone. Open the lid of the case. A setup animation should appear on your iPhone screen almost instantly. Tap “Connect.” If you have AirPods Pro or Gen 3, you might see a few extra screens explaining how to use media controls or “Hey Siri.” Once you tap “Done,” you have successfully learned how to connect airpods to your iPhone. It is that simple.
Troubleshooting Automatic Pairing
Sometimes the animation does not pop up. If this happens, don’t panic. First, ensure your Bluetooth is actually turned on in your Control Center. If it is on and you still see nothing, close the case lid, wait 15 seconds, and open it again. If that fails, locate the small circular button on the back of the case. Press and hold it until the status light flashes white. This manually forces the signal to your phone, prompting the connection card to appear.
Utilizing iCloud for Multi-Device Use
One of the coolest features is that once you connect to your iPhone, your earbuds are automatically set up with any other Apple device signed into the same iCloud account. This means your iPad, Mac, and Apple Watch already know how to connect airpods without you doing anything extra. It saves you the hassle of pairing with every single gadget you own individually.
Checking Battery Status
Once connected, every time you open the case near your iPhone, a card will pop up showing the battery life of the case and each earbud. This is crucial for maintaining your device’s health. You can also add a “Batteries” widget to your iPhone’s Today View or Home Screen to keep an eye on power levels without having to open the case every time.
How to Connect AirPods to an Android Phone
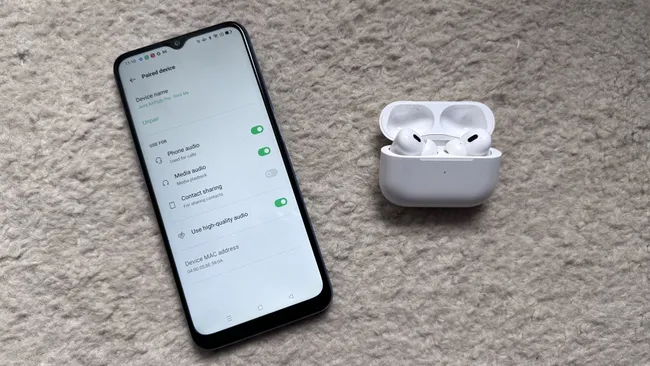
Many people assume these earbuds only work with Apple products, but that is a myth. They are essentially standard Bluetooth headphones, meaning you can use them with your Samsung, Pixel, or any other Android device. While you lose some features like Siri and automatic ear detection, the audio quality remains excellent. Learning how to connect airpods to Android takes just a few manual steps.
Activating Pairing Mode
Since Android phones do not have the “magic” chip integration, you must trigger pairing mode manually. Place the earbuds in the case and keep the lid open. Turn the case around and locate the setup button on the back. Press and hold this button. Watch the LED light inside the case (or on the front, depending on the model). It will flash amber momentarily and then pulse white. This white pulsing light means the device is discoverable and ready to pair.
Using Bluetooth Settings
On your Android device, go to Settings > Connections > Bluetooth. Make sure Bluetooth is toggled on. Your phone will scan for nearby devices. Look for your AirPods in the list of “Available Devices.” Tap on their name. Your phone might ask you to confirm the pairing request. Tap “Pair” or “OK.” You have now successfully figured out how to connect airpods to an Android ecosystem.
Limitations on Android
It is important to manage expectations. On Android, you cannot customize what a double-tap does (unless you use a third-party app), and the music will not automatically pause when you take an earbud out of your ear. However, Active Noise Cancellation and Transparency mode (on Pro and Max models) still work by squeezing the stem or pressing the button on the headphones.
Third-Party Apps for Enhanced Features
The Android community is resourceful. There are several apps available on the Google Play Store, such as “Assistant Trigger” or “MaterialPods,” that bring back some Apple-exclusive features. These apps can display battery levels in your notification shade and even enable ear detection. If you want the full experience, installing one of these apps is a great follow-up step after learning how to connect airpods.
How to Connect AirPods to a Mac Computer
If you already paired your earbuds with your iPhone, they should theoretically appear on your Mac automatically. However, sometimes technology hiccups, or perhaps your Mac is your only Apple device. In these cases, knowing the manual method for how to connect airpods to macOS is essential for Zoom calls, listening to music while working, or watching movies.
Using the Menu Bar
If you see the volume icon or Bluetooth icon in your Mac’s menu bar (top right of the screen), click it. If your earbuds are already associated with your iCloud, they will appear under “Output” or “Devices.” simply click them to connect. If they aren’t there, you will need to pair them manually.
Manual Pairing via System Settings
Open “System Settings” (or System Preferences on older macOS versions) from the Apple menu. Click on “Bluetooth.” Make sure Bluetooth is on. With your earbuds in the case and the lid open, press and hold the setup button on the back of the case until the light flashes white. Your Mac should now display the headphones in the “My Devices” or “Nearby Devices” list. Click “Connect.” This is the standard method for how to connect airpods to any computer running macOS.
Adjusting Sound Settings
Once connected, you might want to tweak the settings. Go to System Settings > Sound. Here you can adjust the input volume (for the microphone) and output volume. This is particularly important for video conferencing. Sometimes the Mac defaults to the internal microphone, so ensuring your AirPods are selected as the input device is key to being heard clearly.
Switching Between Devices
If you have automatic switching enabled, your sound might jump from your Mac to your iPhone if you get a call. Some users find this annoying. You can turn this off in Bluetooth settings by selecting your device options and changing “Connect to this Mac” from “Automatically” to “When Last Connected to This Mac.” This gives you more control over how to connect airpods during your workflow.
How to Connect AirPods to a Windows PC
Windows users often love the sleek design of Apple’s audio gear. Fortunately, connecting to a Windows 10 or Windows 11 PC is very similar to connecting to an Android phone. It treats the device as a standard Bluetooth peripheral. Whether for gaming or business calls, here is how to connect airpods to your PC.
Preparing the PC
First, ensure your PC actually has Bluetooth. Most laptops do, but some desktop towers require a Bluetooth dongle. Click the Start button and type “Settings.” Go to Devices > Bluetooth & other devices. Make sure the Bluetooth toggle switch is set to “On.” Then, click the big button that says “Add Bluetooth or other device.”
The Pairing Process
Select “Bluetooth” from the pop-up menu (Mice, keyboards, pens, or audio). Now, grab your charging case. Open the lid, keep the buds inside, and hold the button on the back until the light flashes white. Your PC will search for the signal. When your device name appears in the list, click it. Windows will say “Your device is ready to go!” Congratulations, you have mastered how to connect airpods to a Windows operating system.
Troubleshooting Audio Issues on Windows
Sometimes, Windows connects but audio doesn’t play, or the microphone quality is poor. This is often a driver issue. Go to your Sound settings and ensure your headphones are selected as both the Output and Input device. Note that Bluetooth bandwidth is limited; if you use the microphone and audio simultaneously (like in a game chat), the audio quality might drop to “mono.” This is normal for Bluetooth headsets on Windows.
Reconnecting Later
Unlike the iPhone, Windows doesn’t always reconnect automatically. You might need to go back to the Bluetooth menu and click “Connect” manually next time you want to use them. For quicker access, you can press the Windows Key + K to open the “Connect” sidebar and select your audio device from there. This is a handy shortcut for anyone learning how to connect airpods quickly.
How to Connect AirPods to Apple TV
Watching movies late at night without waking up the whole house is a perfect use case for headphones. Apple TV integrates beautifully with your audio gear. If your Apple TV is signed into the same iCloud account as your iPhone, the setup is often automatic, but knowing the manual steps for how to connect airpods is useful just in case.
Automatic Connection
When you put your headphones in your ears while the Apple TV is on, a notification might appear in the top corner of your TV screen asking if you want to connect. Simply press the TV button on your remote to accept. This is the seamless ecosystem in action, making the process of how to connect airpods effortless.
Manual Connection via Settings
If the prompt doesn’t appear, go to the Settings app on your Apple TV. Select “Remotes and Devices” and then “Bluetooth.” Put your headphones in pairing mode (button on the back, light flashing white). Look for them under “Other Devices” on your TV screen. Select them to pair. Now all your movie audio will be routed privately to your ears.
Audio Sharing
One of the best features on Apple TV is Audio Sharing. You can connect two pairs of headphones simultaneously so you and a partner can watch a movie together silently. While wearing your set, bring the second set close to the Apple TV or use the control center to add a second output. This advanced tip on how to connect airpods transforms movie night.
Spatial Audio on TV
If you have the Pro, Max, or 3rd Gen models, you can enjoy Spatial Audio with dynamic head tracking on Apple TV. This creates a surround sound experience that mimics a movie theater. Make sure your tvOS is updated to the latest version to take full advantage of these immersive features.
Understanding Status Lights
The little LED light on your case is your primary way of communicating with the device. Understanding what each color means is crucial when learning how to connect airpods and troubleshooting connection issues. The light is located either inside the case (between the earbud slots) or on the front of the case (for wireless charging cases).
Flashing White Light
This is the “Ready to Pair” signal. You will only see this after you press and hold the setup button on the back. If you are trying to learn how to connect airpods to a new device, this is the light you need to see. If you don’t see it, you aren’t in pairing mode.
Solid Amber (Orange) Light
If the light is amber while the earbuds are in the case, it means they are charging. However, if the light is flashing amber, it indicates a problem. usually, it means the pair has encountered a setup error and needs to be reset. We will cover resetting in a later section.
Green Light
A solid green light means the device is fully charged. If the buds are inside, they are charged. If you take the buds out, the light represents the battery level of the case itself. Knowing this helps you ensure you have enough power before you attempt the process of how to connect airpods.
No Light
If there is no light at all, even when you open the lid or press the button, your battery is completely dead. You must charge the case for at least 15 minutes before attempting any connection. A dead battery is the number one reason people fail when trying to figure out how to connect airpods.
Common Connection Problems and Solutions
Even the best technology fails sometimes. You might follow every step on how to connect airpods perfectly and still face issues. Don’t worry; most problems are easy to fix with a few standard troubleshooting steps.
Resetting Your AirPods
This is the “turn it off and on again” of the headphone world. If you can’t connect, try a reset.
- Put the buds in the case and close the lid. Wait 30 seconds.
- Open the lid. Go to Settings on your iPhone, find the device, and tap “Forget This Device.”
- With the lid open, press and hold the back button for about 15 seconds.
- The light will flash amber, then white.
- Now, try to reconnect as if they were brand new. This fixes 99% of issues regarding how to connect airpods.
Bluetooth Interference
Sometimes, other devices interfere with the signal. If your audio is cutting out or you can’t pair, try moving away from Wi-Fi routers, microwave ovens, or other Bluetooth devices. Wireless interference can make learning how to connect airpods frustrating, but a change of location often helps.
Dirty Charging Contacts
If one earbud isn’t connecting, check the bottom of the stem and the inside of the case. Earwax or dust can block the charging contacts, meaning one bud is dead while the other works. Clean the contacts gently with a cotton swab and a little rubbing alcohol. Keeping your gear clean ensures the process of how to connect airpods works every time.
Outdated Software
Ensure your phone, computer, or tablet is running the latest software update. Apple frequently releases firmware updates for the headphones that install automatically, but your host device (iPhone/Mac) needs to be up to date to support them properly.
Optimizing Audio Quality After Connection
Once you have mastered how to connect airpods, the next step is ensuring they sound amazing. There are several settings hidden in your device that can drastically improve your listening experience.
Ear Tip Fit Test (Pro Models Only)
If you have the Pro model, go to Bluetooth settings and run the “Ear Tip Fit Test.” The phone will play a short clip of music to check if the seal in your ear is tight. A good seal is essential for bass response and noise cancellation. Adjusting the tips based on this test is a vital part of how to connect airpods correctly for the best sound.
Headphone Accommodations
Hidden in the Accessibility settings of the iPhone is a feature called “Headphone Accommodations.” This allows you to tune the audio to your hearing. You can boost vocals, increase brightness, or even input an audiogram from a doctor to customize the sound frequencies specifically for your ears.
Spatial Audio Settings
Spatial Audio makes sound feel like it is coming from all around you. You can toggle this on in the Control Center by long-pressing the volume slider. You can choose between “Fixed” (audio stays in front of you) or “Head Tracked” (audio moves when you turn your head). Experimenting with this is the fun part of learning how to connect airpods.
Equalizer (EQ) Settings
While there is no dedicated EQ app for the headphones, you can adjust the EQ for Apple Music in the iPhone Settings > Music > EQ. Options like “Bass Booster” or “Acoustic” can change the sound profile to suit your taste. If you use Spotify, it has its own built-in equalizer in the app settings.
Connecting to Gaming Consoles
Many gamers want to use their high-quality earbuds for gaming, but consoles like the PS5 and Xbox Series X do not support Bluetooth audio natively. This makes the question of how to connect airpods to a console a bit tricky, but not impossible.
Using a Bluetooth Adapter
The most reliable method is to buy a Bluetooth transmitter dongle that plugs into the controller’s 3.5mm headphone jack or the console’s USB port. You put your headphones in pairing mode and the dongle in pairing mode, and they connect directly. This bypasses the console’s restrictions on how to connect airpods.
Connecting via TV
Alternatively, you can connect your headphones directly to your Smart TV (as discussed in the Apple TV section). Since the console sends audio to the TV, and the TV sends audio to your ears, this works for gaming too. However, be aware that there might be a slight audio delay (latency), which can be annoying in fast-paced shooter games.
Using Remote Play Apps
If you stream your game to your phone using the PS Remote Play or Xbox app, you can simply connect your headphones to your phone. The game audio will come through the phone, allowing you to use your earbuds. This is a clever workaround for those figuring out how to connect airpods for gaming without buying extra accessories.
Nintendo Switch
Fortunately, the Nintendo Switch recently added native Bluetooth audio support. Go to System Settings > Bluetooth Audio > Pair Device. Hold the button on your case until it flashes white. The Switch should find it. This makes learning how to connect airpods to a handheld console very straightforward.
Maintaining Your Connection Health
Over time, you might notice the connection getting slower or dropping. Keeping your device healthy ensures you don’t have to constantly relearn how to connect airpods due to failures.
Battery Hygiene
Lithium-ion batteries degrade over time. Try to avoid letting your case or buds hit 0% too often. Also, avoid exposing them to extreme heat (like a hot car) or extreme cold. Healthy batteries maintain a stronger, more stable wireless connection.
Keeping Firmware Updated
Firmware updates fix bugs and improve connectivity. Unlike iPhone updates, there is no “Update Now” button. To ensure updates happen, keep your buds in the case, connect the case to power, and leave them near your iPhone for a while. This happens in the background and is essential for maintaining the knowledge of how to connect airpods seamlessly.
Cleaning the Microphone Mesh
If people complain they can’t hear you on calls, the microphone mesh might be clogged. Use a dry, soft-bristled brush to gently clean the openings. A clear mic path ensures that once you succeed in how to connect airpods, the communication remains clear.
Managing Bluetooth Clutter
If you have paired your phone with fifty different devices over the years, your Bluetooth list is cluttered. Remove old devices you no longer use. This helps your phone find and prioritize your current headphones faster, speeding up the process of how to connect airpods.
Safety and Usage Tips
Using in-ear headphones requires some care for your hearing health and situational awareness. Once you know how to connect airpods, use them responsibly.
Volume Limits
It is easy to crank up the volume, especially in noisy environments. However, prolonged exposure to loud sounds causes hearing damage. Use the “Headphone Safety” feature in iPhone settings to limit loud sounds automatically. This allows you to enjoy the results of how to connect airpods without risking your health.
Transparency Mode
If you are walking in the city or biking, use Transparency Mode (on supported models). This uses the microphones to pipe outside sound into your ears, allowing you to hear traffic and people while listening to music. It is a vital safety feature to activate after you how to connect airpods.
Hygiene
In-ear devices can introduce bacteria into the ear canal. Clean your ear tips regularly with water (remove them from the bud first) or a gentle wipe. Never share your earbuds with others to prevent ear infections. Proper hygiene makes the daily routine of how to connect airpods much more pleasant.
Lost and Found
If you lose a bud, use the “Find My” app on your iPhone. You can make the missing bud play a loud chirping sound to help you locate it in the couch cushions. This feature requires that you have already successfully completed the process of how to connect airpods to your iCloud.
Comparison Table: Connection Features by Device
|
Device Type |
Connection Method |
Special Features Supported |
|---|---|---|
|
iPhone / iPad |
Automatic “Magic” Pairing |
Spatial Audio, Hey Siri, Auto-Switching, Battery Status |
|
Android Phone |
Manual Bluetooth Pairing |
Active Noise Cancellation (button only), Basic Audio |
|
Mac Computer |
iCloud Sync / Manual |
Auto-Switching, Spatial Audio (M1/M2 Macs) |
|
Windows PC |
Manual Bluetooth Pairing |
Basic Audio, Mic (monaural quality) |
|
Apple TV |
iCloud Sync / Manual |
Spatial Audio, Audio Sharing |
|
Nintendo Switch |
Manual Bluetooth Pairing |
Basic Audio Only |
Frequently Asked Questions (FAQ)
Why won’t my AirPods connect to my iPhone?
First, check that Bluetooth is on. Then, ensure the device is charged. If it still fails, reset the headphones by holding the back button for 15 seconds until the light flashes amber then white. This reset usually solves the issue of how to connect airpods.
Can I connect AirPods to two devices at once?
You cannot play audio from two devices simultaneously. However, with “Automatic Switching” on Apple devices, they can jump between your iPhone and Mac instantly depending on which one you are using. This makes it feel like they are connected to both, simplifying how to connect airpods in a multi-device workflow.
Do AirPods work with Samsung phones?
Yes. You can pair them just like any other Bluetooth headset. You press the button on the case to enter pairing mode and select them in your Samsung’s Bluetooth menu. You won’t get Siri, but the sound works fine. This is a common question regarding how to connect airpods cross-platform.
How do I check the battery on Android?
By default, you cannot see the battery percentage on Android. You need to download a third-party app like “MaterialPods” or “CAPod” from the Play Store. These apps read the signal and display the battery, enhancing the experience of how to connect airpods on non-Apple phones.
What does the flashing orange light mean?
A flashing orange (amber) light means a pairing error has occurred. You need to reset the device. Forget them from your Bluetooth settings and hold the setup button until the light turns white. This is the fix for when how to connect airpods goes wrong.
Advanced Tips for Power Users
For those who want to get the absolute most out of their device, here are some pro tips that go beyond the basic how to connect airpods instructions.
Announce Notifications
You can have Siri read your text messages to you automatically without unlocking your phone. Go to Settings > Notifications > Announce Notifications. This is incredibly useful when cooking or driving.
Live Listen
This accessibility feature turns your iPhone into a remote microphone. You can leave your phone on a table and listen to the conversation through your earbuds from across the room. It helps in noisy restaurants. Add the “Hearing” icon to your Control Center to use this after you learn how to connect airpods.
Customizing Controls
On iPhone, go to Bluetooth settings and tap the “i” next to your device. You can customize what a double-tap (or stem squeeze) does for each ear. You can set the left one to skip tracks and the right one to summon Siri. Customization is the reward for mastering how to connect airpods.
Background Sounds
If you need to focus, your iPhone can play rain, ocean, or white noise sounds directly to your headphones without a third-party app. Look for “Background Sounds” in Accessibility settings. It is a great productivity hack.
Conclusion
Connecting your AirPods doesn’t have to be a headache. Whether you are deep in the Apple ecosystem or mixing and matching with Android and Windows, the process is fundamentally about Bluetooth communication. By following the steps outlined in this guide, you now know how to connect airpods to virtually any device you own. From the “magic” of instant iPhone pairing to the utility of connecting to a PC for work, these little devices are incredibly versatile.
Remember, if things go wrong, the reset button is your best friend. Keep your firmware updated, your device clean, and your battery charged, and you will enjoy high-quality wireless audio for years to come. Now that you have mastered the connection, it’s time to put on your favorite playlist and enjoy the music. For more tech insights and guides, you can always visit helpful resources like Silicon Valley Time.
For further reading on the technology behind wireless communication, check out this Wikipedia article on Bluetooth, which explains the underlying tech that makes it possible for you to know how to connect airpods so easily.


