







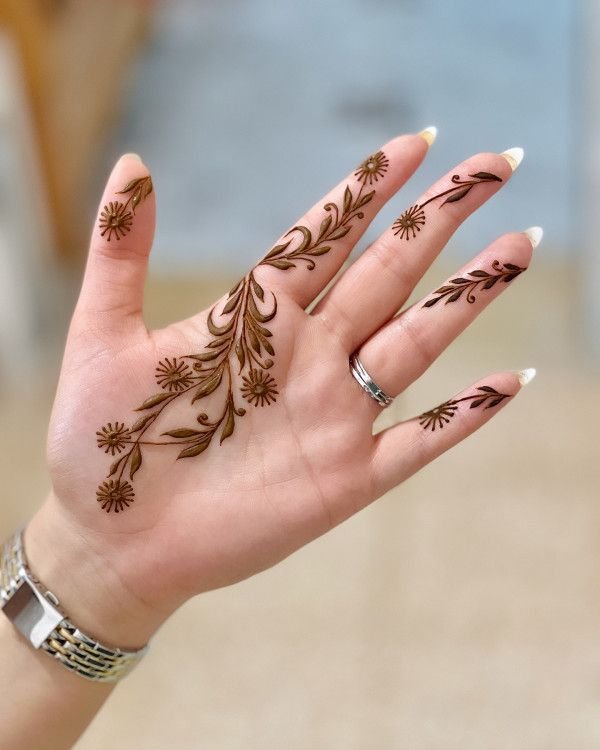

Beginner cute simple mehndi designs for front hands work best when they use clean lines, open spaces, small flowers, leafy vines, dots, finger accents, or a simple central mandala. Beginners should start with one main motif instead of covering the whole hand. A neat, balanced design usually looks more attractive than an overly detailed pattern.
Featured Snippet: What Are the Best Simple Front Hand Mehndi Designs for Beginners?
The easiest front hand mehndi designs for beginners include small floral trails, leafy vines, simple mandalas, finger patterns, bracelet-style designs, lotus motifs, dots, hearts, and diagonal Arabic-inspired patterns. Choose a design with plenty of empty space and repeat only two or three basic shapes for a neat, elegant result.
Why Simple Front Hand Mehndi Designs Are Perfect for Beginners
Mehndi is a form of temporary body decoration created by applying henna paste to the skin. It has a long cultural history and remains especially popular across South Asia as well as parts of the Middle East and Africa.
For a beginner, however, traditional full-hand patterns can feel difficult. Intricate petals, tiny grids, detailed paisleys, and perfectly symmetrical lines require practice.
That is why cute simple mehndi designs for front hands are an ideal starting point. They let you practice basic strokes while still creating something attractive enough for Eid, weddings, parties, festivals, family events, or casual wear.
Simple designs also have another advantage: mistakes are easier to correct. If one leaf looks slightly different from another, the open layout usually prevents the error from becoming obvious.
What Makes a Mehndi Design Beginner-Friendly?
A genuinely beginner-friendly mehndi pattern should not depend on dozens of tiny details. Instead, it should use a few repeatable elements.
Look for designs with:
- Large flowers instead of tiny complicated petals
- Simple leaves and vines
- Dots and circles
- Straight or gently curved lines
- Open negative space
- One central focal point
- Limited finger detailing
- Repeated shapes
- Clear spacing between motifs
For your first few attempts, avoid trying to fill every part of the palm. Empty space is not a mistake. In fact, it often makes modern mehndi look cleaner and more elegant.
Best Beginner Cute Simple Mehndi Designs for Front Hands
Here is a quick comparison before exploring each style in detail.
| Mehndi Style | Difficulty | Approx. Practice Level | Best For |
|---|---|---|---|
| Small floral trail | Very Easy | First attempt | Casual events |
| Leafy vine | Very Easy | Beginner | Everyday mehndi |
| Simple mandala | Easy | Beginner | Eid and parties |
| Finger mehndi | Easy | Beginner | Minimal looks |
| Diagonal Arabic style | Easy–Medium | Some practice | Weddings |
| Lotus design | Easy | Beginner | Elegant occasions |
| Bracelet mehndi | Easy | Beginner | Modern styling |
| Heart and dot design | Very Easy | First attempt | Cute designs |
| Geometric design | Medium | Steady hands | Modern looks |
| Half-hand floral design | Medium | Practiced beginner | Festive events |
1. Small Floral Trail Mehndi Design
A floral trail is one of the safest designs to try when you are completely new to mehndi.
Start with one medium-sized flower near the center or side of the palm. Next, draw a thin curved stem toward one finger. Add small leaves on alternating sides of the stem.
You can extend another short vine toward the wrist if you want slightly more coverage.
The secret is not making every flower complicated. Five rounded petals with a dot in the middle can look beautiful when the lines are clean.
This style also photographs well because the empty space around the flower makes the motif stand out.
2. Simple Leafy Vine Front Hand Mehndi
A leafy vine requires only three skills: drawing a curved line, making pointed leaves, and placing small dots.
Begin near the wrist and create one flowing line that moves diagonally across the palm. Then add pairs of leaves along the line.
You can end the vine near the index or middle finger.
For an even easier version, decorate just one finger with tiny leaves while leaving the remaining fingers mostly empty.
This design works especially well for someone who wants minimal front hand mehndi without a heavy traditional look.
3. Easy Mandala Mehndi Design
The mandala is a classic choice because the entire design grows outward from one central point.
Begin by drawing a small circle in the center of your palm. Surround it with:
- Small dots
- Rounded petals
- A second ring of larger petals
- Tiny lines or dots around the outside
Stop once the mandala looks balanced.
Beginners sometimes make the mistake of adding too many layers. A small three-layer mandala usually looks cleaner than a large design with uneven circles.
You can then add two or three thin bands to the fingers to complete the look.
4. Cute Finger Mehndi Designs
You do not always need to decorate the whole hand.
Simple finger mehndi can create a stylish look with very little drawing.
Try decorating only the index and middle fingers with:
- Tiny leaves
- Small flowers
- Parallel lines
- Dotted chains
- Mini semicircles
- Small diamond shapes
Another easy approach is to place a small flower near the base of one finger and connect it to a short leafy branch.
Finger designs are particularly useful when you want something quick, delicate, and easy to practice.
5. Diagonal Arabic-Inspired Mehndi Design
Arabic-inspired mehndi commonly features flowing floral forms and generous open space. Regional mehndi traditions vary widely, but floral patterns are strongly associated with several Middle Eastern styles.
For a beginner version, draw a diagonal vine starting near the wrist and moving toward the index finger.
Add two or three flowers along the vine. Fill the gaps with leaves and dots.
Do not try to recreate an extremely detailed bridal Arabic pattern on your first attempt. Instead, concentrate on creating a smooth visual flow.
A diagonal design naturally follows the shape of the hand, which helps even simple motifs look sophisticated.
6. Heart and Dots Mehndi Design
If you want something especially cute, combine small hearts with dotted trails.
Draw a simple heart slightly below the center of your palm. Add a thin curved line extending upward and decorate it with tiny leaves.
Then place dots of gradually decreasing size around the design.
This idea works well for teenagers, birthday parties, casual celebrations, or anyone who prefers modern mehndi over heavily traditional designs.
Keep the heart small. A giant central heart can overpower the hand and make the design harder to balance.
7. Simple Bracelet Mehndi Design
Bracelet mehndi creates the appearance of jewelry around the wrist.
Start with two parallel curved lines. Fill the space between them with:
- Dots
- Small leaves
- Semicircles
- Tiny petals
- Diamond shapes
Next, draw one thin chain from the bracelet toward a finger or the center of the palm.
You can finish it with a flower or small mandala.
This style creates an elegant hand-jewelry effect without requiring dense mehndi coverage.
8. Easy Lotus Mehndi Design for Front Hands
The lotus is another excellent motif because you can build it from simple curved petals.
Draw three central petals first. Add two or three slightly larger petals underneath them. Then place a small curved stem or leafy branch below the flower.
For a minimalist result, use only one lotus.
For a fuller design, connect the lotus to a vine that travels toward the wrist.
The most important beginner tip is to keep your petals similar in size. You do not need perfect symmetry, but balanced proportions make the entire design appear more polished.
9. Minimal Half-Hand Mehndi Design
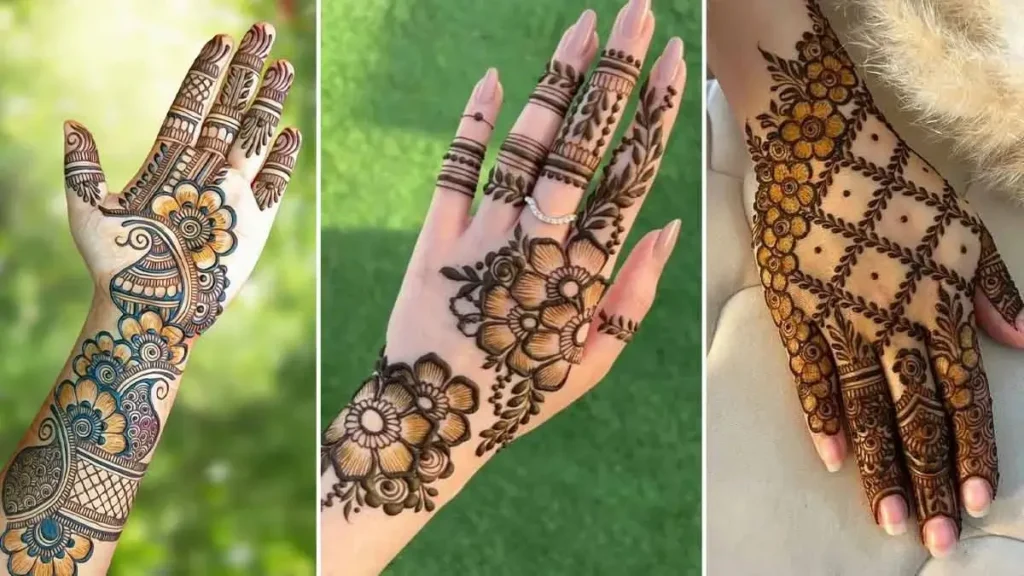
Half-hand mehndi gives you more coverage without forcing you to design the entire palm.
Choose either the wrist side or finger side of the hand.
For example, create:
- One flower near the wrist
- Two leafy branches
- A dotted curve
- Small finger accents
Leave the opposite side of the palm empty.
This use of negative space gives the design a modern appearance and makes minor inconsistencies less noticeable.
It also takes less time than a full-hand pattern.
10. Simple Geometric Mehndi Design
Not every mehndi design needs flowers.
Geometric patterns can use:
- Diamonds
- Triangles
- Straight lines
- Dots
- Squares
- Repeating bands
Begin with a small diamond in the middle of the hand. Add one larger diamond around it and decorate the edges with dots.
You can repeat small geometric bands on one or two fingers.
However, geometric designs require slightly steadier lines than floral patterns. Practice on paper first if you struggle to draw straight sections with a cone.
11. Easy Festive Front Hand Mehndi Design
For Eid, Diwali, weddings, or other celebrations, you may want something simple that still looks festive.
A practical combination is:
central flower + diagonal vine + finger bands + wrist border
This gives the hand enough detail for a special occasion without becoming difficult.
Mehndi continues to hold an important place in many cultural and celebratory traditions, including weddings and religious festivals.
Beginners can therefore adapt a minimal design to the occasion by increasing or reducing the amount of detail.
How to Apply Simple Mehndi Step by Step
A beautiful result depends as much on application technique as design choice.
First, wash your hands and remove creams, oils, or lotions. Dry the skin completely.
Next, test your henna cone on paper. You want the paste to come out in a smooth, consistent line rather than suddenly forming thick blobs.
Then follow this simple process:
- Start with the main motif. Draw your flower, mandala, heart, or lotus first.
- Add the main line. Extend a vine or curved branch from the central motif.
- Build small details. Add leaves, petals, dots, and decorative lines.
- Decorate the fingers. Use small accents rather than complicated filling.
- Check the balance. Look at the entire hand before adding more details.
- Stop before it becomes overcrowded. Simple mehndi depends on clean spacing.
Beginners often improve faster when they practice individual elements instead of repeatedly attempting complete designs.
How to Make Mehndi Lines Look Neat
Cone control is one of the biggest challenges for new artists.
Hold the cone similarly to a pen, but avoid pressing it directly against your skin. Keep the tip slightly above the surface while gently squeezing.
Maintain steady pressure.
If you squeeze harder in the middle of a line, the paste becomes thicker. That can make flowers and vines look uneven.
Before decorating your hand, practice:
- 10 straight lines
- 10 curved lines
- 10 circles
- 20 leaves
- 10 petals
- Several rows of dots
This short exercise can make a noticeable difference in your control.
Also, rotate your hand when necessary instead of forcing your wrist into an uncomfortable angle.
How to Get a Beautiful Henna Stain
Fresh natural henna usually appears orange when the paste first comes away, and the stain can deepen as oxidation occurs. Wikipedia’s overview notes that henna commonly develops toward a reddish-brown shade and gradually fades as the skin naturally exfoliates.
For a better result, avoid repeatedly touching or smudging freshly applied paste.
Give the design enough time to dry and follow the instructions supplied with the specific henna product you are using.
Most importantly, do not judge the final color immediately after removing the paste. Natural henna develops over time.
Important Henna Safety Tip for Beginners
Be careful when purchasing products marketed as “black henna.”
The U.S. Food and Drug Administration warns that some products sold as black henna may contain p-phenylenediamine (PPD) to create a darker color. PPD can trigger potentially serious skin reactions, and the FDA states that it is not permitted in cosmetics intended for application directly to the skin.
Therefore, do not assume that every cone or temporary tattoo product labeled “henna” contains the same ingredients.
Check the product information and ingredient list when possible. Stop using a product and seek appropriate medical care if you develop a concerning reaction such as significant swelling, blistering, intense itching, or worsening skin irritation.
Common Beginner Mehndi Mistakes to Avoid
The first mistake is starting with a design that is too complicated. Pinterest and Instagram may show stunning bridal patterns, but copying hundreds of tiny elements is not the best way to learn.
Another common mistake is holding the cone too tightly. Excess pressure can suddenly release too much paste.
Beginners should also avoid:
- Filling every empty area
- Drawing extremely tiny petals
- Switching between too many motif styles
- Making every finger completely different
- Adding extra details to hide one small mistake
- Starting without testing the cone
- Touching wet mehndi
- Using unknown products simply because they promise an unusually dark or instant stain
Remember that neatness usually matters more than complexity.
Which Mehndi Design Should You Choose for Different Occasions?
For casual wear, choose a leafy vine, tiny flower, or finger-only design.
For Eid or festive gatherings, a mandala with decorated fingers gives slightly more impact.
For a wedding guest look, try a diagonal Arabic-inspired floral trail or bracelet design.
For a bridesmaid, combine a larger floral motif with vines and moderate finger detailing.
For someone applying mehndi for the first time, start with a flower and leaf trail. It provides enough variety to practice curves, petals, leaves, dots, and spacing without becoming overwhelming.
How to Choose a Design That Suits Your Hand
The shape and size of your hand can influence how a pattern looks.
If you have smaller hands, avoid making the central motif so large that it covers almost the entire palm. A small floral trail or compact mandala often creates better proportions.
If you have longer fingers, thin vines and finger bands can emphasize their shape beautifully.
For wider palms, a diagonal arrangement can visually guide the eye across the hand and create a balanced composition.
Still, these are design suggestions rather than strict rules. The best mehndi design is ultimately the one you enjoy wearing.
Frequently Asked Questions
Which mehndi design is easiest for beginners?
A simple flower connected to a leafy vine is one of the easiest options. It uses only a few basic strokes and does not require perfect symmetry.
How can I practice mehndi before applying it to my hand?
Practice straight lines, curves, dots, petals, leaves, spirals, and circles on paper. Once your lines become consistent, combine them into small motifs.
Is a mandala design difficult for beginners?
A basic mandala is beginner-friendly. Start with a circle and add only two or three layers of petals or dots instead of attempting a detailed bridal mandala.
Can beginners create Arabic-style mehndi?
Yes. Start with a simplified diagonal floral trail containing two flowers, a vine, leaves, and open space. Avoid intricate filling until your cone control improves.
Should I decorate every finger?
No. Decorating only one, two, or three fingers can create a beautiful minimalist look. It also makes the design much easier to complete.
How long does henna usually stay visible?
Natural henna stains gradually fade as the outer layers of skin exfoliate. Depending on factors such as placement and the henna used, staining may remain visible for days and can sometimes persist for one to three weeks.
What is the best first design to practice?
Try a five-petal flower with one curved vine, six to eight leaves, several dots, and two simple finger bands. It teaches most of the basic techniques without requiring complicated detail.
Internal Linking Suggestions
To strengthen topical authority, link this article naturally to related content such as:
- Easy Arabic Mehndi Designs
- Simple Finger Mehndi Designs
- Eid Mehndi Designs for Beginners
- Back Hand Mehndi Designs
- Simple Bridal Mehndi Designs
- How to Make Mehndi Darker
- Small Flower Mehndi Designs
- Latest Mehndi Designs for Girls
Use descriptive anchor text instead of generic phrases such as “click here.”
External Authority Link Suggestions
For stronger EEAT, consider referencing authoritative sources where they genuinely add value.
The U.S. Food and Drug Administration is useful for information about temporary tattoos, henna, and the risks associated with products marketed as black henna.
For cultural and historical context, resources from established institutions such as the Natural History Museum can support background information about the henna plant and its use across different traditions.
Final Thoughts
You do not need years of experience to create beautiful mehndi. Start with flowers, leaves, dots, vines, mandalas, and simple finger accents, then slowly add more detail as your confidence improves. The most attractive beginner cute simple mehndi designs for front hands often succeed because they use clean lines, thoughtful spacing, and one clear focal point rather than excessive detail. Mehndi also carries a much broader artistic and cultural history than any single modern design trend; readers who want to explore that background can visit Wikipedia’s overview of Mehndi for additional context.