


Box braids are more than just a hairstyle; they are a cultural staple, a protective method for natural hair, and a versatile fashion statement all rolled into one. Whether you are looking to give your natural hair a break from daily manipulation or you simply want to try a new look that turns heads, this style offers endless possibilities. From classic long plaits to trendy bob cuts, the world of braiding is vast and exciting.
In this guide, we are going to dive deep into everything you need to know. We will cover how to prepare your hair, the installation process, maintenance tips to keep your style fresh, and different ways to rock your new look. We will also discuss the history and cultural significance behind this enduring style. So, grab a cup of tea, sit back, and let’s get into the wonderful world of braiding.
Key Takeaways
- Versatility: Box braids can be styled in hundreds of ways, from buns to ponytails.
- Protection: This style protects natural hair ends and promotes length retention.
- Low Maintenance: Once installed, your daily hair routine becomes much simpler.
- Customization: You can choose any length, color, or thickness to suit your personality.
- Longevity: With proper care, this style can last anywhere from 4 to 8 weeks.
What Are Box Braids exactly?
When you hear the term “box braids,” it refers to a specific type of hair braiding style that is predominantly popular among people of African heritage. The name comes from the way the hair is sectioned. The stylist parts the hair into square-shaped divisions, or “boxes,” across the scalp. While squares are the most traditional shape, modern variations have introduced triangles and diamond parts, but the general technique remains similar.
This style involves taking a section of your natural hair and braiding it from the root all the way down to the ends. Usually, synthetic braiding hair (like Kanekalon) is added to the natural hair to provide length, thickness, and durability. This added hair also helps to lock in the style and gives it that signature sleek, uniform look. Unlike cornrows which are braided flat against the scalp, these braids hang loose, allowing for incredible movement and styling flexibility.
Beyond just looking great, these braids serve a functional purpose. They are considered a “protective style.” This means they tuck away the ends of your hair—the oldest and most fragile part—protecting them from environmental damage like sun, wind, and cold air. This protection helps reduce breakage and split ends, often resulting in noticeable hair growth when the braids are finally taken down.
The Rich History Behind the Style
It is impossible to talk about this hairstyle without acknowledging its deep roots. Braiding is an ancient art form that originated in Africa thousands of years ago. Historically, braid patterns were not just for aesthetics; they often signaled a person’s tribe, age, marital status, wealth, power, and religion. While the specific “box” parting technique has evolved, the fundamental practice of plaiting hair is a tradition passed down through generations.
In the 1990s, box braids saw a massive surge in mainstream popularity, largely thanks to Janet Jackson in the movie Poetic Justice. Her long, thick braids became iconic and sparked a trend that has never truly gone away. Today, celebrities like Beyoncé, Zoë Kravitz, and countless influencers continue to reinvent the style, proving that it is timeless.
Understanding this history adds a layer of appreciation when you wear the style. It connects you to a lineage of beauty and artistry. While trends come and go, the cultural significance of braiding remains a powerful expression of identity and heritage.
Preparing Your Natural Hair for Installation
Before you even sit in the stylist’s chair or pick up a pack of hair, preparation is crucial. The health of your natural hair underneath the braids will determine how good the style looks and how much your hair grows while it is tucked away. You never want to install a long-term style on dirty or weak hair.
The Wash Day Routine
Start with a thorough wash day. Use a clarifying shampoo to remove all product buildup from your scalp and strands. A clean scalp is essential to prevent itching later on. Follow up with a moisturizing deep conditioner. Your hair won’t get a good wash for several weeks, so you want to infuse as much moisture as possible right now.
Detangling and Stretching
After washing, detangle your hair gently but thoroughly. Knots left in the hair can lead to matting when you take the braids down later. Once detangled, it is often best to stretch the hair. You can do this by blow-drying it straight (using a heat protectant, of course) or by banding it while it air dries. Stretched hair is easier to part cleanly and blends better with the straight texture of the synthetic braiding hair.
Scalp Health
If you suffer from a dry scalp, treat it before braiding. Apply a nourishing oil like jojoba or tea tree oil to your scalp. This preemptive step helps ward off the dreaded “braid itch” that can occur in the first week. Remember, healthy hair grows from a healthy scalp, so give it some love before you cover it up.
Choosing the Right Hair Extensions
Selecting the right hair is a big part of the process. The most common type of hair used for box braids is synthetic Kanekalon hair. It is affordable, comes in a massive variety of colors, and has a texture that grips natural hair well, preventing slippage.
Types of Braiding Hair
|
Hair Type |
Texture |
Pros |
Cons |
|---|---|---|---|
|
Kanekalon |
Crimped, slightly coarse |
Holds style well, lightweight, cheap |
Can cause itching for some |
|
Toyokalon |
Silky, softer |
More natural sheen, less tangling |
Can be slippery, harder to grip |
|
X-Pression |
Pre-stretched, smooth |
Saves time, tapered ends look natural |
Slightly more expensive |
|
Human Hair |
Very soft, natural |
Looks most natural, lasts long |
Very expensive, high maintenance |
Most people opt for pre-stretched X-Pression hair these days. “Pre-stretched” means the hair is already tapered at the ends, so you don’t have to manually pull and stretch the hair to avoid blunt ends. This saves hours of preparation time and results in a lighter, more feathery finish at the tips of your braids.
Color Selection
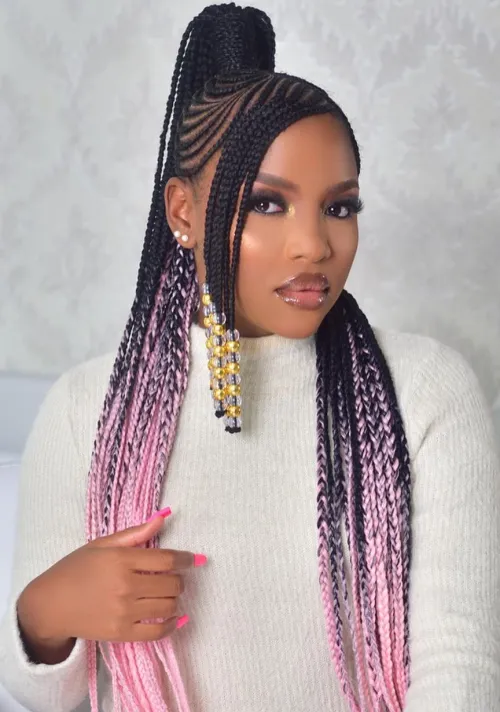
This is where you can have fun! You can stick to natural colors like 1B (off-black) or 2 (dark brown), or go wild with ombré blends, bright reds, blues, or even rainbow colors. Mixing colors is also a popular way to add dimension to your style without committing to dyeing your own hair.
Step-by-Step Installation Guide
While we recommend seeing a professional for the best results, many people choose to DIY their box braids to save money. Be warned: it takes patience and time—often between 4 to 8 hours depending on size and length.
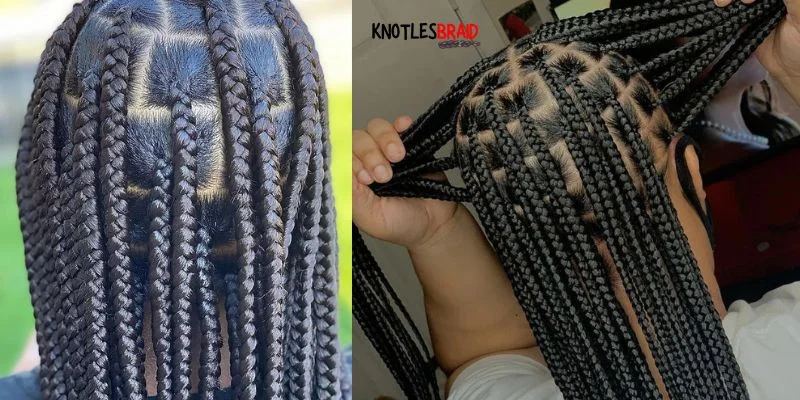
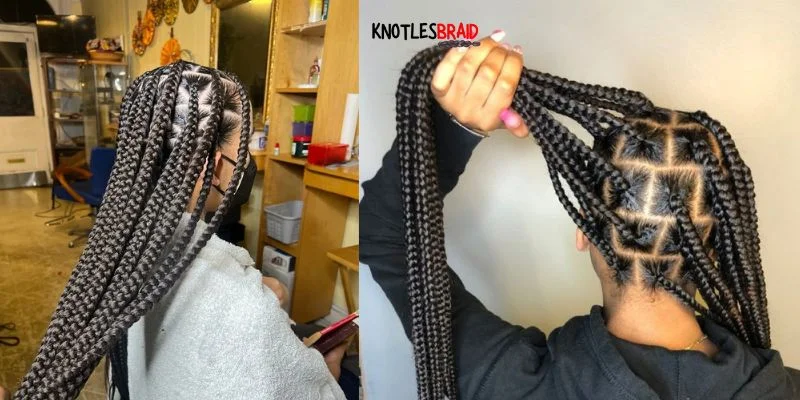
1. Sectioning
Start at the back of the head near the nape of the neck. Use a rat-tail comb to create a clean horizontal part. Then, divide that row into square sections. Use edge control or braiding gel on the roots of each square to make the parts crisp and neat.
2. Attaching the Hair
Take a section of braiding hair and loop it around the base of your natural hair section. There are various methods to do this, but the “knotless” method is gaining popularity because it puts less tension on the scalp. In traditional methods, you knot the synthetic hair at the root.
3. The Braiding Process
Begin braiding the three strands (two synthetic, one natural, or mixed) tightly but not painfully. As you braid down, ensure the synthetic hair covers your natural hair so it blends seamlessly. Continue braiding all the way to the ends.
4. Sealing the Ends
Once you reach the end of the braid, you need to seal it so it doesn’t unravel. For synthetic hair, the most common method is dipping the ends in boiling hot water. This shrinks the synthetic fibers, locking the braid and making the hair flexible and drapey. Be extremely careful with hot water!
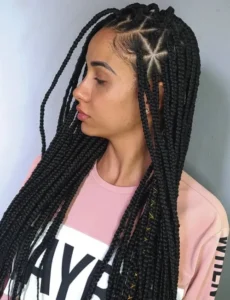
The Rise of Knotless Box Braids
If you have been scrolling through social media lately, you have likely seen “knotless” box braids mentioned. This is a modern variation that has taken the hair world by storm. In traditional braids, a small knot is created at the root where the synthetic hair attaches. This can sometimes be bulky, heavy, and painful for the first few days.
Knotless braids, however, start with your natural hair. The stylist begins braiding your own hair and then gradually feeds in small pieces of synthetic hair as they go down the braid. This creates a flat, seamless look at the root.
Benefits of Knotless Braids:
- Pain-Free: There is significantly less tension on the scalp since there is no tight knot at the root.
- Natural Look: They look like they are growing directly out of your scalp.
- Flexibility: You can put them in a bun or ponytail immediately; no waiting for them to “loosen up.”
- Lightweight: Generally, they use less hair at the root, making them lighter on the head.
The downside? They usually take longer to install and can be more expensive due to the intricate technique required. However, for many, the comfort and natural appearance are well worth the extra cost.
Sizing and Length Options
One of the best things about this style is the ability to customize. The size of the box part and the thickness of the braid can drastically change the look.
Micro Braids
These are tiny, delicate braids. They take a very long time to install and remove but offer the most versatility because they move almost like loose hair. You can style them easily, but be careful of tension on your edges.
Medium Braids
This is the “Goldilocks” size—not too big, not too small. Medium box braids are the most popular choice. They are quick enough to install but small enough to look neat and allow for various updos. They generally last about 6 to 8 weeks.
Jumbo Braids
Big, bold, and beautiful. Jumbo braids make a statement. They are much faster to install because you have fewer sections. However, they can be heavy if they are very long, and they tend to get frizzy faster than smaller braids, meaning they might not last as long.
Length Check
Do you want a bob that frames your face? Or do you want waist-length drama? Perhaps you want them down to your knees? The choice is yours. Just remember that longer braids require more packs of hair and will be heavier on your neck and shoulders.
Daily Maintenance and Care
Just because box braids are low maintenance doesn’t mean they are no maintenance. To keep them looking fresh and to protect your natural hair, you need a routine.
Nighttime Routine
Never go to bed without protecting your hair. The friction from cotton pillowcases can cause frizz and dry out your hair. Wrap your braids in a silk or satin scarf or bonnet. This keeps the edges neat and preserves moisture. If your braids are long, you might want to pile them loosely on top of your head in a “pineapple” style before wrapping.
Moisturizing
Your natural hair is trapped inside the synthetic hair, so it can dry out. Use a lightweight braid spray or mix water and leave-in conditioner in a spray bottle. Mist your scalp and the length of the braids every few days. Follow up with a light oil on your scalp to seal in that moisture.
Washing Your Braids
Yes, you can and should wash your braids if you keep them in for weeks. Dilute shampoo in a spray bottle and apply it directly to the scalp. Use the pads of your fingers to gently massage the scalp between the parts. Rinse thoroughly by letting the water run down the hair. Squeeze (don’t rub) the braids dry with a towel and ensure they dry completely to avoid mildew smell. A hooded dryer is great for this.
Styling Your Braids
Once your braids are installed, the fun begins! There are countless ways to style them for different occasions.
- The High Bun: Gather all your braids at the crown of your head and wrap them around into a large bun. Secure with hair ties or bobby pins. This is elegant and keeps hair out of your face.
- Half-Up, Half-Down: Take the top section of your braids and pull them into a ponytail or bun, leaving the back section loose. This is a cute, casual look.
- Space Buns: Divide your hair into two sections and create two buns on either side of your head. This is a playful, festival-ready style.
- Deep Side Part: Simply flipping all your braids to one side creates instant volume and a touch of glamour.
For more lifestyle and beauty tips, you can always check out resources like https://siliconvalleytime.co.uk/ which often covers trending topics.
Common Mistakes to Avoid
Even with the best intentions, things can go wrong. Here are some pitfalls to watch out for to ensure your hair stays healthy.
1. Installing Them Too Tightly
This is the cardinal sin of braiding. If you see white bumps on your scalp or have a headache that lasts more than a day, your braids are too tight. This can lead to traction alopecia, a form of hair loss caused by pulling. Speak up if your stylist is hurting you!
2. Leaving Them in Too Long
We know, you want to get your money’s worth. But leaving braids in for 3 or 4 months causes the hair to mat and lock at the roots. When you finally take them out, you will experience massive breakage. Stick to the recommended 6-8 weeks maximum.
3. Neglecting Your Edges
The hair at your hairline (edges) is the most fragile. Avoid heavy styles that pull on your edges constantly. Give your edges a break now and then by wearing your hair down or loosely tied back.
4. Not Drying Completely
If you wash your braids or go swimming, you must dry them 100%. Damp braids can create a breeding ground for mold and mildew, leading to a funky smell that is hard to get rid of.
How to Remove Your Braids Safely
taking down box braids is a process that requires patience. Do not rush this step, or you risk cutting your own hair.
- Cut the Extensions: Cut the braid about two inches below where you think your natural hair ends. It is better to leave them a bit longer than to accidentally snip your own ends.
- Unravel: Use the tail of a comb or your fingers to unbraid the hair all the way up to the root.
- Detangle Immediately: This is critical. As you remove each braid, you will see shed hair accumulation at the root. You must gently comb out this shed hair before you wash your hair. If you wet that shed hair without detangling it first, it will mat up like dreadlocks, and you will have to cut it out.
- Wash and Condition: Once all braids are out and hair is detangled, proceed with a rigorous wash and deep conditioning treatment to restore moisture.
Cost and Time Investment
The cost of box braids varies wildly depending on your location, the stylist’s expertise, the size of the braids, and the length.
- Average Cost: In the US, expect to pay anywhere from $100 to over $400.
- Time: Plan to be in the chair for at least 4 hours. For micro braids or extra-long styles, it could take 8 to 10 hours.
It is an investment of both time and money, but considering you won’t have to style your hair for two months, many find it incredibly cost-effective in the long run.
Are Box Braids Right for You?
If you are looking for a style that protects your natural hair, saves you time in the morning, and looks fantastic, then yes, they likely are! They work for almost all hair textures, though they hold best on hair with some texture (curly or coily).
However, if your hair is extremely brittle, damaged, or thinning, you should consult with a professional stylist first. The weight of the added hair might be too much for weak follicles. In that case, they might recommend a lighter style or a treatment plan to strengthen your hair first.
FAQ
Q: Do box braids damage your hair?
A: No, not if they are installed correctly and not kept in too long. In fact, they usually help hair grow by protecting it from daily manipulation. Damage occurs from tight installation, neglect, or improper removal.
Q: Can I swim with box braids?
A: Absolutely! Just remember that synthetic hair absorbs water and becomes heavy. Rinse the chlorine or salt water out afterward and ensure they dry completely to prevent odors.
Q: How long does my hair need to be to get box braids?
A: Your hair generally needs to be at least 2 to 3 inches long for a stylist to catch and grip it securely.
Q: Why does my scalp itch?
A: This can be due to a dry scalp or an allergic reaction to the coating on synthetic hair. Washing the synthetic hair with apple cider vinegar before installation can remove this chemical coating and reduce itching.
Q: How do I sleep with long braids?
A: Use a large satin bonnet. You can also loosely braid them into two large plaits to keep them contained while you sleep.
Conclusion
Box braids are a timeless, beautiful, and practical choice for anyone looking to switch up their style while caring for their natural hair. From the cultural history to the modern knotless techniques, there is a variation of this style for everyone. By choosing the right size, maintaining your scalp health, and following safe removal practices, you can enjoy weeks of “good hair days” with minimal effort.
Whether you are a first-timer or a braiding veteran, the key to a great experience is preparation and care. Embrace the versatility, have fun with the colors, and wear your crown with pride. If you are looking for more lifestyle tips and trends, remember to visit https://siliconvalleytime.co.uk/ for more great content. Now, go book that appointment and get ready to whip your hair back and forth


