


Imagine driving down the highway, singing along to your favorite song, when suddenly—thump, thump, thump. Your car starts pulling to one side, and your heart sinks. You have a flat tire. It is one of the most frustrating experiences a driver can face, but it doesn’t have to ruin your day. For decades, drivers have relied on a handy can of tire sealant, commonly known as fix a flat, to get them out of sticky situations and back on the road quickly.
This guide is your comprehensive manual for everything related to tire emergencies. We aren’t just going to talk about spraying a can into a tire; we are going to dive deep into how these products work, when you should (and shouldn’t) use them, and how to maintain your tires so you might avoid a flat altogether. Whether you are a brand-new driver or someone who has been on the road for forty years, understanding the mechanics of emergency tire repair is a crucial skill. We will break down the science, the safety, and the step-by-step process of using fix a flat solutions so you are never left stranded.
Key Takeaways:
- Fix a flat products are temporary solutions, not permanent repairs.
- Safety is the number one priority when pulling over to address a tire issue.
- Understanding tire pressure and maintenance can prevent many flats before they happen.
- Not all tire damage can be fixed with a sealant spray.
What Exactly Is Fix a Flat and How Does It Work?
When people talk about fix a flat, they are usually referring to a specific brand or the general category of aerosol tire inflators and sealants. These products are essentially a can of compressed air mixed with a liquid sealant. The idea is simple but brilliant: you attach the hose to your tire’s valve stem, push the button, and the can injects both the sealant and air into your tire simultaneously. It is designed to be a quick, roadside remedy that eliminates the need for jacking up the car or wrestling with a lug wrench on the side of a busy highway.
The science behind it is fascinating. The liquid sealant inside the can is a latex-based formula (usually). When it enters the tire, centrifugal force—the force created when your tire spins—spreads the liquid around the inside surface of the tire tread. When the liquid finds the puncture hole, the escaping air pushes the sealant into the gap, where it clots and hardens, effectively plugging the leak. At the same time, the propellant gas in the can inflates the tire enough to get the rim off the ground.
However, it is vital to understand the limitations. Fix a flat is designed for small punctures in the tread area of the tire. It is not magic. If you have a massive blowout, a gash in the sidewall, or a bent rim, a can of sealant won’t help you. It is meant to be a “get home” or “get to a mechanic” solution. The sealant stays liquid inside the tire for a while, which can throw off your tire balance if left for too long. This is why mechanics always emphasize that this is a temporary fix. You still need to get the tire professionally repaired or replaced as soon as possible.
The Pros and Cons of Using Aerosol Tire Sealants
Like any tool in your automotive kit, fix a flat has its champions and its critics. Understanding the advantages and disadvantages is crucial before you decide to rely on it. The biggest “pro” is convenience. Changing a tire is hard work. It requires physical strength, knowledge of jack points, and time. In dangerous conditions—like rain, snow, or a narrow road shoulder—getting out of the car to change a tire can be life-threatening.
Using a can of sealant takes minutes and keeps you relatively safe inside or near your vehicle. It is also much lighter and smaller than carrying a spare tire, which is why many modern car manufacturers are replacing spare tires with sealant kits to improve fuel economy.
On the flip side, there are significant “cons.” The most common complaint from mechanics is the mess. When a tire shop eventually takes your tire off the rim to fix it properly, they have to clean out the liquid sealant. It can be sticky, smelly, and difficult to remove.
Additionally, if the product is not TPMS (Tire Pressure Monitoring System) safe, it can clog or damage the expensive sensors inside your wheels. Another downside is that fix a flat can freeze in extreme winter conditions if not stored properly, rendering it useless when you need it most. Also, remember that it only provides a partial inflation. You often still need to stop at a gas station air pump to get the tire up to full pressure.
Comparison Table: Spare Tire vs. Fix a Flat
|
Feature |
Spare Tire |
Fix a Flat (Sealant) |
|---|---|---|
|
Time Required |
20-45 Minutes |
5-10 Minutes |
|
Physical Effort |
High (Jacking, lifting) |
Low (Connecting hose) |
|
Permanence |
Temporary (Donuts) to Permanent |
Very Temporary (3 days/100 miles) |
|
Mess Factor |
Dirty hands |
Internal tire mess |
|
Cost |
Included with car (usually) |
$10 – $15 per can |
|
Weight |
Heavy (30-50 lbs) |
Light (1-2 lbs) |
Safety First: Steps to Take Before You Attempt Repairs
Before you even reach for your can of fix a flat, you need to secure the scene. Tire emergencies often happen in less-than-ideal places, and panic can lead to poor decision-making. The moment you realize something is wrong with your tire, turn on your hazard lights (flashers). This signals to other drivers that you are experiencing an issue and may be moving slowly or stopping. Do not slam on the brakes. Instead, take your foot off the gas and let the car slow down naturally while you look for a safe place to pull over.
Ideally, you want a flat, paved surface away from traffic. A parking lot is perfect. If you are on a highway, aim for a wide shoulder or an exit ramp. Never try to fix a tire in a travel lane. Once you have stopped, put the car in “Park” (or “Neutral” with the parking brake engaged if you drive a manual transmission) and engage the emergency brake firmly. This prevents the car from rolling while you are working on it. If you have emergency triangles or road flares, set them up behind your vehicle to warn oncoming traffic.
It is also crucial to inspect the tire safely. Do not crawl under the car. Look at the tire to see if you can spot the object that caused the puncture. If it is a nail or a screw, do not pull it out. Leaving the object in place actually helps the fix a flat sealant work better because it gives the clotting agents something to bind to. If you pull the nail out, the hole might be too big for the sealant to plug effectively. Also, check the sidewall. If the side of the tire is ripped open, do not attempt to use sealant. Call a tow truck immediately.
Step-by-Step Guide: How to Use Fix a Flat Correctly
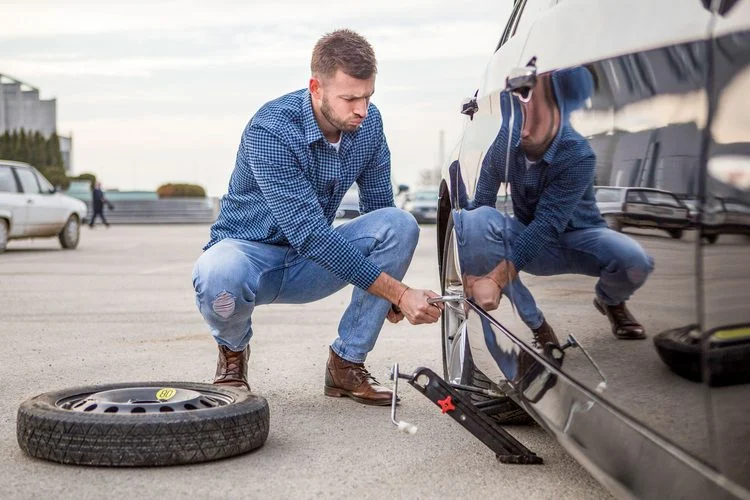
Using a tire inflator can seems intuitive, but following the correct procedure ensures it works effectively and safely. First, if the weather is extremely cold, warm the can with your car’s heater vents for a few minutes. The chemicals inside flow better when they aren’t freezing. Shake the can vigorously for at least 30 seconds. This is a step many people skip, but it is vital. The sealant and the propellant need to be mixed thoroughly to ensure the foam enters the tire evenly. If you don’t shake it, you might just get air and no sealant, or sealant with no air.
Next, unscrew the valve cap from your tire’s valve stem and place it somewhere safe, like your pocket or a cup holder. You do not want to lose it. Screw the hose nozzle of the fix a flat can onto the valve stem.
Make sure it is threaded on straight and tight to prevent leakage. Depending on the type of can you bought, you will either push a button on the top or remove a safety tab and press a trigger. Hold the can upright (unless the instructions specifically say to invert it) and dispense the entire contents of the can into the tire. You will hear the gas rushing in, and you should see the tire begin to lift off the rim.
Once the can is empty, unscrew the hose quickly and replace your valve cap. Now comes the most critical part: driving. You must drive the car immediately after using the product. Drive for about 2 to 4 miles at a moderate speed. This rotation distributes the sealant evenly around the inside of the tire so it can find and seal the puncture. After driving this short distance, stop and check the tire again. If it is holding air, drive to the nearest service station to adjust the tire pressure to the manufacturer’s recommended level.
Identifying When Fix a Flat Will NOT Work
There are specific scenarios where using fix a flat is a waste of time and money. The product relies on the structural integrity of the tire to work. It cannot fix structural damage. The most obvious “no-go” situation is sidewall damage. The sidewall of a tire flexes significantly as you drive. Because of this constant movement and the lack of tread structure, sealants cannot bond effectively to sidewall cuts or bubbles. If you see a bulge or a tear on the side, that tire is dead.
Another situation where sealant fails is with large punctures. Most aerosol sealants are rated to seal holes up to 1/4 inch in diameter. If you ran over a large bolt, a piece of rebar, or a jagged rock that created a gaping hole, the liquid will simply pour out onto the road. Similarly, if the tire has come completely off the rim (this is called “de-beading”), fix a flat will not generate enough pressure to pop the tire back onto the rim. In this case, the air will just escape through the gap between the tire and the wheel.
Lastly, check the rim itself. If you hit a pothole hard enough to bend or crack the metal wheel rim, the air leak is coming from the seal between the metal and the rubber, not a puncture in the rubber. No amount of sealant will fix a bent rim. In all these cases—sidewall damage, large holes, de-beaded tires, or bent rims—your only options are to install a spare tire or call for professional roadside assistance. Recognizing these signs early saves you from standing on the side of the road shaking a can that won’t help.
The Impact of Sealants on Tire Pressure Monitoring Systems (TPMS)
Modern cars (mostly those made after 2007) are equipped with a Tire Pressure Monitoring System, or TPMS. These systems use sensors inside the tire, attached to the valve stem, to send real-time pressure data to your dashboard. When your tire gets low, a little yellow light that looks like a horseshoe with an exclamation point lights up. This is a great safety feature, but it complicates the use of fix a flat and similar products.
In the past, older formulas of tire sealant were known to gum up and destroy these sensitive electronic sensors. The sealant would harden over the sensor port, preventing it from reading pressure, or corrode the electronics. Replacing a TPMS sensor can cost anywhere from $50 to over $100 per wheel. Because of this, many chemical manufacturers have updated their formulas to be “TPMS Safe.”
When buying a can of emergency sealant, you must look for the “TPMS Safe” label. However, even with “safe” sealants, you aren’t entirely out of the woods. The sensor still gets covered in liquid goo. When you take your car to the tire shop to get the flat repaired permanently, you must tell the mechanic that you used fix a flat. They will need to carefully clean the sensor or replace the valve core to ensure it continues to function correctly. If you don’t tell them, they might assume it’s just air inside and damage the sensor while removing the tire.
Permanent Repairs vs. Temporary Solutions
It is vital to reiterate that fix a flat is a “band-aid,” not a cure. The Chemical components in the can are designed to stay liquid for a short time to plug the hole, but they eventually break down or cure into a lumpy mess that can unbalance your tire. Driving on a tire treated with sealant for hundreds of miles is dangerous. The patch created by the fluid is not as strong as a professional patch or plug, and it can fail, leading to a blowout at highway speeds.
A permanent repair involves removing the tire from the rim. A mechanic will inspect the inside of the tire to ensure there is no hidden damage from driving on it while it was flat (often called “run-flat damage”). If the structure is sound, they will clean the puncture area, buff it, and apply a combination patch/plug from the inside. This seals the inner liner of the tire and fills the hole, creating a repair that can last for the life of the tire.
Using fix a flat creates extra work for the mechanic because they have to wash out the water-soluble sealant before they can apply the patch. Some shops may charge a small extra fee for this cleaning service. Additionally, if the sealant has been in the tire for a long time, it can corrode steel rims or degrade the rubber inner liner. This is why the instructions on the can usually state that you should seek professional repair within 3 days or 100 miles of using the product.
Preventing Flats: Tire Maintenance 101
The best way to handle a flat tire is to prevent it from happening in the first place. While you can’t avoid every nail on the road, proper maintenance drastically reduces your risk. The most critical factor is tire pressure. Tires naturally lose a little bit of air over time—about 1 PSI (pound per square inch) per month. They also fluctuate with temperature; for every 10 degrees Fahrenheit drop in temperature, your tire pressure drops by about 1 PSI.
Under-inflated tires are the leading cause of tire failure. When a tire is soft, more of the rubber touches the road, creating excessive friction and heat. This heat can cause the tire layers to separate and blow out. Check your tire pressure once a month and before any long road trips. You can find the correct pressure number on a sticker inside the driver’s side door jamb (do not use the “Max Pressure” number written on the tire sidewall).
Tread depth is another major factor. Bald tires are more susceptible to punctures because there is less rubber protecting the inner tube. You can check your tread using the “Penny Test.” Take a penny and insert it into the tread groove with Abraham Lincoln’s head facing down. If you can see all of Lincoln’s head, your tread is too low, and it’s time for new tires. Rotating your tires every 5,000 to 7,000 miles also helps them wear evenly, extending their life and keeping you safer.
Alternative Emergency Tools You Should Carry
While fix a flat is popular, it isn’t the only tool you can keep in your trunk. Many drivers prefer carrying a portable air compressor. These small devices plug into your car’s 12V outlet (cigarette lighter) and can inflate a tire in a few minutes. If you have a slow leak, sometimes just adding air is enough to get you to a shop without using messy chemicals. An air compressor is a reusable investment that is also great for topping off bicycle tires or sports equipment.
Another excellent tool is a tire plug kit. These kits look like a T-handled screwdriver and come with sticky rubber strips. If you have a nail in your tire, you pull the nail out, use a reaming tool to roughen the hole, and then shove the sticky rubber plug into the hole. This is a much more robust repair than aerosol sealant and can often last for thousands of miles (though professional inspection is still recommended). However, using a plug kit requires significant physical strength and usually requires you to lie on the ground, which might not be ideal in a roadside emergency.
Of course, the ultimate backup is a spare tire. Make sure your spare tire is actually inflated! It is very common for people to get a flat, pull out their spare, and realize the spare is flat too because it hasn’t been checked in five years. Check your spare tire’s pressure every time you check your main tires. Also, ensure you have a working jack and a lug wrench that fits your wheel nuts.
Environmental Considerations and Disposal
We live in a world where we must be conscious of our environmental footprint. Fix a flat cans are pressurized aerosols containing chemicals. You cannot simply throw an empty (or partially full) can into the regular trash or recycling bin. Aerosol cans can explode if crushed in a garbage truck, and the chemical residue can be hazardous to sanitation workers.
Most communities have hazardous waste disposal centers or specific drop-off days for items like paint, oil, and aerosol cans. Check with your local waste management facility to see how to properly dispose of the can. Furthermore, the liquid sealant itself is a chemical mixture. When the tire shop washes it out of your tire, they have to dispose of that wastewater responsibly.
Choosing to repair a tire rather than replace it is actually an environmentally friendly act. Tires are difficult to recycle and often end up in landfills. By using a sealant to get to a shop and then paying for a professional patch, you are extending the life of that tire and keeping it out of the trash heap. Just remember that the goal is to save the tire, so getting it cleaned and patched quickly is key to sustainability.
Understanding Different Types of Tire Sealants
Not all sealants are created equal. We have mostly discussed the aerosol “can-in-hand” type, but there are other varieties on the market. Some car manufacturers include a “mobility kit” instead of a spare tire. This kit usually consists of a small air compressor and a bottle of sealant gel. You hook the bottle to the compressor, and the compressor pushes the gel into the tire. These are generally higher quality than the $10 cans you buy at a gas station and are designed specifically for that vehicle.
There are also “preventative” sealants. These are liquids you squeeze into the tire before you get a flat. They slosh around inside the tire while you drive, ready to seal a puncture the instant it happens. These are very popular for bicycles, lawnmowers, and off-road vehicles. However, they are generally not recommended for high-speed passenger cars because a large amount of liquid can cause severe vibration and balance issues at highway speeds.
When shopping for fix a flat, pay attention to the size of the can. Cans come in standard (16 oz) and large (20-24 oz) sizes. A small car with 13-inch or 14-inch wheels only needs a standard can. However, if you drive a large SUV or a truck with 18-inch or 20-inch wheels, a standard can won’t provide enough air or sealant to lift the vehicle. You need the “truck/SUV” sized can. Using a small can on a big truck is a common mistake that leaves drivers stranded.
The Cost of Tire Neglect: Why Emergency Prep Matters
Ignoring tire safety can be incredibly expensive. A simple flat tire, if handled poorly, can cascade into thousands of dollars in damage. If you try to “limp” a car home on a completely flat rim, you will destroy the tire (costing $150-$300), likely ruin the metal wheel rim (costing $200-$600), and potentially damage your suspension, brakes, and alignment. Compared to these costs, a $12 can of fix a flat or a roadside assistance membership is a bargain.
Beyond the financial cost, there is the cost of time and safety. Waiting for a tow truck can take hours. Being stranded in a remote area without cell service is dangerous. Having the knowledge and the tools to perform a self-rescue gives you independence. It means you aren’t helpless when things go wrong.
It is worth building a small “tire emergency fund.” Put aside a little money for high-quality tires, a portable compressor, and a can of sealant. View it as insurance. You hope you never have to use it, but when the moment comes, you will be incredibly grateful you prepared.
Common Myths About Fix a Flat
There is a lot of misinformation floating around about tire sealants. Let’s bust a few myths.
- Myth 1: It ruins your tire forever.
-
- Fact: It does not ruin the tire if cleaned out promptly. It only ruins the tire if you leave it in for months or if the tire had structural damage to begin with.
- Myth 2: It is explosive.
-
- Fact: In the very old days, some sealants used flammable propane as a propellant. If a mechanic used a spark tool, it could cause a boom. Today, almost all reputable brands use non-flammable propellants. However, you should still warn your mechanic just in case.
- Myth 3: It fills the tire completely.
-
- Fact: It rarely fills the tire to recommended pressure. It provides enough pressure to lift the rim off the ground so you can drive slowly to an air pump.
- Myth 4: You can use it on bicycle tires.
-
- Fact: You can, but you must be careful. The pressure in a car can is high. If you blast a bicycle tube with it, you might pop the tube. Use short bursts or buy sealant made specifically for bikes.
Driving Habits That Lead to Flats
Believe it or not, the way you drive influences how likely you are to get a flat. Driving on the shoulder of the road is a surefire way to pick up a nail. The shoulder is where all the road debris—nails, glass, sharp metal—collects. Avoid driving on the shoulder unless absolutely necessary.
Construction zones are another hazard. If you drive through an area where homes are being built or roads are being repaired, keep your eyes peeled. Debris is common here. Also, avoid hitting potholes and curbs. Hitting a curb while parking might not seem like a big deal, but it can pinch the sidewall or cause a microscopic crack in the rim that slowly leaks air over weeks.
Aggressive driving also heats up tires. Rapid acceleration and hard braking increase friction. Hot rubber is softer and more easily penetrated by sharp objects than cooler rubber. Smooth, defensive driving preserves your tires and your fuel economy.
Preparing a Full Roadside Emergency Kit
A can of sealant is just one part of a complete kit. If you are putting together a safety box for your trunk, here is what it should include besides fix a flat:
- Jumper Cables: For dead batteries.
- Flashlight: With extra batteries, because flats often happen at night.
- Gloves: Tires are incredibly dirty.
- Rain Poncho: Because it always seems to rain when you break down.
- First Aid Kit: For minor cuts or scrapes.
- Water and Granola Bars: If you are stuck for a long time.
- Reflective Vest: So other drivers can see you.
Having these items turns a crisis into an inconvenience. It keeps you calm because you know you have resources.
Recommended Emergency Kit Checklist:
- Fix a Flat (Large Can)
- Portable Air Compressor
- Tire Pressure Gauge
- Flashlight
- Work Gloves
- Multitool
- Duct Tape
When to Call a Professional
There is no shame in calling for help. If you are unsure about how to use the equipment, if the traffic is too dangerous, or if you are physically unable to manage the repair, call a professional. Services like AAA, or roadside assistance included with your insurance or credit card, are there for this exact reason.
Using fix a flat is a great DIY solution, but safety is paramount. If you are on a blind curve where cars are zooming by at 70 mph, do not get out of your car. Stay buckled up, call 911 or roadside assistance, and wait. No tire is worth your life.
Professionals have the big trucks, the bright lights, and the experience to manage traffic flow while they work. If the tire damage looks severe, or if you suspect suspension damage, a tow is the only safe option.
Conclusion
Getting a flat tire is a rite of passage for every driver. It is an annoyance, certainly, but armed with knowledge and a can of fix a flat, it doesn’t have to be a disaster. We have covered the mechanics of how sealants work, the safety steps you must take, and the importance of following up with a professional repair. Remember, these products are your temporary ticket to safety, not a permanent fix.
By maintaining your tires, driving smartly, and keeping an emergency kit in your trunk, you are taking responsibility for your safety and the safety of those around you. So, check your tire pressure, buy a can of sealant for peace of mind, and drive with confidence. For more tech and lifestyle tips, you can always check out resources like Silicon Valley Time.
Being prepared is the ultimate travel hack. Safe travels!
Frequently Asked Questions (FAQ)
1. How long can I drive on a tire with Fix a Flat in it?
You should drive on it for no more than 3 days or 100 miles. The sooner you get to a repair shop, the better. The liquid can corrode the wheel or unbalance the tire if left too long.
2. Will Fix a Flat ruin my TPMS sensor?
It is possible. You should always buy a can labeled “TPMS Safe.” Even then, you must tell your mechanic you used it so they can clean the sensor carefully. If not cleaned properly, the sensor may need to be replaced.
3. Can I use Fix a Flat on a blowout?
No. Tire sealants are designed for small tread punctures (usually up to 1/4 inch). They cannot fix sidewall blowouts, large gashes, or rim damage.
4. Do I need to jack up the car to use Fix a Flat?
No, that is the main benefit! The pressure in the can is designed to inflate the tire enough to lift the rim off the ground without using a jack.
5. Does Fix a Flat expire?
Yes, it does. Most cans have a shelf life of about 2 to 5 years. After that, the chemical formula can degrade, or the pressure in the can may leak out. Check the expiration date on your can annually.
6. Can I use Fix a Flat on a motorcycle?
Technically yes, but be careful. Motorcycles are very sensitive to wheel balance. The liquid sloshing around can cause dangerous wobbles at high speeds. It is strictly a “limp home” solution for bikes, and you should ride very slowly.
For further reading on the history and chemical composition of tire sealants, you can find a link from https://www.wikipedia.org/ related to this keyword ” fix a flat ” and learn more about how the industry has evolved.


