


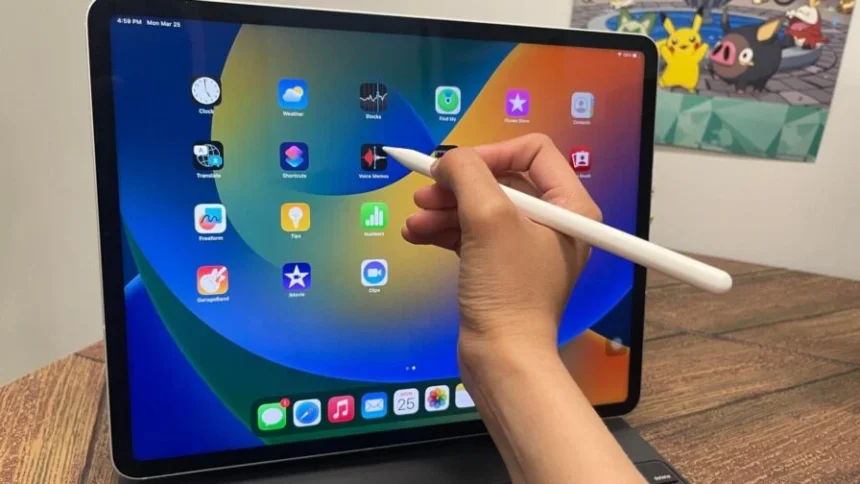
Welcome to your complete guide on mastering the connection between your Apple Pencil and your iPad. Whether you’re a digital artist, a student taking notes, or someone who loves the precision a stylus offers, the Apple Pencil transforms your iPad experience. But before you can start sketching, writing, or navigating with it, you need to pair it correctly. This guide will walk you through every step, troubleshoot common issues, and answer all your questions.
Connecting your Apple Pencil is usually a straightforward process, but it differs depending on which model of Apple Pencil and iPad you own. We will cover everything from identifying your devices to advanced troubleshooting tips. By the end of this article, you’ll be a pro at pairing your devices, so you can spend less time figuring things out and more time creating. Let’s dive in and get your digital pen and tablet working together seamlessly.
Key Takeaways
- Connecting an Apple Pencil (1st generation) involves plugging it directly into the iPad’s Lightning port.
- The Apple Pencil (2nd generation) and Apple Pencil (Pro) connect and charge by magnetically attaching to the side of a compatible iPad.
- The Apple Pencil (USB-C) pairs and charges via a USB-C cable connected to your iPad.
- Bluetooth must be enabled on your iPad for any Apple Pencil to connect and function properly.
- If you encounter connection problems, common fixes include checking Bluetooth, ensuring the Pencil is charged, re-attaching or re-plugging it, and restarting your iPad.
Identifying Your Apple Pencil and iPad Model
Before you can learn how to connect apple pencil to ipad, the first crucial step is to know exactly which models you have. Apple has released different generations of both the Apple Pencil and the iPad, and their compatibility is not universal. Using an incompatible pair will prevent a connection, no matter how many times you try. Let’s break down how to identify your specific hardware. This knowledge is the foundation for a successful pairing process.
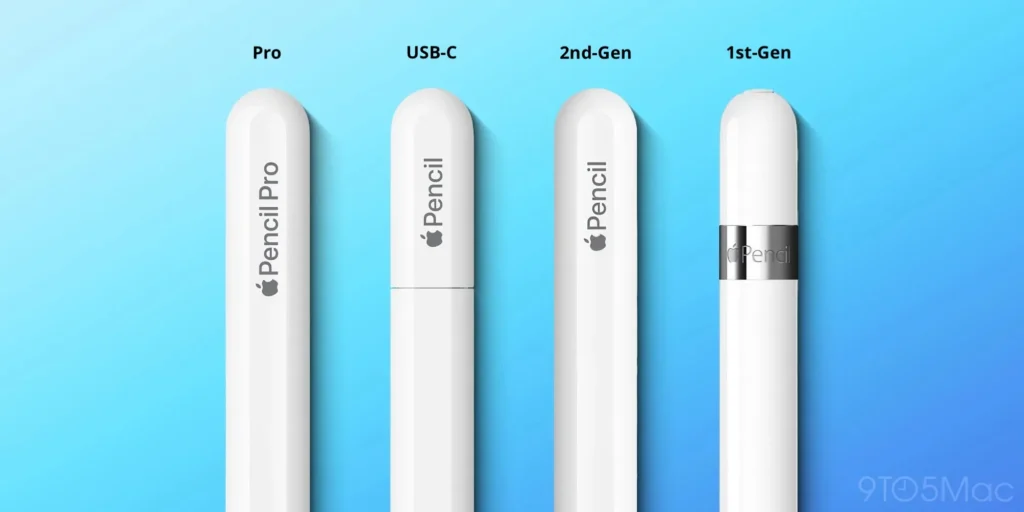
The Apple Pencil (1st generation) is perfectly cylindrical and has a removable cap on the end that reveals a Lightning connector. This is the most distinct physical feature. The Apple Pencil (2nd generation), by contrast, has a flat side that allows it to attach magnetically to the iPad and has a matte finish.
The newer Apple Pencil (Pro) looks very similar to the 2nd generation model but includes “Apple Pencil Pro” text on the side. Finally, the Apple Pencil (USB-C) is the shortest of the bunch, features a matte finish, and has a sliding cap that reveals a USB-C port. Identifying your iPad model can be done by looking at the back of the device for a model number (e.g., A2588) or by going to Settings > General > About on your iPad. Once you know your models, you can easily check Apple’s official compatibility list to confirm they are designed to work together.
Apple Pencil (1st generation) Compatibility
The original Apple Pencil set the standard for high-precision styluses on the iPad. Its rounded design and Lightning connector are its defining features. If you have this model, you need to ensure your iPad is on its compatibility list. The 1st generation Pencil was designed for iPads that have a Lightning port, as that is how it pairs and charges. Trying to connect it to a newer iPad with only a USB-C port (without a special adapter) will not work.
Here is a list of iPad models compatible with the Apple Pencil (1st generation):
- iPad (6th, 7th, 8th, 9th, and 10th* generation)
- iPad Air (3rd generation)
- iPad mini (5th generation)
- iPad Pro 12.9-inch (1st and 2nd generation)
- iPad Pro 10.5-inch
- iPad Pro 9.7-inch
Note: To pair and charge the Apple Pencil (1st generation) with the iPad (10th generation), you must use the USB-C to Apple Pencil Adapter, as this iPad model has a USB-C port instead of a Lightning port.
Apple Pencil (2nd generation) Compatibility
The Apple Pencil (2nd generation) represented a significant upgrade, introducing magnetic pairing, charging, and a double-tap feature. This model is not backward-compatible with iPads designed for the 1st generation Pencil. It relies on the magnetic connector strip located on the side of specific iPad models. If your iPad doesn’t have this flat-edged magnetic strip, it will not be able to connect with the 2nd generation Pencil. The seamless nature of its connection is a major benefit, as you don’t need to worry about caps or connectors.
The following iPad models are designed to work with the Apple Pencil (2nd generation):
- iPad Air (4th and 5th generation)
- iPad mini (6th generation)
- iPad Pro 12.9-inch (3rd, 4th, 5th, and 6th generation)
- iPad Pro 11-inch (1st, 2nd, 3rd, and 4th generation)
Apple Pencil (USB-C) Compatibility
The Apple Pencil (USB-C) is a more budget-friendly option that brings the core Apple Pencil experience to a wider range of modern iPads. As its name suggests, this Pencil pairs and charges via a USB-C cable. While it attaches magnetically to the side of compatible iPads for storage, it does not charge wirelessly like the 2nd generation or Pro models. This model is a great middle-ground, offering wide compatibility with any iPad that has a USB-C port. However, it does lack the pressure sensitivity found in the 1st and 2nd generation models.
The Apple Pencil (USB-C) is compatible with these iPad models:
- iPad (10th generation)
- iPad Air (4th and 5th generation)
- iPad Air 11-inch (M2)
- iPad Air 13-inch (M2)
- iPad mini (6th generation)
- iPad Pro 12.9-inch (3rd, 4th, 5th, and 6th generation)
- iPad Pro 11-inch (1st, 2nd, 3rd, and 4th generation)
- iPad Pro 11-inch (M4)
- iPad Pro 13-inch (M4)
Apple Pencil Pro Compatibility
The newest and most advanced stylus from Apple is the Apple Pencil Pro. It builds upon the 2nd generation’s design with new features like a squeeze gesture, barrel roll, and haptic feedback. These advanced functionalities mean it is only compatible with the very latest iPad models equipped with the hardware to support them. It connects, pairs, and charges magnetically, just like the 2nd generation model, but it is exclusive to the M4 iPad Pro and M2 iPad Air models. It will not work with older iPad Pro or Air models, even those that support the 2nd generation Pencil.
The Apple Pencil Pro is compatible with the following iPad models:
- iPad Pro 13-inch (M4)
- iPad Pro 11-inch (M4)
- iPad Air 13-inch (M2)
- iPad Air 11-inch (M2)
Step-by-Step: How to Connect Apple Pencil to iPad (1st Gen)
Connecting the first-generation Apple Pencil is a physical process. Unlike later models that pair wirelessly, this one requires a direct connection to your iPad’s Lightning port. Before you begin, make sure your iPad’s Bluetooth is turned on. You can check this by swiping down from the top-right corner of your screen to open the Control Center and ensuring the Bluetooth icon is blue. If it’s not, tap it to enable it. This is a non-negotiable step, as the ongoing communication between the Pencil and iPad happens over Bluetooth, even though the initial pairing is done physically.
The process itself is incredibly simple. First, take the cap off the back of your Apple Pencil. You’ll see a metal Lightning connector. Now, take that connector and plug it directly into the Lightning port at the bottom of your compatible iPad. This is the same port you use for charging your iPad. Once you plug it in, a “Bluetooth Pairing Request” dialog box should appear on your iPad’s screen within a few seconds. Simply tap the “Pair” button on this prompt. That’s it! Your Apple Pencil is now connected and ready to use. You can put the cap back on your Pencil and start writing or drawing. This initial pairing process also begins charging your Pencil.
Step-by-Step: How to Connect Apple Pencil to iPad (2nd Gen & Pro)
The process for how to connect apple pencil to ipad models that support the 2nd generation or Pro versions is even more elegant and seamless. This method relies on a magnetic connector built into the side of the iPad. Just like with the 1st generation model, the first thing you must do is ensure Bluetooth is enabled on your iPad. Go to Settings > Bluetooth or check the Control Center to make sure it’s on. Without Bluetooth, the magnetic attachment will charge the Pencil, but it will not be able to pair and communicate with the iPad for drawing or writing.
With Bluetooth active, the pairing process is as simple as it gets. Take your Apple Pencil (2nd generation) or Apple Pencil Pro and place it on the magnetic connector, which is a long, pill-shaped area located on the side of your iPad (usually the side opposite the volume buttons).
The Pencil should snap firmly into place. As soon as it attaches, a small image of the Apple Pencil will appear at the top of your iPad screen, showing its current battery percentage and confirming the connection. There are no buttons to press or prompts to tap. The magnetic attachment initiates both pairing and charging automatically. You can now remove the Pencil and begin using it immediately. To keep it charged and paired, simply reattach it to the magnetic strip whenever you’re not using it.
Step-by-Step: How to Connect Apple Pencil to iPad (USB-C)
Connecting the Apple Pencil (USB-C) is a hybrid process that combines elements from the other models. Like all Apple Pencils, it requires Bluetooth to be enabled on your iPad to function, so make sure that is turned on first. The unique aspect of this model is its reliance on a physical cable for both pairing and charging, similar to the 1st generation, but using the modern USB-C standard. This makes it compatible with any iPad that features a USB-C port, which covers a wide range of recent models.
To begin the pairing process, slide the back end of the Apple Pencil (USB-C) to reveal the hidden USB-C port. Next, take a USB-C to USB-C cable. Plug one end into the Apple Pencil and the other end into the USB-C port on your iPad. Once the physical connection is made, the iPad will recognize the device, and it should pair automatically.
You’ll see a notification confirming the connection and showing the battery status. After this initial pairing, you can unplug the cable and use the Pencil wirelessly. While this model can attach magnetically to the side of an iPad for storage, remember that this magnetic connection does not charge the Pencil. You will need to reconnect it with the USB-C cable whenever its battery runs low.
How to Check Your Apple Pencil’s Battery
Knowing your Apple Pencil’s battery level is essential to avoid it dying in the middle of an important task. Thankfully, Apple makes it very easy to check the remaining charge. There are a few different methods you can use, depending on your Pencil model and preference. The most common and convenient way is by using the iPad’s built-in battery widget.
You can add this widget to your Home Screen or Today View. To do this, press and hold on an empty area of your Home Screen until the icons jiggle, then tap the ‘+’ icon in the upper-left corner. Search for “Batteries” and add the widget size you prefer. This widget will display the battery levels of your iPad, Apple Pencil, and any other connected Bluetooth devices like AirPods.
For the Apple Pencil (2nd generation) and Apple Pencil Pro, the process is even simpler. Whenever you magnetically attach the Pencil to the side of your iPad, a small banner will appear momentarily at the top of the screen, displaying the current battery percentage. This provides an instant status check every time you store it. Additionally, for all Pencil models, you can go to Settings > Apple Pencil on your iPad. This menu will show the exact battery percentage at the top of the screen. Keeping an eye on the battery level ensures your workflow is never interrupted.
Charging Your Apple Pencil
- Apple Pencil (1st generation): Plug it into the Lightning port of your iPad. Alternatively, you can use the Lightning adapter that came in the box to charge it with a standard Lightning cable and power brick.
- Apple Pencil (2nd generation) & Pro: Attach it to the magnetic connector on the side of your compatible iPad. This is the only way to charge these models.
- Apple Pencil (USB-C): Connect it to your iPad or a power adapter using a USB-C cable.
Troubleshooting Common Connection Problems
Even with Apple’s user-friendly design, you might occasionally run into issues where your Apple Pencil won’t connect. When you’re trying to figure out how to connect apple pencil to ipad and it’s not working, don’t panic. Most problems can be solved with a few simple troubleshooting steps. The most common culprit is a disabled Bluetooth connection. The very first thing you should always check is to make sure Bluetooth is turned on in your iPad’s settings or Control Center. The Pencil may be charged and physically connected, but without an active Bluetooth signal, it cannot communicate with the iPad.
Another frequent issue is a dead battery. If your Pencil has been sitting unused for a long time, the battery may be completely drained. For a 1st generation model, plug it into your iPad for at least 15-20 minutes. For a 2nd generation or Pro model, ensure it’s seated correctly on the magnetic charger and leave it there for a while.
For a USB-C model, connect it via its cable. Sometimes, a simple physical reseating can solve the problem. Detach and reattach the Pencil (or unplug and re-plug it). This action forces the iPad to re-initiate the pairing process and can often resolve a temporary glitch. A quick check in Settings > Apple Pencil can also confirm if the device is being detected at all.
Re-Pairing Your Apple Pencil
If the basic troubleshooting steps don’t work, the next solution is to force your devices to forget each other and start fresh. This re-pairing process can clear out any corrupted connection data that might be causing the issue. To do this, go to Settings > Bluetooth on your iPad. In the list of “My Devices,” find your Apple Pencil. Tap the small “i” icon (for information) to the right of its name. On the next screen, you will see an option that says “Forget This Device.” Tap it, and then confirm your choice. This will completely remove the Apple Pencil from your iPad’s memory.
After you have forgotten the device, you will need to perform the initial pairing process all over again.
- For Apple Pencil (1st Gen): Plug it back into the iPad’s Lightning port and tap “Pair” when the prompt appears.
- For Apple Pencil (2nd Gen/Pro): Re-attach it to the magnetic connector on the side of the iPad.
- For Apple Pencil (USB-C): Plug it into the iPad using a USB-C cable.
This fresh start resolves the vast majority of persistent connection problems and is a key skill for any Apple Pencil user.
Restarting Your iPad
The classic “turn it off and on again” advice is a cliché for a reason—it often works. Restarting your iPad can clear up temporary software glitches, memory issues, and background processes that might be interfering with Bluetooth or device connections. If your Apple Pencil is still refusing to connect after you’ve checked the charge, re-paired it, and confirmed Bluetooth is on, a simple restart is the next logical step. It’s a low-effort, high-reward troubleshooting technique that can save you a lot of frustration.
To restart an iPad without a Home button (most modern models), press and hold either the top button and one of the volume buttons simultaneously until the power-off slider appears. Drag the slider to turn the device off. Wait about 30 seconds for it to shut down completely, then press and hold the top button again until the Apple logo appears.
For an iPad with a Home button, simply press and hold the top button until the slider appears, drag it, wait, and then press and hold the top button to turn it back on. Once your iPad has fully rebooted, try pairing your Apple Pencil again from the beginning. This can often resolve mysterious issues that other steps can’t fix.
Checking for a Loose Nib
A less obvious but still common reason for an Apple Pencil acting erratically or not responding is a loose nib. The nib is the small plastic tip of the Pencil that makes contact with the screen. It is a consumable part that is designed to be replaceable, and over time and with use, it can sometimes become slightly unscrewed. When the nib is loose, the internal sensors may not register contact or pressure correctly, leading you to believe the Pencil is disconnected or broken. Before you assume you have a major hardware or software problem, take a moment to check the nib.
This is a very simple check. Gently hold the body of the Apple Pencil and try to tighten the nib by turning it clockwise with your fingers. You should only tighten it until it is finger-tight; do not use pliers or any other tools, as this could damage the Pencil. If it was loose, you’ll feel it screw back into place. Often, this simple twist is all that’s needed to restore full functionality. If your nib is worn down, damaged, or lost, you can purchase replacement nibs from Apple. A fresh, securely tightened nib ensures the best possible performance and connection between your Pencil and iPad, providing a smooth and accurate drawing experience.
Optimizing Your Apple Pencil Experience
Once you have successfully mastered how to connect apple pencil to ipad, you can start exploring the features that make it such a powerful tool. The experience goes far beyond simple pairing. Your iPad’s settings offer a range of customization options to tailor the Pencil’s behavior to your specific needs. Navigate to Settings > Apple Pencil to access these controls. Here, you can configure what happens when you double-tap the side of an Apple Pencil (2nd generation or Pro). By default, this gesture often switches between the current tool and the eraser, but you can change it to switch to the last-used tool, show the color palette, or turn it off completely.
This settings menu is also where you can test out the Pencil’s pressure sensitivity. For the models that support it, you can draw or write in the provided text box to see how varying the pressure affects the thickness of your lines. For the Apple Pencil Pro, you will find additional options here for customizing the squeeze gesture and barrel roll features.
Another fantastic feature to enable is “Scribble.” You can find this in the same settings menu. Scribble allows you to write by hand in any text field—like a search bar or a note—and your iPad will automatically convert your handwriting into typed text. This makes interacting with your iPad faster and more fluid, blending the analog feel of writing with the efficiency of digital text. Exploring these settings transforms the Apple Pencil from a simple stylus into a deeply integrated and personalized tool.
|
Feature |
Apple Pencil (1st Gen) |
Apple Pencil (2nd Gen) |
Apple Pencil (USB-C) |
Apple Pencil Pro |
|---|---|---|---|---|
|
Pairing/Charging |
Lightning Port |
Magnetic Attachment |
USB-C Cable |
Magnetic Attachment |
|
Pressure Sensitivity |
Yes |
Yes |
No |
Yes |
|
Double-Tap Gesture |
No |
Yes |
No |
Yes |
|
Hover |
No |
Yes (on compatible iPads) |
Yes (on compatible iPads) |
Yes |
|
Squeeze Gesture |
No |
No |
No |
Yes |
|
Barrel Roll |
No |
No |
No |
Yes |
|
Haptic Feedback |
No |
No |
No |
Yes |
|
Find My Support |
No |
No |
No |
Yes |
Frequently Asked Questions (FAQ)
Q1: Why won’t my Apple Pencil connect to my iPad?
A: The most common reasons are: Bluetooth is turned off on your iPad, your Apple Pencil’s battery is dead, or your Pencil and iPad models are not compatible. First, ensure Bluetooth is enabled. Then, charge your Pencil for at least 15 minutes. Finally, double-check that your specific Apple Pencil and iPad models are designed to work together.
Q2: Can I use a 1st generation Apple Pencil with an iPad Pro that uses USB-C?
A: Yes, but with an adapter. The iPad Pro models with USB-C do not have a Lightning port for direct pairing. If you have a 10th generation iPad, you must use the Apple USB-C to Apple Pencil Adapter to pair and charge your 1st gen Pencil.
Q3: How do I know if my Apple Pencil is charging?
A: For the 2nd generation and Pro models, a notification appears on the iPad screen when you attach the Pencil to the magnetic connector. For all models, you can add the Batteries widget to your Home Screen or check the status in Settings > Apple Pencil to see the current charge percentage.
Q4: My Apple Pencil is connected, but it’s not writing. What should I do?
A: First, check that the nib (tip) of the Apple Pencil is screwed on tightly. A loose nib can prevent it from working correctly. If that doesn’t work, try restarting your iPad. Finally, ensure the app you’re using supports the Apple Pencil and that you have the drawing tool selected within the app.
Q5: Can I use my Apple Pencil while it’s charging?
A: For the Apple Pencil (1st generation) and Apple Pencil (USB-C), you cannot use them while they are physically plugged in for charging. However, the Apple Pencil (2nd generation) and Apple Pencil Pro are used wirelessly and charge when not in use, so this limitation does not apply to them.
Conclusion
Mastering how to connect apple pencil to ipad is the first step toward unlocking a new level of creativity and productivity with your tablet. While the process varies slightly depending on your specific hardware, the core principles remain the same: ensure compatibility, keep Bluetooth on, and maintain a sufficient charge. We’ve covered the distinct pairing methods for the 1st generation, 2nd generation, USB-C, and Pro models of the Apple Pencil, from plugging in a Lightning connector to the simple magnetic snap. We’ve also explored essential troubleshooting steps, like re-pairing the device, restarting your iPad, and checking for a loose nib, which can solve nearly any connection issue you might encounter.
Remember that your Apple Pencil is more than just a stylus; it’s an integrated tool with customizable features. Take some time to explore the settings to configure gestures and enable powerful functions like Scribble. For those interested in the latest tech news and in-depth guides, resources like siliconvalleytime.co.uk offer valuable insights. By following the steps and advice in this guide, you can ensure a reliable and seamless connection, allowing you to focus on what truly matters: bringing your ideas to life on your iPad’s digital canvas. The technology behind active styluses has evolved significantly, making them incredibly precise and responsive tools for digital interaction, as detailed in extensive articles you can find on sites like Wikipedia.


