


Have you ever looked at a blank piece of paper and wished you could summon a mythical beast right onto the page? Drawing fantasy creatures is one of the most rewarding artistic challenges you can take on. Unlike drawing a cat or a car, where people know exactly what it should look like, dragons give you the freedom to invent. However, learning how to draw a dragon that looks believable—with weight, power, and personality—takes practice and a bit of knowledge about anatomy.
In this massive guide, we are going to break down everything you need to know. Whether you want to draw a classic European fire-breather or a serene Eastern serpentine spirit, this article is your new bible. We will cover tools, anatomy, posing, scales, wings, and so much more. By the time you finish reading and practicing these steps, you will be able to fill your sketchbooks with incredible beasts.
Key Takeaways
- Foundation is Key: Every great dragon starts with simple shapes like circles, cylinders, and boxes.
- Anatomy Matters: Even though dragons are mythical, basing their anatomy on real animals (lizards, bats, cats) makes them look realistic.
- Texture Adds Life: Learning to draw scales, horns, and leathery wings adds depth and realism to your sketch.
- Practice: Learning how to draw a dragon is a journey. Don’t be afraid to make mistakes.
1. Gathering Your Tools: What You Need to Start
Before you even make your first mark on the paper, you need to have the right equipment. You don’t need expensive art supplies to create a masterpiece, but having a solid set of tools makes the process much smoother. When you are learning how to draw a dragon, you want your focus to be on the creature, not on fighting with a bad eraser or a dull pencil.
The most basic requirement is paper and a pencil. For paper, standard printer paper works for practice sketches, but if you want to create a finished piece, consider getting a sketchbook with slightly thicker paper (around 70lb or higher). This prevents the paper from tearing when you erase. Speaking of erasing, a kneaded eraser is a dragon artist’s best friend. It lifts graphite without damaging the paper surface, which is crucial when you are sketching light guidelines.
For pencils, a simple HB pencil is great for general writing, but for drawing, you might want a range. H pencils are harder and lighter, perfect for those initial skeleton sketches. B pencils are softer and darker, ideal for adding those deep shadows under the dragon’s belly or inside its mouth. You might also want a fine liner pen if you plan to ink your drawing later.
Essential Art Supplies Checklist
- Pencils: A set ranging from 2H (hard) to 6B (soft).
- Paper: Smooth Bristol board or a mixed-media sketchbook.
- Erasers: A white vinyl eraser for big mistakes and a kneaded eraser for subtle lifting.
- Sharpener: A good metal sharpener to keep points crisp for detailing scales.
- Reference Images: Photos of lizards, bats, eagles, and dinosaurs.
2. Understanding Dragon Anatomy: The Skeleton Beneath the Scales
The secret to drawing a convincing monster is understanding what goes on underneath the skin. If you just draw outlines, your dragon will look flat, like a sticker. To learn how to draw a dragon properly, you must think like a biologist. Dragons are usually a mix of different animals. Their bodies are often lizard-like, their wings are bat-like, and their necks might move like a swan or a snake.
Start by thinking about the spine. The spine is the “line of action” for your creature. It determines the pose and the flow of the drawing. Dragon spines are long and flexible. Attached to the spine are the ribcage and the hips. The ribcage needs to be large and powerful to house the massive lungs required for breathing fire. The hips need to be sturdy to support the tail and the back legs.
When sketching the limbs, look at big cats like tigers or lions. Dragons are predators. They need powerful shoulders and muscular legs. A common mistake beginners make is drawing the legs too straight. Animals generally have angled legs that act like springs. By observing how a dog or cat stands, you can apply those angles to your dragon’s legs to make it look ready to pounce.
Comparative Anatomy Table
|
Dragon Part |
Real-World Animal Reference |
Why It Works |
|---|---|---|
|
Wings |
Bats |
Bat wings have elongated fingers with skin stretched between them, perfect for dragons. |
|
Scales |
Snakes / Iguanas |
Reptile scales overlap in specific patterns that provide armor and flexibility. |
|
Legs/Paws |
Lions / Tigers |
Big cats have muscular, powerful limbs that imply strength and predatory speed. |
|
Eyes |
Eagles / Cats |
Slitted pupils or intense glares give the dragon a predatory intelligence. |
|
Neck |
Swans / Giraffes |
Long necks need to curve gracefully; swans are great references for S-curves. |
3. The Basics of Sketching: Using Simple Shapes
You should never try to draw the finished details right away. That is the quickest way to get frustrated. Instead, break the dragon down into simple geometric shapes. This technique is called “construction.” When you look at a tutorial on how to draw a dragon, the first step is almost always drawing circles and ovals.
Start with a circle for the head. Add a smaller oval or box shape attached to it for the snout. For the chest, draw a large oval. For the hips, draw a slightly smaller circle. Connect these shapes with a curved line representing the spine. This creates the basic framework or “armature” of your beast. It doesn’t look like much yet, but this wireframe ensures your proportions are correct before you spend hours rendering scales.
Don’t press too hard with your pencil during this phase. You want these lines to be faint so you can erase them later or draw over them. Use your shoulder to draw, not just your wrist. This helps you make smooth, flowing lines rather than shaky, short strokes. Once you have the main body shapes, use cylinders to map out the legs and the neck. This gives your drawing a 3D feel immediately.
4. Designing the Dragon Head: Horns, Snouts, and Eyes
The head is the focal point of your dragon. It’s where the personality lives. Is your dragon wise and ancient? Or is it a mindless, hungry beast? The design of the head tells this story. When learning how to draw a dragon head, think about the skull shape. A Tyrannosaurus Rex skull is a fantastic reference for a heavy, powerful dragon. A horse skull might work better for a sleek, magical dragon.
The Snout and Jaw:
The jaw needs to look functional. If the dragon breathes fire, maybe it has vents or charred scales near the mouth. The teeth shouldn’t all be the same size. Include long fangs for grabbing prey and smaller teeth for gripping. Remember to draw the tongue! A forked tongue makes it look more reptilian.
The Eyes:
Eyes are the windows to the soul, even for a monster. Place the eyes on the sides of the head if it’s a prey animal (which dragons usually aren’t) or forward-facing for a predator. Add a heavy brow ridge to make the dragon look angry or focused. The pupil shape matters, too. A vertical slit pupil looks dangerous and reptilian, while a round pupil can look more human or intelligent.
Horns and Frills:
Horns aren’t just stuck on the head; they grow out of the bone. Draw a base for the horn so it looks anchored. Horns can curve back for aerodynamics or jut forward for combat. Frills or ears add expression. A dragon with its ears pinned back looks furious, just like a cat.
5. Mastering the Neck: Flow and Movement
The neck connects the head to the body and is a major part of the dragon’s gesture. A stiff neck makes the drawing look like a statue. A fluid, curving neck makes the dragon look alive. When figuring out how to draw a dragon neck, avoid making it a straight tube.
Think of the neck as a series of interlocking cylinders or a thick hose. It needs to bend and twist. The throat area often has different textures than the back of the neck. The back of the neck is armored to protect the spine, while the throat might have softer, stretchier skin (called the gullet) to allow for swallowing large prey or expanding for fire breath.
Pay attention to how the neck attaches to the torso. It doesn’t just stick out of the front of the oval; it flows into the shoulders. Use S-curves to suggest movement. If the dragon is looking back, the neck will twist, causing the skin to fold and wrinkle. Drawing these wrinkles adds an immense amount of realism.
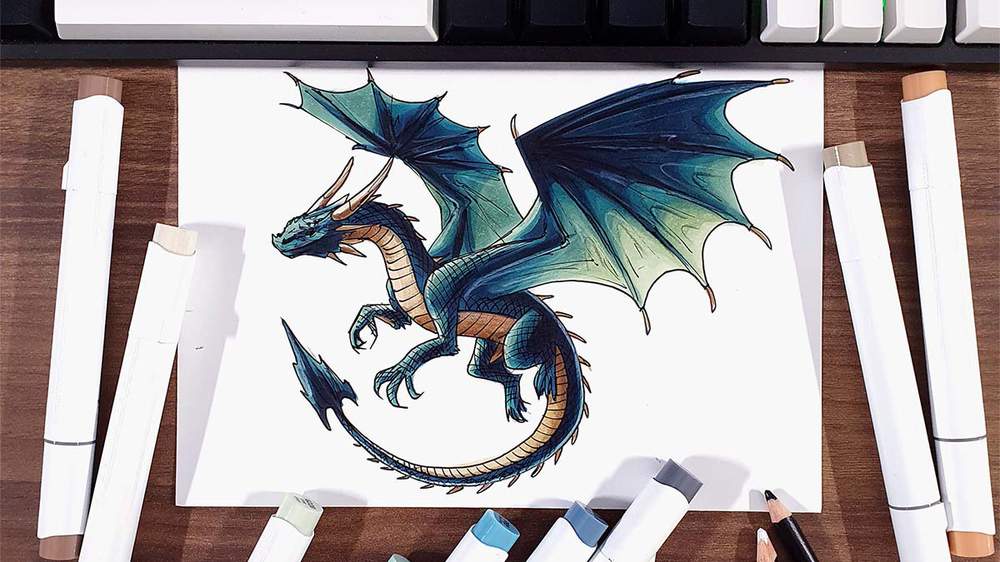
6. How to Draw Dragon Wings: Anatomy of Flight
Wings are often the hardest part for beginners. A dragon’s wings are usually structured like a bat’s wing, which is actually a modified hand. If you look at a bat wing skeleton, you will see a shoulder, an elbow, a wrist, and very long fingers. The wing membrane stretches between these fingers.
The Structure:
Start by drawing the “arm” of the wing: the humerus (upper arm), radius/ulna (forearm), and the fingers. There is usually a thumb claw that sticks out at the “wrist” joint, which the dragon can use to climb or grab things. The fingers should fan out. The membrane connects from the tip of the last finger all the way back to the dragon’s body, usually attaching near the hips or the base of the tail.
The Membrane:
The skin of the wing isn’t a flat sheet. It has weight and elasticity. When the wings are open, the skin is pulled tight, but it should still curve slightly between the fingers (scalloping). When the wings are folded, the skin bunches up and wrinkles. Adding veins and small tears to the wings can make them look used and realistic.
Perspective:
Drawing wings in perspective is tricky. If the wing is coming toward you, it will look shorter (foreshortened). Use overlapping shapes to show depth. The front edge of the wing is thick (muscle and bone), while the trailing edge is thin (skin).
7. The Torso and Hips: Weight and Balance
The body of the dragon holds everything together. It needs to look heavy. A dragon is a massive creature, likely weighing tons. To convey this, the belly should sag slightly if the dragon is standing on all fours, pulled down by gravity. When you are learning how to draw a dragon, never forget gravity.
The chest area is the powerhouse. It houses the flight muscles. These pectoral muscles need to be huge to flap those giant wings. Even if your dragon is skinny, the chest should be broad and deep. The hips are the engine for running and jumping. They should be just as wide, if not wider, than the shoulders, especially for dragons that walk on four legs.
Connect the ribcage and hips with the stomach area. This area is soft and flexible, allowing the dragon to twist. Avoid making the torso a straight sausage. It should narrow at the waist (behind the ribs) and widen again at the hips. This hourglass-like structure (even if it’s a chunky hourglass) gives the body a natural, anatomical look.
8. Legs, Claws, and Feet: Planting the Beast
A dragon needs to stand firmly on the ground. Weak, stick-like legs will ruin the illusion of a powerful monster. Dragon legs are usually digitigrade, meaning they walk on their toes like a dog or cat, rather than on their heels like a human (plantigrade). This gives them an extra joint in the leg and makes them look more agile.
Front Legs:
These are similar to human arms but much thicker. You have the shoulder, elbow, wrist, and fingers (toes). The “wrist” is often high off the ground.
Back Legs:
These are the powerhouses. The knee usually bends forward, and the ankle (often mistaken for a backward knee) bends backward. The thigh muscles should be huge.
Feet and Claws:
Dragon feet need to be wide to support the weight. Draw the toes radiating outward. At the end of each toe is a claw. Don’t just draw a triangle; draw a curved, hook-like shape that looks like it grows out of the toe. Claws are hard and often scratched.
9. The Tail: Balance and Weaponry
The tail is an extension of the spine. It flows naturally from the hips. A stiff tail looks dead; a curved tail looks alive. The tail acts as a counterbalance. If the dragon’s head and neck are sticking way out in front, the heavy tail needs to stretch out behind to keep the dragon from tipping over.
Tails are also weapons. You can add spikes, a club, or a spade shape to the end. When drawing the tail, think about tapering. It starts thick at the base (where it meets the hips) and gets thinner and thinner until it reaches the tip.
Use the tail to help your composition. You can wrap the tail around the dragon’s feet to create a contained, circular composition, or whip it out to the side to create dynamic action.
10. Scales and Texture: Adding Detail
Now that the body is built, it’s time to dress it up. Scales are what make a dragon look like a dragon. However, a common mistake when learning how to draw a dragon is trying to draw every single scale. This makes the drawing look busy and cluttered. Instead, suggest scales.
Scale Placement:
Draw patches of scales in key areas—on the shoulders, the curve of the neck, and the thighs. Let the viewer’s brain fill in the rest. Scales follow the form of the body. They wrap around the cylindrical shapes of the limbs. If you draw flat scales on a round leg, the leg will look flat.
Types of Scales:
- Plate Scales: Large, rectangular plates usually found on the belly (scutes) or the back.
- Pebble Scales: Small, round bumps, like Gila Monster skin. Good for flexible areas like joints.
- Overlapping Scales: Like fish or snake scales. They provide armor.
Don’t forget other textures! Maybe your dragon has feathers, fur, or spines. Mixing textures (like a furry mane on a scaly body) creates a unique and interesting creature design.
11. Lighting and Shading: Creating Volume
A line drawing is great, but shading makes it pop off the page. Decide where your light source is coming from. Is it the sun overhead? Is it the fire in the dragon’s mouth?
Once you pick a light source, stick to it. If the light is coming from the top right, all the shadows will be on the bottom left. Shading helps define the muscles and the roundness of the body.
Core Shadows: These are the darkest parts on the object itself, where the light can’t reach.
Cast Shadows: These are the shadows the dragon casts on the ground or on its own body (like the head casting a shadow on the neck).
Highlights: These are the bright spots where the light hits the scales directly. Shiny scales have sharp, crisp highlights. Matte skin has softer highlights.
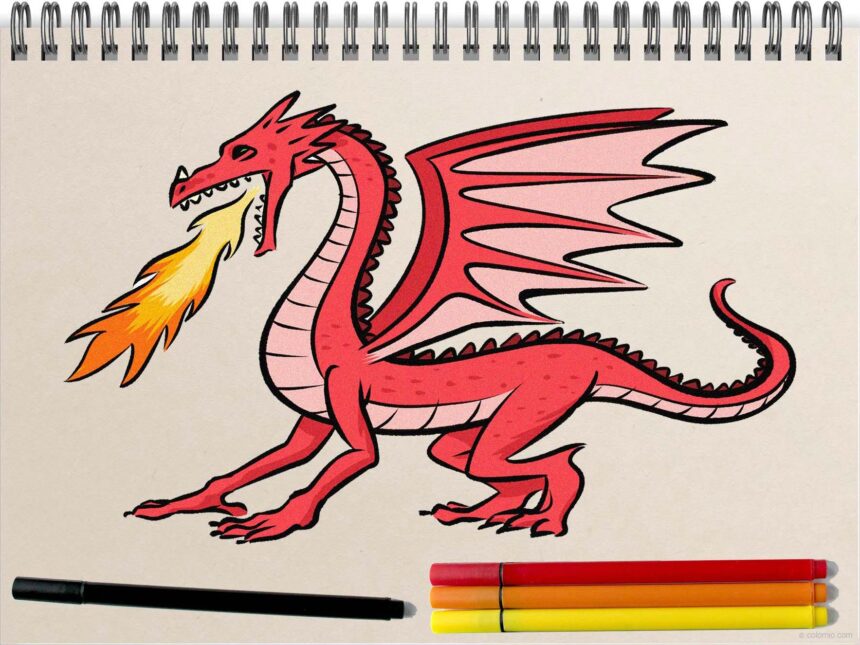
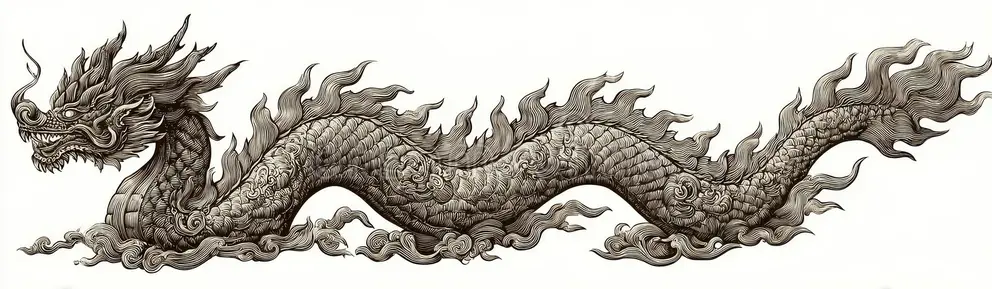
12. Eastern vs. Western Dragons: Styles and Differences
Not all dragons look the same. The two major archetypes are the Western (European) dragon and the Eastern (Asian) dragon. Knowing the difference is crucial depending on what you want to draw.
Western Dragons:
- Body: Dinosaur-like, bulky, robust.
- Limbs: usually four powerful legs.
- Wings: Large, bat-like wings.
- Personality: Often depicted as hoarders, monsters, or beasts to be slain.
- Elements: Fire, poison.
Eastern Dragons:
- Body: Serpentine, snake-like, very long and flexible.
- Limbs: Four smaller legs with eagle-like claws.
- Wings: Usually no wings, yet they fly magically.
- Head: Camel-like face, deer antlers, catfish whiskers, lion mane.
- Personality: Wise, benevolent, god-like, associated with weather.
- Elements: Water, storms, clouds.
13. Posing Your Dragon: Action and Composition
A dragon standing sideways is fine for a reference sheet, but it’s boring for a finished illustration. You want action! Posing requires you to visualize the dragon in 3D space.
Dynamic Poses:
- The Dive: Wings tucked back, head down, diving toward prey.
- The Roar: Chest expanded, head thrown back, wings spread wide to look intimidating.
- The Curl: Sleeping or guarding gold, wrapped tightly in a ball.
Use “lines of action” to plan your pose. Draw a single sweeping gesture line first, then build the dragon around it. This ensures the pose has energy and flow.
14. Backgrounds and Context: Putting the Dragon in a World
A white void is a lonely place for a dragon. Adding a background gives your drawing scale and context. If you draw a tiny bird next to your dragon, suddenly your dragon looks gigantic. This is called “scale cuing.”
Environment Ideas:
- Mountain Peak: Classic. Shows dominance and high altitude.
- Cave: Dark, moody, perfect for lighting effects with fire.
- Clouds: Great for flying poses.
- Ruins: Implies the dragon is ancient and destructive.
You don’t need to draw every leaf on every tree. Use atmospheric perspective—objects further away should be lighter and less detailed than the dragon in the foreground.
15. Refining and Polishing: The Final Touches
You’re almost there. The final stage is cleanup. If you are working in pencil, go over your main lines with a darker lead or a pen. Erase your construction lines (the circles and guidelines you drew in step 3).
Check your contrast. Make your darks darker and your lights lighter. Add those tiny details now—scratches on the armor, drool dripping from the teeth, sparks in the fire breath. These little narrative details make the drawing special.
If you are coloring, remember that dragon scales are reflective. They will pick up colors from the environment. A red dragon sitting on green grass might have greenish shadows on its belly.
Common Mistakes to Avoid
- The “Sausage” Body: Drawing the body as one long, even tube without a chest or hip definition.
- Symmetrical Wings: While wings are symmetrical in design, in a drawing, they are rarely seen at the exact same angle. Varying them adds depth.
- Spaghetti Legs: Making legs too thin to support the body weight.
- Stiff Spine: Drawing a straight line for the back instead of a curve.
Frequently Asked Questions (FAQ)
Q: Can I draw a dragon without wings?
A: Absolutely! Many dragons, like the Eastern Lung dragon or terrestrial drakes, do not have wings. It is your creature; you make the rules.
Q: How long does it take to learn how to draw a dragon well?
A: It depends on how often you practice. If you sketch daily, you will see massive improvements in a month. Mastery takes years, but the journey is fun.
Q: Do I need to know human anatomy first?
A: It helps, but it’s not strictly necessary. Animal anatomy (quadrupeds) is actually more useful for dragons than human anatomy.
Q: What if my dragon looks like a dog?
A: That is actually a good sign! It means you are getting the mammal-like leg structure right. To make it more draconic, focus on the head shape, scales, and reptilian textures.
Q: How do I make the scales look shiny?
A: Contrast is key. Leave a bright white spot (highlight) on the scale and make the edge of the scale very dark. This high contrast creates the illusion of a shiny surface.
Conclusion
Learning how to draw a dragon is one of the most exciting ways to improve your art skills. It forces you to learn about anatomy, texture, perspective, and creature design, all while having fun creating cool monsters. Remember, there is no “right” way to draw a mythical creature. As long as it looks functional and grounded in some sort of reality, it will be believable.
Start with simple shapes. Build the skeleton. Add the muscles. Then, have fun with the details like horns, spikes, and scales. Don’t be discouraged if your first few dragons look a bit wonky. Even professional concept artists for movies started with wobbly sketches. Keep your pencil sharp, keep observing real animals, and keep drawing.
If you are looking for more inspiration on technology, creativity, and the digital world, be sure to visit Silicon Valley Time for more articles.
Now, grab that sketchbook and release the beast!
To read more about the history and mythology of these creatures, you can check out this link on Dragons.


