


Key Takeaways
- Storytelling is Key: Lifestyle photography is about showing your product in a real-life context to help customers imagine owning it.
- Preparation Wins: Successful shoots require detailed mood boards, prop lists, and location scouting before you ever pick up a camera.
- Lighting Matters: Natural light is often the best choice for lifestyle shots, but understanding how to manipulate shadows is crucial.
- Context Creates Value: Placing a product in the right environment increases its perceived value and builds trust with the buyer.
- Editing Polish: Post-production should enhance the image without making the product look unrealistic or fake.
Have you ever stopped scrolling on Instagram because a photo just felt “right”? Maybe it was a steaming mug of coffee on a cozy rainy day, or a pair of hiking boots covered in mud on a mountain trail. You weren’t just looking at an object; you were looking at a feeling. That is the power of visual storytelling.
In the competitive world of e-commerce, showing a product against a plain white background is no longer enough. Customers want to see how items fit into their daily lives. They want to understand the scale, the texture, and the vibe. This is where lifestyle product photography comes into play. It bridges the gap between a cold digital screen and a warm, tangible experience.
This comprehensive guide will walk you through every single step of the process. Whether you are a small business owner using a smartphone or a budding photographer with a DSLR, we will cover everything from planning and lighting to editing and props. We will explore how to create images that don’t just display products but actually sell a lifestyle.
What Is Lifestyle Product Photography?
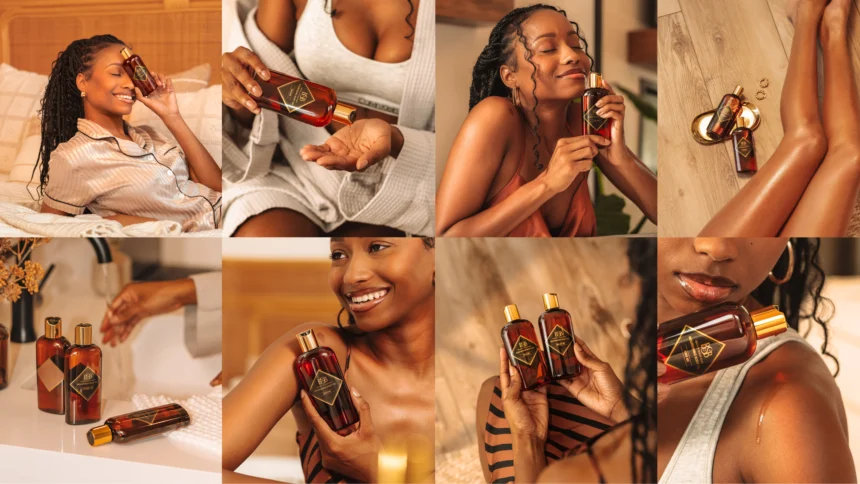
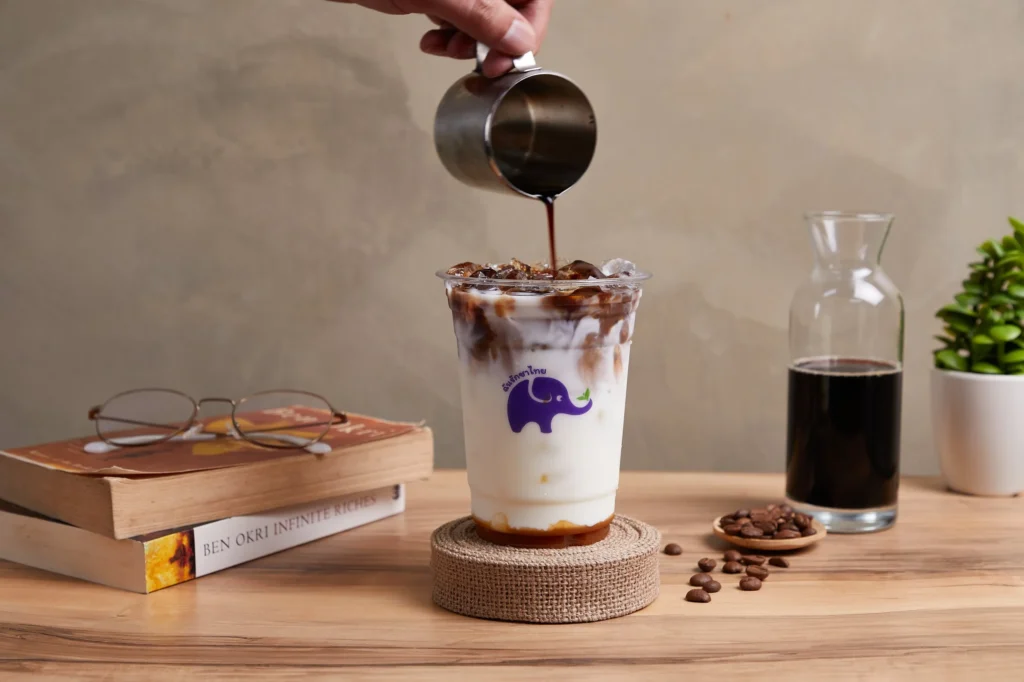
Lifestyle product photography is a style of photography that aims to capture your product within a curated, styled environment. Unlike traditional product photography, which usually features an item on a plain white or solid-colored background (often called “packshots”), lifestyle photography tells a story. It shows the product being used or placed in a setting where it naturally belongs.
The primary goal here is to help the potential customer visualize the product in their own life. If you are selling a blender, a white background shot shows the buttons and the blade. However, a lifestyle shot shows the blender on a marble kitchen counter, filled with fresh strawberries and spinach, with a glass of smoothie next to it. The first photo says, “This is a machine.” The second photo says, “This is a healthy, delicious morning routine.”
This style of photography relies heavily on context. It uses props, models, lighting, and backgrounds to create a mood. It is less about technical perfection of the product’s edges and more about the emotional connection the image evokes. It creates an atmosphere that resonates with your target audience’s identity and aspirations.
When you execute lifestyle product photography correctly, you aren’t just selling an item; you are selling a solution to a problem or a ticket to a better life. It builds a narrative that white background photos simply cannot achieve. This narrative is what turns a passive browser into an active buyer.
Why Your Brand Needs Lifestyle Images
You might be wondering if it is worth the extra effort to organize a lifestyle shoot. The answer is a resounding yes. In a digital marketplace where customers cannot touch or try on products, visuals are the only thing they have to go on. Lifestyle images serve as trust signals. They prove that the product exists in the real world and give vital clues about how it functions.
One of the biggest benefits is emotional engagement. People buy with their emotions and justify with logic. A photo of a soft blanket draped over a reading chair with a book and a candle evokes feelings of comfort and relaxation. That emotional reaction creates a desire that a simple catalog photo cannot. It makes the product feel desirable and necessary for achieving that specific feeling of comfort.
Furthermore, lifestyle photography helps with scale and context. A common complaint in online shopping is that the product looked different in person than it did on the screen. A handbag might look huge on a white background but tiny in real life. By showing a model holding the bag, or placing it next to familiar objects like a phone or a coffee cup, you instantly communicate the size. This reduces returns and increases customer satisfaction because they know exactly what they are getting.
Finally, these images are essential for social media marketing. Platforms like Instagram, Pinterest, and TikTok are visual-first channels. Users on these platforms are looking for inspiration, not a catalog. High-quality lifestyle images are shareable and engaging. They blend seamlessly into a user’s feed, looking less like an advertisement and more like genuine content. This organic feel effectively increases brand awareness and engagement rates.
Understanding Your Target Audience
Before you start snapping photos, you need to know who you are snapping them for. A lifestyle product photography shoot for a luxury watch brand will look completely different from a shoot for a rugged camping gear company. The “lifestyle” you are portraying must match the lifestyle your customers actually want.
Start by creating a customer persona. Ask yourself questions about your ideal buyer. How old are they? What are their hobbies? What does their home look like? Do they value minimalism and cleanliness, or are they drawn to vibrant colors and chaotic energy? If you are selling eco-friendly water bottles to college students, your photos should feature campuses, backpacks, and study sessions. If you are selling high-end skincare to women in their 40s, the setting might be a spa-like bathroom with soft lighting and elegant textures.
You should also look at where your audience hangs out online. If your audience is primarily on TikTok, you might want photos that feel candid and unpolished. If they are on Pinterest, you might need highly stylized, aesthetic vertical images. Understanding these nuances ensures that your images resonate.
It is also helpful to look at successful competitors or brands that share a similar demographic. What kind of imagery are they using? You should never copy, but you can certainly learn from the general “vibe” that seems to work for your industry. If every successful coffee brand is using dark, moody lighting, there is probably a reason for that.
Ultimately, your photos should act like a mirror. When your customer looks at the image, they should see a better version of themselves. They should think, “That is the person I want to be,” or “That is the home I want to have.” If you can achieve that reflection, you have understood your audience perfectly.
Planning Your Lifestyle Shoot
Great photography rarely happens by accident. It is the result of meticulous planning. The pre-production phase is arguably the most important part of lifestyle product photography. Without a plan, you will waste time on the day of the shoot and likely end up with disjointed images that don’t fit your brand.
The first step is creating a mood board. A mood board is a collection of images that define the visual direction of your shoot. You can use tools like Pinterest to gather inspiration. Look for lighting styles, color palettes, prop ideas, and poses that fit your vision. This board serves as a visual guide for everyone involved in the shoot, ensuring that the photographer, stylist, and models are all on the same page.
Next, you need a shot list. This is a checklist of every specific photo you need to capture. It should be detailed. Instead of writing “photos of shoes,” write “close-up of shoe laces,” “wide shot of model walking down street,” and “top-down view of shoes on pavement.” A shot list ensures you don’t wrap up the shoot only to realize you forgot to get a photo of the back of the product.
You also need to plan your logistics. Who is bringing the props? What time does the sun set? Do you need permits for the location? If you are shooting outdoors, always have a backup plan for bad weather. It is also wise to research trends and business insights to see what is currently working in the market. For example, resources like https://siliconvalleytime.co.uk/ can provide interesting perspectives on business and tech trends that might influence how you style modern tech products.
Pre-Production Checklist:
- Concept: Define the story you want to tell.
- Mood Board: Visual references for style and color.
- Shot List: Specific angles and scenarios to capture.
- Call Sheet: A schedule for the day, including contact info for the team.
- Equipment Check: ensuring all batteries are charged and memory cards are empty.
Finding the Perfect Location
The location acts as the stage for your product. In lifestyle product photography, the background provides the context. You have three main options: a home studio, a rented location, or the great outdoors. Each has its pros and cons, and the right choice depends entirely on your product and budget.
1. Home Studio:
This is the most cost-effective option. You can set up a corner of your living room or a spare bedroom. This works well for smaller products like jewelry, cosmetics, or stationery. You can use backdrops like vinyl surfaces that look like marble or wood to simulate a kitchen or desk. The downside is space limitation. It is hard to shoot wide, full-body shots in a small apartment.
2. Rented Locations:
For a more authentic “lived-in” feel, many brands rent spaces via platforms like Airbnb or Peerspace. This allows you to shoot in a beautiful, fully furnished kitchen, a modern loft, or a rustic cabin without buying all the furniture yourself. It gives you a variety of “scenes” in one location—you can shoot in the bedroom, the living room, and the garden all in one day.
3. Outdoors:
Outdoor shoots are fantastic for activewear, travel gear, and sunglasses. Nature provides a beautiful, free backdrop. However, you are at the mercy of the elements. The wind, rain, and rapidly changing light can be challenging. If you choose an outdoor location, scout it beforehand at the same time of day you plan to shoot so you know where the light falls.
When choosing a location, look for texture and depth. A flat white wall is boring. A brick wall, a wooden fence, or a velvet sofa adds visual interest. Also, consider the colors of the location. If your product is bright red, you probably don’t want a bright green wall behind it unless you are going for a very specific high-contrast look. Neutral backgrounds usually work best as they let the product pop.
Selecting Models and Props
Adding a human element to your photos can drastically increase conversion rates. However, hiring professional models can be expensive. The good news is that for lifestyle product photography, you often don’t need a supermodel. You just need someone who represents your customer.
You can often use friends, family, or even yourself. Often, you don’t even need to show the model’s face. “Hand modeling” is very popular. Showing a hand holding a cup, typing on a keyboard, or tying a shoelace is enough to provide human context. If you do use models, ensure their clothing doesn’t clash with the product. Neutral, logo-free clothing is usually the safest bet.
Props are the supporting actors of your scene. They help tell the story but should never steal the spotlight. If you are photographing a coffee maker, your props might be coffee beans, a nice mug, a spoon, and maybe a morning newspaper. These items suggest a “morning routine” narrative.
Rules for Prop Selection:
- Relevance: The props must make sense with the product. Don’t put a seashell next to a laptop unless you are selling travel insurance.
- Color Harmony: Choose props that fit your color palette.
- Condition: Ensure props are clean and photogenic. A chipped mug or a wilted flower will ruin the shot.
- Subtlety: If the viewer looks at the prop before the product, the prop is too distracting.
When styling, try to create “organized chaos.” Real life isn’t perfectly symmetrical. A slightly crumpled napkin looks more inviting than a perfectly folded one. It makes the scene feel accessible and real.
Essential Gear for Lifestyle Photography
You do not need a $5,000 camera to take great lifestyle photos. While professional gear helps, understanding how to use whatever gear you have is far more important. Many successful brands started out shooting entirely on iPhones.
Cameras:
If you are buying a camera, a DSLR or Mirrorless camera is the standard. Brands like Canon, Sony, and Nikon offer excellent entry-level options. The key advantage of these cameras is the ability to change lenses and shoot in RAW format, which gives you much more flexibility when editing. However, modern smartphones have incredible cameras with “Portrait Mode” that simulates the blurry background effect (bokeh) of professional lenses.
Lenses:
For lifestyle product photography, a 50mm lens (often called the “nifty fifty”) is a favorite. It mimics the human eye’s field of view and usually has a wide aperture (low f-number), which is great for blurring the background. A 35mm lens is wider and better for capturing the environment along with the product. A macro lens is essential if you sell small items like jewelry and need to capture tiny details.
Tripod:
A tripod is non-negotiable for sharp images. It allows you to keep the camera steady, which is especially important in low-light situations. It also allows you to frame a shot and then step in to adjust the props without losing your composition.
Reflectors and Diffusers:
These are cheap but powerful tools. A reflector (which can be a piece of white foam board) bounces light back onto the dark side of your product to fill in shadows. A diffuser (or a sheer white curtain) softens harsh sunlight coming through a window, creating that soft, dreamy look.
Lighting Techniques for Natural Looks
Lighting can make or break a photo. In lifestyle product photography, the goal is usually to make the lighting look natural, as if you just stumbled upon a beautiful scene.
Natural Light:
This is the holy grail for lifestyle shots. Window light is your best friend. Set up your scene next to a large window, but avoid direct sunlight hitting the product, as this creates harsh, ugly shadows. Instead, use a sheer curtain to diffuse the light. Ideally, turn off all the overhead lights in the room. Mixing yellow room lights with blue daylight creates “color contamination” that looks unprofessional and is hard to fix.
Golden Hour:
This refers to the hour after sunrise and the hour before sunset. The sun is low in the sky, casting a warm, soft, golden glow. This is perfect for outdoor shoots or romantic, cozy product vibes.
Artificial Light:
If you are shooting at night or in a dark room, you need artificial lights. Softboxes or LED panels are great continuous light sources (meaning the light stays on, unlike a flash). The key is to make it look like natural light. Place a large softbox to the side of the product to mimic a window. Avoid pointing a bright light directly at the front of the product, as this flattens the image.
Shadow Management:
Don’t be afraid of shadows; they add depth. However, you want “soft” shadows, not hard black lines. If the shadows are too dark, use a white card (reflector) on the opposite side of the light source to bounce some light back in and lift the shadows.
Composition Rules for Better Photos
Composition is the arrangement of elements within your frame. Good composition guides the viewer’s eye exactly where you want it to go—straight to your product.
The Rule of Thirds:
Imagine a grid dividing your image into nine equal squares (two vertical lines and two horizontal lines). Most cameras and phones have this grid setting. Place your main subject along these lines or at the points where they intersect. This creates a more balanced and interesting image than just plonking the subject in the dead center.
Depth of Field:
This refers to how much of the image is in focus. In lifestyle photography, a shallow depth of field (where the background is blurry) is very popular. It isolates the product and makes it stand out. You achieve this by using a wide aperture (low f-stop like f/1.8 or f/2.8).
Leading Lines:
Use lines in the environment to point toward the product. This could be the edge of a table, a road, a fence, or even a model’s arm. These lines subconsciously tell the viewer where to look.
Negative Space:
Leave some empty space in your photo. This is especially important if you plan to add text overlays for social media or website banners. If the photo is too cluttered, there is no room for your logo or a “Shop Now” button.
Angles:
Don’t just shoot from eye level.
- Flat Lay (Bird’s Eye View): Shooting straight down. Great for organizing multiple products or showing the contents of a box.
- Eye Level: Creates a direct connection.
- Low Angle: Makes the product look heroic and large.
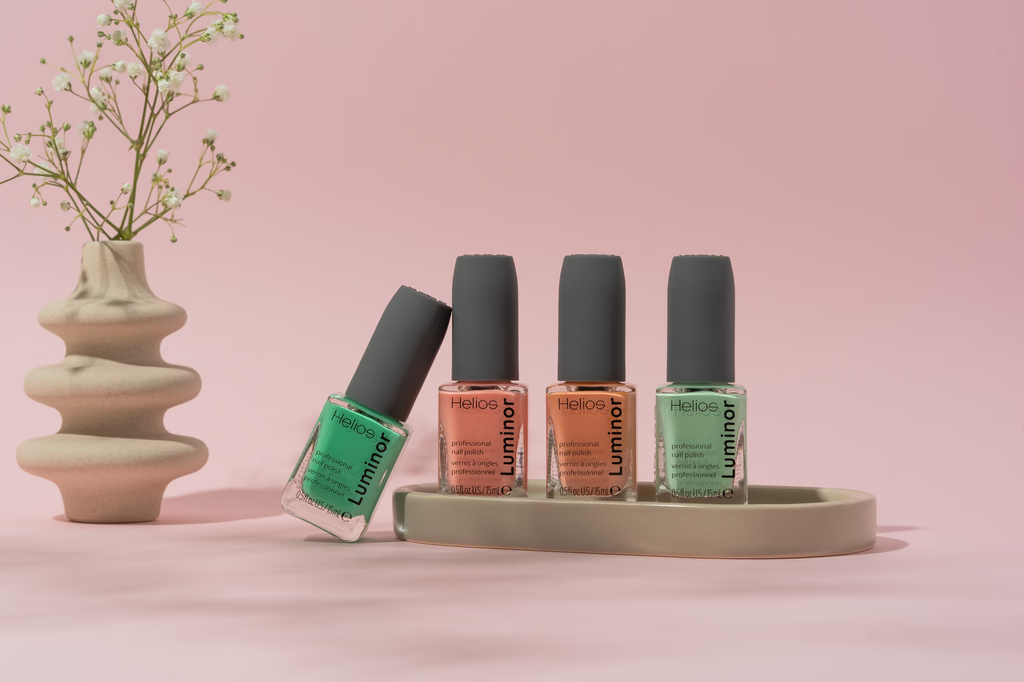
The Role of Color Psychology
Colors communicate feelings without words. The colors you choose for your background, props, and wardrobe should align with your brand identity and the emotion you want to evoke. This is a subtle but powerful part of lifestyle product photography.
- Blue: Trust, calm, stability. Great for tech products or financial services.
- Green: Nature, health, growth. Perfect for organic food, skincare, or outdoor gear.
- Red: Energy, passion, urgency. Good for clearance sales or fitness brands.
- Yellow: Happiness, optimism, warmth. Attention-grabbing but can be overwhelming if used too much.
- White/Neutral: Cleanliness, minimalism, sophistication. The go-to for high-end luxury and modern aesthetics.
You should establish a consistent color palette for your brand. If your Instagram feed is a mix of neon colors one day and rustic browns the next, it confuses the customer. Stick to a family of colors. You can use a color wheel to find complementary colors (opposites that look good together, like blue and orange) or analogous colors (neighbors on the wheel, like blue and green).
When planning a shoot, bring the product to the location and hold it up. Does the wall color clash? Do the props blend in too much? Contrast is important. If your product is white, a white background might make it disappear. A dark wood background would make it pop.
Comparison: DIY vs. Professional Photography
It is often a difficult choice between doing it yourself or hiring a pro. Here is a breakdown to help you decide.
|
Feature |
DIY Photography |
Professional Photography |
|---|---|---|
|
Cost |
Low (Time + Equipment rental) |
High (Day rates + Licensing fees) |
|
Control |
Total creative control |
Collaborative, but relies on pro’s vision |
|
Equipment |
Limited to what you own |
Access to high-end cameras/lighting |
|
Skill Level |
Learning curve required |
Expert knowledge of light/composition |
|
Time |
High time investment |
Fast turnaround on shoot day |
|
Best For |
Social media content, blogs, startups |
Hero website images, ad campaigns |
If you are just starting, DIY is a great way to learn your brand’s visual language. As you scale, investing in a professional for your main “hero” images (the big banners on your website) is usually worth the money.
Editing and Post-Processing Tips
Taking the photo is only half the battle. Editing is where the magic happens. However, in lifestyle product photography, the goal is to enhance reality, not fake it.
Software:
Adobe Lightroom is the industry standard for color correction. It allows you to edit batches of photos so they all have a consistent look. For mobile, apps like VSCO or the mobile version of Lightroom are fantastic. Adobe Photoshop is used for more heavy-duty retouching, like removing a pimple from a model or erasing a stray hair on the product.
Basic Adjustments:
- Exposure: Brighten the image if it is too dark.
- Contrast: Add a little contrast to make the image pop and look less “flat.”
- White Balance: Ensure the whites look white, not yellow or blue. This corrects the color temperature.
- Crop and Straighten: Fix crooked horizons. A tilted table makes the viewer feel seasick.
Presets:
Presets are like filters that you can apply with one click. They are great for maintaining consistency. You can buy presets from photographers whose style you admire. However, never rely 100% on a preset. You will almost always need to tweak the exposure and white balance after applying it.
Caution:
Do not over-saturate the colors. The product in the photo must match the color of the real product. If a customer buys a dress thinking it is teal because of your filter, but it arrives and it is navy blue, they will return it. Color accuracy is vital for product photography.
Optimizing Images for E-commerce and Social Media
You have beautiful photos, but if they take ten seconds to load on your website, you will lose customers. Optimization is technical but necessary.
File Size:
Raw camera files are huge (often 20MB+). You need to compress them for the web. Ideally, web images should be under 200KB. Tools like TinyPNG or plugins on Shopify/WordPress can compress images without losing visible quality.
File Format:
- JPEG: The standard for photographs. Good balance of quality and file size.
- PNG: Better for graphics or images with transparent backgrounds (rare for lifestyle).
- WebP: A modern format that offers superior compression. Most modern browsers support it.
Dimensions:
Don’t upload a 6000-pixel wide image if your website only displays it at 1000 pixels. Resize the image to the maximum width it will be displayed.
- Instagram Portrait: 1080 x 1350 pixels (4:5 ratio). Takes up the most screen space.
- Instagram Square: 1080 x 1080 pixels.
- Stories/Reels: 1080 x 1920 pixels (9:16 ratio).
Alt Text:
Always add “Alt Text” to your images on your website. This is a text description of the image (e.g., “Woman hiking wearing red waterproof boots”). This helps visually impaired users who use screen readers, and it is also crucial for SEO (Search Engine Optimization), helping Google understand what is in your image.
Common Mistakes to Avoid
Even experienced photographers make mistakes. Here are some pitfalls to watch out for in lifestyle product photography.
1. Clutter:
Putting too many props in the scene. If the viewer has to play “Where’s Waldo?” to find your product, you have failed. Keep it simple.
2. Reflections:
If your product is shiny (glass, metal, plastic), you might see the reflection of the camera, the tripod, or yourself in it. You can fix this by changing your angle or using a “polarizing filter” on your lens to cut glare.
3. Inconsistent Branding:
One photo is dark and moody, the next is bright and neon. This makes your brand look disorganized. Stick to your mood board.
4. Poor Focus:
The product must be sharp. If the model’s face is in focus but the product they are holding is blurry, the photo is useless for sales.
5. Ignoring the Details:
Fingerprints on a screen, dust on a table, or wrinkles in a tablecloth. These tiny details look sloppy. Carry a microfiber cloth and a lint roller with you at all times.
Budgeting for Your Photoshoot
You can spend $50 or $50,000 on a photoshoot. Setting a budget helps you make smart decisions.
Low Budget ($0 – $500):
- Camera: Smartphone.
- Lighting: Window light (free).
- Models: Friends (pay them in pizza or product).
- Location: Your home or a public park.
- Props: Items you already own or buy from thrift stores.
Mid Budget ($500 – $2,000):
- Camera: Entry-level DSLR/Mirrorless.
- Lighting: Cheap softbox kit or reflector.
- Models: Micro-influencers or beginner models.
- Location: Airbnb rental or Peerspace studio for a few hours.
- Props: Specific purchases to match brand colors.
High Budget ($2,000+):
- Camera: Professional Photographer hire.
- Lighting: Professional studio lighting.
- Models: Agency models plus a hair/makeup artist.
- Location: Professional studio or exclusive location permit.
- Props: Professional stylist hired to source and arrange props.
Remember, creativity is more valuable than money. A clever idea shot on an iPhone often outperforms a boring idea shot on a $10,000 camera.
Future Trends in Product Photography
The world of photography is always changing. To stay ahead, you need to keep an eye on emerging trends.
Video is King:
Static images are great, but video is taking over. “Cinemagraphs” (photos where one element moves, like steam rising from coffee) bridge the gap. Short-form video (Reels, TikTok) essentially is moving lifestyle photography. Shooting video clips alongside your stills is now mandatory.
Authenticity and Imperfection:
The days of overly polished, fake-looking stock photos are gone. Gen Z consumers prefer “ugly” or “flash” photography that looks candid and raw. It feels more honest. Brands are leaving mistakes in—a messy bed, a half-eaten meal—to prove reality.
360-Degree and AR:
While not strictly “lifestyle,” Augmented Reality (AR) allows users to place a digital version of your product in their own room via their phone camera. This is the ultimate personalized lifestyle experience.
Sustainability:
Shoots are becoming eco-friendly. Brands are avoiding single-use props and plastics in their set designs to align with consumer values regarding sustainability.
Conclusion
Mastering lifestyle product photography is a journey, not a destination. It requires a mix of technical skill, artistic vision, and marketing strategy. But the payoff is immense. By placing your product in a context that resonates with your audience, you transform it from a commodity into a necessity.
Remember to plan thoroughly, light carefully, and edit tastefully. Always keep your customer in mind—what do they aspire to? What does their ideal life look like? Your photos are the bridge to that life. Whether you are shooting with a smartphone in your kitchen or directing a crew in a studio, the principles remain the same: tell a story, evoke emotion, and build trust.
Start small, experiment often, and don’t be afraid to break the rules once you learn them. Your brand has a unique story; it is time to capture it.
FAQ
Q: Do I need a professional camera for lifestyle photography?
A: No. Modern smartphones are capable of capturing high-quality lifestyle images, especially for social media. Lighting and composition are more important than the camera itself.
Q: How many props should I use?
A: Use enough to set the scene, but not so many that they distract from the product. Start with 1-3 hero props and add smaller texture items if needed. The product must always be the focal point.
Q: What is the best time of day to shoot outdoors?
A: The “Golden Hour” (shortly after sunrise or before sunset) provides the most flattering, soft light. Avoid high noon when the sun is directly overhead, as it creates harsh shadows.
Q: How do I find models for my shoot if I have no budget?
A: Ask friends or family members. You can also reach out to micro-influencers who might trade their modeling time for free product.
Q: Why do my photos look yellow?
A: This is likely a white balance issue caused by mixing indoor light bulbs with natural window light. Turn off indoor lights when shooting by a window, or adjust the White Balance setting in your editing app.
For further reading on the broader context of how imagery is used in commerce, you can explore this Wikipedia article on Commercial Photography.


