


Key Takeaways
- Easy Setup: Learn exactly how to get your thonny download and installation completed in minutes.
- Beginner-Friendly: Understand why Thonny is the top choice for students and new coders.
- Features Explained: Discover powerful tools like the debugger and variable explorer that make learning Python easier.
- Troubleshooting: Solutions for common installation issues on Windows, Mac, and Linux.
If you are just starting your journey into the world of programming, Python is likely the first language you want to learn. It is powerful, readable, and used everywhere from web development to data science. But before you write your first line of code, you need a place to write it. That is where an IDE (Integrated Development Environment) comes in. While professional developers might use complex tools, beginners need something simple and clean.
This is exactly why you need a thonny download. Thonny is an IDE designed specifically for learning Python. It strips away the confusing buttons and menus that clutter other software, leaving you with a clean interface that lets you focus on coding. Whether you are a student, a teacher, or a hobbyist, getting Thonny set up on your computer is the best first step you can take.
In this massive guide, we are going to cover absolutely everything you need to know. We will walk you through the installation process for every operating system, explain how to write your first script, and dive deep into the features that make Thonny special. Let’s get started on your coding adventure.
What Is Thonny and Why Do You Need It?
When you first decide to learn Python, the sheer number of tools available can be overwhelming. You might hear about PyCharm, VS Code, or IDLE. These are all great tools, but they often have a steep learning curve. Thonny is different. It was created at the University of Tartu in Estonia with one goal in mind: to remove the barriers to entry for new programmers.
The primary reason to search for a thonny download is its simplicity. Most IDEs require you to configure environments, set up interpreters, and manage plugins before you can even print “Hello, World.” Thonny comes with Python built right in. This means you don’t have to install Python separately. You just download Thonny, install it, and you are ready to code immediately. This “batteries included” approach saves beginners hours of frustration.
Another major reason to use Thonny is its visual debugger. Debugging is the process of finding and fixing errors in your code. In professional tools, debuggers can be complicated beasts. In Thonny, you can run your code step-by-step. You can see how Python evaluates your expressions. If you have a math equation in your code, Thonny will show you how it solves it piece by piece. This visual feedback is incredibly valuable for understanding how computer logic actually works.
Furthermore, Thonny has a clean interface that doesn’t distract you. There are no sidebar ads, no confusing project trees (unless you want them), and no overwhelming menu bars. It feels like a simple text editor, but it has the power of a full programming environment under the hood. For students in middle school or high school, or anyone who wants a frustration-free start, Thonny is the gold standard.
How to Prepare for Your Thonny Download
Before you hit that download button, it helps to know a little bit about your computer. Thonny is incredibly lightweight, meaning it doesn’t need a super-powerful computer to run. It works great on older laptops, school computers, and even Raspberry Pis. However, knowing your operating system version is important to ensure you get the right file.
First, check your internet connection. The thonny download file is not very large—usually around 20MB to 50MB depending on your system—so it should download quickly even on slower connections. You won’t need gigabytes of free space, which is great news if your hard drive is getting full.
You should also decide where you want to install it. The default location is usually fine, but if you are using a shared computer or a school network, you might need specific permissions. The good news is that Thonny offers a “portable” version. This allows you to put Thonny on a USB stick and run it on any computer without actually installing it. This is a fantastic feature for students who move between home and school labs.
Lastly, make sure you don’t have any conflicting Python installations that might confuse you. While Thonny handles its own Python version nicely, sometimes having multiple versions of Python on a system can be confusing for a beginner when trying to install extra packages later. Generally, though, Thonny is designed to be isolated, so it won’t mess up other programs on your computer.
System Requirements for Thonny
|
Component |
Minimum Requirement |
Recommended |
|---|---|---|
|
Operating System |
Windows 8.1, macOS 10.11, Linux |
Windows 10/11, macOS 11+, Ubuntu 20.04+ |
|
Processor (CPU) |
1 GHz single core |
2 GHz dual core or better |
|
RAM (Memory) |
1 GB |
4 GB or more |
|
Disk Space |
200 MB free space |
500 MB free space |
|
Display |
1024 x 768 resolution |
1920 x 1080 resolution |
As you can see, the requirements are very low. This accessibility is a huge part of why Thonny is so popular in education.
Step-by-Step Thonny Download for Windows
For most users, Windows is the operating system of choice. Installing Thonny on Windows is very straightforward, but there are a few options you should pay attention to during the setup wizard. We will guide you through the standard installer method, which is the easiest way to get everything running smoothly.
To begin your thonny download for Windows, you need to visit the official website. You will see a download box in the top right corner. Hover over the link that says “Windows” to see the specific version details. Usually, it will offer an executable file (.exe). Click it to save the installer to your Downloads folder.
Once the download finishes, locate the file (it will look like thonny-4.x.x.exe) and double-click it. Windows might ask for permission to run the file; click “Yes.” The setup wizard will appear. This wizard guides you through the installation. You will be asked to accept the license agreement—it’s open-source, so it’s free to use!
During the installation, you might see an option to create a desktop icon. We highly recommend checking this box so you can easily find Thonny later. You may also be asked if you want to install it for “all users” or just the “current user.” If you are the only one using the computer, “current user” is usually fine and doesn’t require administrator passwords. Once you click “Install,” the process will take just a minute or two. When it finishes, click “Finish” and you are ready to launch Thonny!
Installing Thonny on macOS
Mac users love Thonny because it feels right at home on macOS. However, Apple’s security settings can sometimes make installing third-party software a little tricky if you haven’t done it before. Don’t worry, the process is safe and simple if you follow the correct steps.
Start by going to the official site for your thonny download. Look for the link labeled “macOS.” You will likely download a package file (.pkg) or a disk image (.dmg). Click the link and let the file download to your computer.
Once downloaded, locate the file in your Finder. Double-click it to open the installer. On macOS, you might get a warning saying the app is from an “unidentified developer” or that it was downloaded from the internet. This is standard for apps not downloaded from the App Store. To bypass this, simply right-click (or Control-click) the installer file and select “Open,” then confirm you want to open it.
Follow the on-screen instructions in the installer window. You will drag the Thonny icon into your Applications folder if it’s a DMG file, or click through the “Continue” buttons if it’s a PKG file. Once the installation is complete, you can find Thonny in your Launchpad or Applications folder. The first time you run it, macOS might verify the software, which takes a few seconds. After that, you will see the clean Thonny interface ready for action.
Setting Up Thonny on Linux
Linux users often prefer using the command line, and Thonny supports this perfectly. In fact, if you are using a Raspberry Pi, Thonny usually comes pre-installed! But if you are on a standard Linux distribution like Ubuntu, Mint, or Fedora, you might need to do a manual thonny download and install.
The easiest way to install Thonny on many Linux distributions is using the built-in package manager. For example, on Ubuntu or Debian-based systems, you can open your terminal and type sudo apt install thonny. This will fetch the version available in your distribution’s repository. However, these repositories sometimes have older versions.
If you want the absolute latest features, it is better to use the installation script provided by the Thonny developers. Open your terminal and run the command usually found on the Thonny website (often something like bash <(wget -O - https://thonny.org/installer-for-linux)). This script downloads the latest files and sets everything up for you automatically.
After the script finishes, or the package manager completes the installation, you should be able to find Thonny in your applications menu under “Development” or “Programming.” Alternatively, you can just type thonny into your terminal and hit Enter to launch the program. It is fast, efficient, and integrates well with the Linux environment.
Exploring the Thonny Interface
Once you have completed your thonny download and opened the application, you will be greeted by a very simple window. This simplicity is intentional. Unlike other IDEs that look like the cockpit of a spaceship, Thonny looks like a notepad. But don’t be fooled—there is a lot of power hidden here.
The main area is the Editor. This is the large white space where you type your code. It has syntax highlighting, which means it colors different parts of your code (like keywords, strings, and numbers) to make them easier to read. If you make a typo, the colors will often look “wrong,” giving you a visual clue that something needs fixing.
Below the Editor is the Shell (sometimes called the REPL). This is where the output of your code appears. If you write a program to print “Hello,” the word “Hello” will show up here. You can also type Python commands directly into the Shell to test them out instantly without saving a file. It’s perfect for quick math or checking how a specific command works.
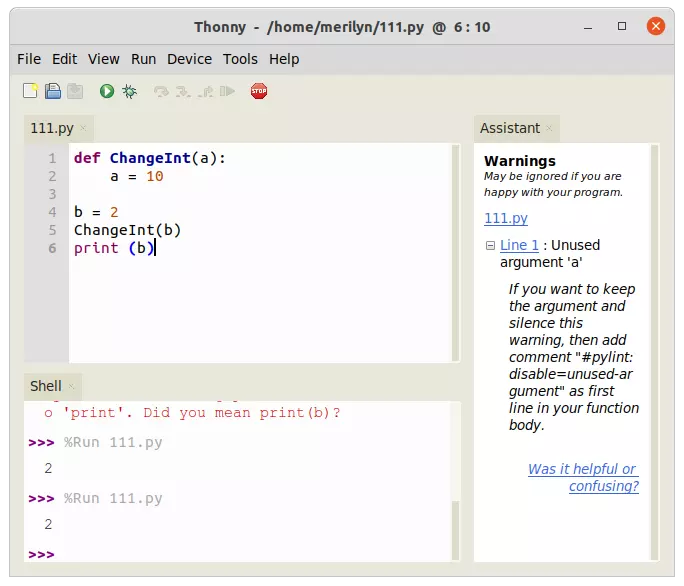
At the top, you have the Toolbar. It has big, friendly buttons for “New,” “Open,” “Save,” “Run,” and “Debug.” The “Run” button is usually a green play icon. The “Debug” button looks like a bug. These icons are intuitive and easy to remember. There are also menus at the very top (File, Edit, View, etc.) that hold more advanced features, but you won’t need most of them when you are just starting out.
Key Interface Components
- Editor: Where you write scripts.
- Shell: Where results appear and immediate commands run.
- Assistant: A helper pane that explains errors.
- Variables: Shows the value of every variable in your program.
- Toolbar: Quick access to essential functions.
Writing Your First Python Program in Thonny
Now that you have the software installed, let’s put that thonny download to good use. Writing your first program is a rite of passage. We will write the classic “Hello, World!” program, but we will also add a little bit of math to show off Thonny’s features.
- Open Thonny: Click the icon to launch the program.
- Type the Code: In the main Editor window, type the following:
print("Hello, World!") name = "Coder" print("Welcome, " + name) a = 5 b = 10 result = a + b print("The result is:", result) - Save the File: Before you can run a script, you must save it. Click the “Save” icon (or File > Save). Name it
first_program.py. Make sure you save it somewhere you can find easily, like a “Python Projects” folder on your Desktop. - Run the Code: Click the green “Run” button (the play icon) or press the F5 key on your keyboard.
- Check the Output: Look at the Shell window at the bottom. You should see:
Hello, World!
Welcome, Coder
The result is: 15
Congratulations! You just wrote and ran your first Python program. Notice how Thonny handled the text and the math effortlessly. If you made a mistake—say, you forgot a quotation mark—Thonny would show an error message in the Shell, and often the Assistant pane would pop up to explain exactly what went wrong in plain English.
Using the Visual Debugger
The debugger is arguably the most important feature you get with your thonny download. In most other IDEs, debugging involves setting “breakpoints” and watching complex memory stacks. It can be scary. Thonny changes the game by letting you execute your code step-by-step with simple keyboard shortcuts.
Let’s use the code we wrote in the previous section. Instead of clicking the green “Run” button, click the “Debug” button (the bug icon) or press Ctrl+F5. Nothing will happen in the Shell immediately. Instead, Thonny will highlight the first line of your code.
Now, press the F7 key (Step Into). Thonny will execute just that one piece of code. If you keep pressing F7, you will see Python moving through your code. When it gets to result = a + b, it won’t just calculate it instantly. It will first highlight a, then replace it with 5. Then it will highlight b and replace it with 10. Finally, it will show 5 + 10 becoming 15.
This visual breakdown is incredible for learning. It shows you that variables are just containers for values. It helps you catch logic errors where your math might be wrong, or where you used the wrong variable name. Mastering the debugger early on will save you hundreds of hours of frustration later in your coding career.
Installing Third-Party Packages
Python is famous for its “libraries” or “packages.” These are bundles of code written by other people that you can use in your projects. For example, if you want to make a game, you might use a library called pygame. If you want to make charts, you might use matplotlib. Managing these packages can be a nightmare in professional tools, but Thonny makes it easy.
After your thonny download is installed, you have a tool called the “Package Manager.” Go to the “Tools” menu at the top and select “Manage packages…” A window will pop up.
In this window, there is a search bar. Type the name of the package you want (e.g., pygame) and click “Search.” Thonny will look up the package on PyPI (the Python Package Index). Once it finds it, you will see a description and an “Install” button. Click it, and Thonny will download and install the package for you.
Once installed, you can use it in your code immediately by typing import pygame. You don’t need to mess with command prompts or virtual environments manually. Thonny handles all the backend configuration for you. This feature alone makes it one of the best tools for getting into data science or game development as a beginner.
Popular Beginner Packages
- Pygame: For creating 2D games.
- Matplotlib: For plotting graphs and charts.
- Requests: For downloading data from the internet.
- Pandas: For data analysis (like Excel for Python).
- Turtle: Usually built-in, great for drawing shapes.
Managing Files and Projects
As you continue to use your thonny download, you will eventually have more than just one file. You might have a project with images, sound files, and multiple Python scripts. Keeping organized is key to being a good programmer.
Thonny has a “Files” view that you can toggle on. Go to the “View” menu and select “Files.” A sidebar will appear on the left side of the window. This sidebar shows you the files on your computer. You can browse through your folders without leaving Thonny.
This is very helpful when your script needs to open another file. For example, if you are writing a program to read a text file, you can see exactly where that text file is located relative to your script. Double-clicking a Python file in this sidebar will open it in the Editor.
While Thonny doesn’t have a complex “Project” system like PyCharm, simply using folders on your computer is usually enough for beginner to intermediate projects. Just create a new folder for each new project you start, and keep all your related files inside it. Thonny’s file browser makes navigating these folders a breeze.
Customizing Thonny for Your Needs
Even though Thonny is simple, it is also customizable. After you get comfortable with the default look, you might want to change things up. Maybe the text is too small, or you prefer a dark mode because it’s easier on your eyes during late-night coding sessions.
Go to “Tools” and then “Options.” Here you will find tabs for various settings.
- Theme & Font: This is the most popular tab. You can change the “UI theme” (how the buttons and menus look) and the “Syntax theme” (how the code colors look). There are several dark themes available that make Thonny look very modern and professional. You can also increase the font size here.
- Editor: You can turn on line numbers (highly recommended!), enable automatic closing of quotes and brackets, and adjust indentation settings.
- Interpreter: This allows you to choose which version of Python Thonny uses. By default, it uses the one that came with your thonny download, but advanced users can point it to other Python installations if needed.
Customizing your environment helps you feel more ownership over your tools. It can make coding more comfortable and fun. Don’t be afraid to experiment with different themes until you find one that suits your style.
Why Thonny Is Better Than IDLE
When you install standard Python from python.org, it comes with a tool called IDLE. Many schools use IDLE because it is the default. However, compared to a thonny download, IDLE is quite limited.
IDLE has no line numbers by default. Its debugging tools are very difficult to use and don’t offer the visual step-by-step execution that Thonny does. IDLE’s error messages are often hard to read for beginners.
Thonny, on the other hand, was built after observing how students struggle with IDLE. Thonny provides the Assistant pane, which acts like a tutor sitting next to you. If you get a syntax error, the Assistant explains why it happened, not just that it happened. This educational focus makes Thonny vastly superior for anyone in the learning phase.
Also, code completion in Thonny is much better. When you type object., Thonny suggests what functions you can call. This helps you discover new commands without having to Google everything constantly. IDLE has this feature, but it is often slower and less intuitive.
Troubleshooting Common Installation Issues
Sometimes, technology doesn’t cooperate. Even though the thonny download and install process is designed to be easy, you might run into hiccups. Here are some common problems and how to fix them.
1. “Thonny won’t open” on Windows:
If you click the icon and nothing happens, try right-clicking and selecting “Run as administrator.” Sometimes permissions prevent it from launching. If that doesn’t work, try uninstalling and reinstalling. Make sure your antivirus isn’t blocking the program.
2. “Unidentified Developer” on Mac:
As mentioned earlier, this is a security feature. Go to System Settings > Privacy & Security. You should see a note about Thonny being blocked. Click “Open Anyway.”
3. Python DLL errors:
This is rare but can happen on older Windows versions. It usually means your Windows needs an update. Ensure you have the latest Service Packs installed for your version of Windows.
4. Pip or Package installation fails:
If you get errors when trying to install packages, it might be an internet connection issue or a firewall blocking Thonny. Ensure Thonny has permission to access the internet. Also, try updating pip through the “Tools” menu > “Open system shell” and typing python -m pip install --upgrade pip.
If you are stuck, the Thonny community is very helpful. There are forums and GitHub issues pages where you can search for your specific error message.
Moving Beyond Thonny
Eventually, you might outgrow Thonny. This is a good thing! It means you have mastered the basics and are ready for more complex projects. Perhaps you want to build a massive web application with Django, or work on a team with other developers using Git version control.
When that time comes, moving from your thonny download to a pro tool like VS Code or PyCharm will be a natural transition. You will already understand the concepts of variables, debugging, and packages. The professional tools will just offer you more shortcuts and plugins to manage larger codebases.
However, keep Thonny installed. It remains the best tool for quickly testing a small snippet of code. Professional developers often keep a lightweight editor like Thonny handy for “scratchpad” work because it loads instantly and doesn’t require setting up a whole project structure. It’s a tool that grows with you, even if it eventually becomes your secondary editor.
For more tech insights and resources as you grow your skills, be sure to check out https://siliconvalleytime.co.uk/ for the latest updates in the tech world.
Frequently Asked Questions (FAQ)
Q: Is the thonny download free?
A: Yes! Thonny is open-source software, which means it is completely free to download, use, and share. There are no hidden costs or premium versions.
Q: Can I use Thonny for other languages like C++ or Java?
A: No, Thonny is designed specifically for Python. This focus is what makes it so good. If you need to code in other languages, you will need a different IDE.
Q: Does Thonny work on Chromebooks?
A: Yes, but you need to enable “Linux (Beta)” on your Chromebook first. Once Linux is enabled, you can install Thonny using the Linux terminal commands.
Q: Is Thonny safe for kids?
A: Absolutely. It is educational software used in schools worldwide. It has no ads, no chat features, and does not collect personal data.
Q: Does Thonny come with Python included?
A: Yes. The standard installer includes a recent version of Python, so you don’t need to install anything else to get started.
Conclusion
Getting your thonny download is the single best step you can take toward learning Python. It removes the friction from the setup process, provides you with powerful learning tools like the visual debugger, and offers a clean, distraction-free environment. Whether you are a student tackling homework or an adult looking to switch careers, Thonny respects your time and helps you understand how code works, not just how to type it.
Programming is a superpower in the modern world. It allows you to automate boring tasks, analyze data, and build creative projects. By choosing the right tool at the beginning, you ensure that your learning journey is fun rather than frustrating. Thonny is that tool. So, download it today, write your first “Hello, World,” and unlock your potential as a coder.
For more detailed technical history and specifications regarding this software, you can refer to this related link on Wikipedia.


