


Have you ever seen “SOS” appear in the status bar of your iPhone? It can be a little alarming if you don’t know what it means. Don’t worry, it’s actually a helpful feature designed to keep you safe. The iPhone SOS mode is a powerful tool that can connect you to emergency services, even when you’re outside of your usual network coverage.
This guide will walk you through everything you need to know about the iPhone SOS feature. We’ll cover what it is, how it works, and how you can use it to your advantage. Understanding this feature is a simple step you can take to be better prepared for unexpected situations.
Key Takeaways
- iPhone SOS allows your device to make emergency calls and send texts by connecting to other available cellular networks when your primary network is out of range.
- This feature is automatically enabled on iPhones and works in many countries around the world.
- Emergency SOS via satellite (on iPhone 14 and later) lets you contact emergency services even without any cellular or Wi-Fi signal.
- You can set up Emergency Contacts who will be notified with your location after you make an SOS call.
- Understanding how to use and manage the iPhone SOS settings can provide significant peace of mind.
What Exactly Is the iPhone SOS Feature?
At its core, the iPhone SOS feature is a safety net. When your iPhone displays “SOS” in the status bar, it means that while you can’t make regular calls or use cellular data through your own carrier, you can still make emergency calls to numbers like 911 in the United States. Your phone is essentially borrowing another carrier’s network just for the purpose of ensuring you can reach help if you need it.
Think of it as a universal pass for emergency communication. This capability is built directly into the iOS operating system and is a standard feature on modern iPhones. It’s designed to work seamlessly in the background, activating automatically whenever your device loses connection to your primary network but can detect a signal from another one. This simple yet brilliant function ensures you’re never truly disconnected when it matters most.
How is “SOS Only” Different from “No Service”?
It’s easy to confuse the “SOS” or “SOS Only” message with the dreaded “No Service” notification, but they mean very different things.
- No Service: This message indicates that your iPhone cannot detect any cellular networks at all. In this state, you cannot make any calls (including emergency ones) or use cellular data. This typically happens in very remote areas, deep inside buildings, or underground.
- iPhone SOS: This message means your specific carrier’s network is unavailable, but your iPhone has detected a signal from another carrier’s network. While you can’t browse the web or call your friends, the device is permitted to use that other network for the sole purpose of contacting emergency services.
Understanding this distinction is crucial. Seeing iPhone SOS should be reassuring, not alarming, as it confirms you still have a lifeline to get help.
How to Use Emergency SOS on Your iPhone
Apple has made it simple to trigger an emergency call, ensuring you can do it quickly under stress. There are two primary methods to activate the iPhone SOS calling feature. It’s a good idea to practice these methods (without completing the call, of course) so you are familiar with them.
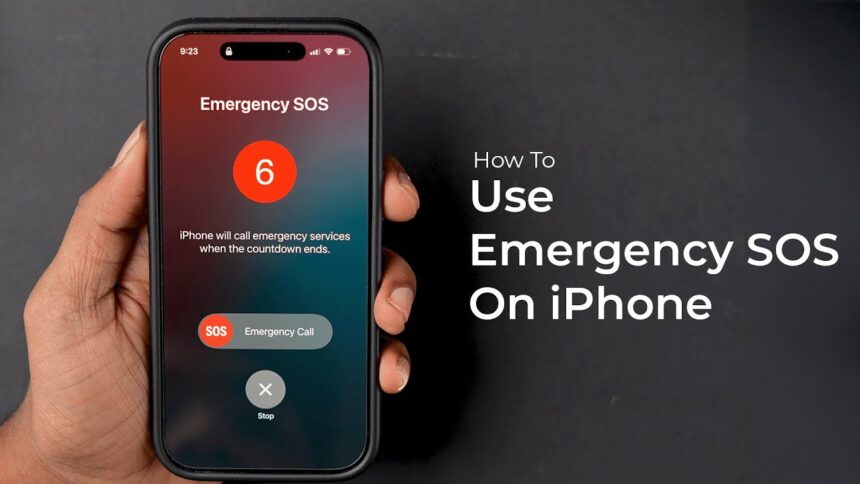
Method 1: Using the Side and Volume Buttons
This is the most common and fastest way to initiate an emergency call.
- Press and hold the Side button (on the right) and one of the Volume buttons (on the left) simultaneously.
- Continue holding the buttons. The Emergency SOS slider will appear on the screen.
- If you keep holding the buttons, a countdown will begin, and an alert will sound. Once the countdown finishes, your iPhone will automatically call emergency services.
- Alternatively, you can stop holding the buttons once the slider appears and simply drag the Emergency SOS slider to the right to place the call immediately.
This method is designed to be accessible even if you can’t look at your screen.
Method 2: Using the Side Button Rapidly
For users who have this setting enabled, you can also trigger iPhone SOS with rapid presses of the Side button.
- Quickly press the Side button five times in a row.
- The Emergency SOS slider will appear.
- Drag the slider to call emergency services. On some models and with certain settings, starting the five-press sequence may also initiate an automatic countdown to call 911.
You can manage this setting by going to Settings > Emergency SOS and turning “Call with 5 Presses” on or off.
Introducing Emergency SOS via Satellite
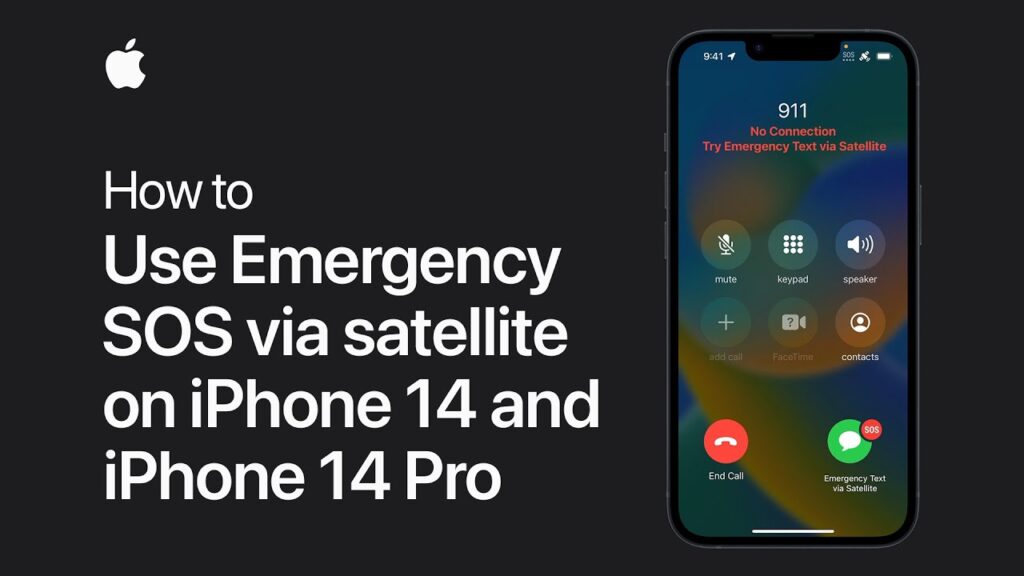
For those who venture into areas completely off the grid, Apple introduced a game-changing feature with the iPhone 14 and newer models: Emergency SOS via satellite. This technology allows you to contact emergency services when you have no cellular and no Wi-Fi coverage.
When you’re in a situation without any conventional signal and try to call 911, your iPhone will give you the option to text with emergency services via satellite. The interface guides you to point your phone toward a satellite in the sky to establish a connection. Because satellite bandwidth is very limited, the system will ask you a series of multiple-choice questions to quickly assess your situation (e.g., “What is the emergency?”, “Who is injured?”). Your answers, along with your location, Medical ID, and battery level, are compressed into a short text message sent to a relay center. Trained specialists at the center then call for help on your behalf.
This incredible feature, a highlight in tech news from sources like those found at https://siliconvalleytime.co.uk/, has already been credited with saving lives in remote wilderness areas where communication would have otherwise been impossible.
Setting Up Your Emergency Contacts
One of the most important parts of the iPhone SOS ecosystem is the ability to notify your chosen emergency contacts. After you make an emergency call, your iPhone will automatically send a text message to your emergency contacts, unless you choose to cancel.
This message informs them that you have called emergency services and shares your current location. For a period of time after you enter SOS mode, it will also send them updates if your location changes. This gives your loved ones critical information so they can understand the situation and coordinate if necessary.
How to Add an Emergency Contact
Setting this up is simple and should be a priority for every iPhone user.
- Open the Health app on your iPhone.
- Tap on your profile picture in the top-right corner, then select Medical ID.
- Tap Edit in the top-right corner.
- Scroll down to Emergency Contacts and tap “add emergency contact”.
- Select a contact from your address book and specify their relationship to you (e.g., spouse, parent, friend).
- Tap Done to save your changes.
You can add multiple emergency contacts. Choose people who are reliable and likely to be able to respond or assist in an emergency.
Understanding Your iPhone SOS Settings
You have control over how some aspects of the iPhone SOS feature work. To access these options, navigate to Settings > Emergency SOS. Here, you can customize the feature to your preference.
|
Setting |
Description |
Recommended |
|---|---|---|
|
Call with Hold and Release |
Press and hold the side and volume buttons to start a countdown to call emergency services. |
On (Default) |
|
Call with 5 Presses |
Quickly press the side button five times to start a countdown to call emergency services. |
User Preference |
|
Call Quietly |
When enabled, warning sounds and flashes from the countdown will be silenced to allow for a discreet call. |
On if you want the option for a silent emergency call. |
|
Emergency Contacts |
View and manage your emergency contacts directly from this screen. |
Review and update regularly. |
Taking a moment to review these settings can ensure the feature works exactly how you expect it to in a high-stress moment.
The Role of Medical ID
Your Medical ID is another critical component of the iPhone’s emergency features. This digital card holds vital health information that first responders can access from your Lock Screen without needing your passcode.
Information you can include in your Medical ID:
- Medical Conditions
- Allergies & Reactions
- Medications
- Blood Type
- Height and Weight
- Primary Language
To make your Medical ID accessible, ensure that “Show When Locked” is enabled within the Medical ID settings in the Health app. In an emergency, this information can speak for you when you can’t.
What Happens After an iPhone SOS Call?
Once an iPhone SOS call is completed, a few things happen automatically. As mentioned, your emergency contacts are notified with a text message containing your location. Your iPhone will display your Medical ID on the lock screen, allowing first responders to access your health information easily.
The location sharing with your emergency contacts will continue for a set period. You will receive a reminder every few hours that your location is still being shared, and you can choose to stop sharing at any time by tapping the status bar and selecting “Stop Sharing Emergency Location.” This feature provides an ongoing connection to your support system during and immediately after a crisis.
Frequently Asked Questions (FAQ)
Q1: Does using the iPhone SOS feature cost money?
No, using the iPhone SOS feature to call emergency services is free. The satellite service is also free for a promotional period with the purchase of a compatible iPhone.
Q2: Can I accidentally trigger an iPhone SOS call?
It’s possible but unlikely. The system requires you to either hold two buttons for several seconds or press one button five times rapidly, both of which are intentional actions. If you do start a call accidentally, you can hang up immediately and inform the dispatcher that it was a mistake.
Q3: Will iPhone SOS work in other countries?
Yes, the feature is designed to work internationally. Your iPhone will automatically detect the local emergency number (e.g., 112 in Europe, 000 in Australia) and connect you when you use the SOS feature.
Q4: Do I need a SIM card for iPhone SOS to work?
For standard iPhone SOS (using cellular networks), your phone needs to be able to connect to a network, which is often facilitated by a SIM, even if it’s not your own carrier’s network. For Emergency SOS via satellite, no SIM or cellular connection is needed.
Q5: How do I turn off the SOS on my iPhone?
You don’t “turn off” the SOS mode itself. The “SOS” status appears when you lack a signal from your carrier but can find another. To make it go away, you simply need to move back into an area where your carrier has service. The feature is a status indicator, not a mode you can disable.
Be Prepared, Not Scared
The iPhone SOS feature is a testament to how technology can be a powerful force for safety and security. From making an emergency call on a borrowed network to texting for help via satellite from a remote canyon, your iPhone has built-in tools that can make a life-or-death difference.
By taking a few minutes to set up your Medical ID, add emergency contacts, and familiarize yourself with how to activate a call, you are taking a proactive step toward your own safety. This feature is one you hope you never have to use, but you’ll be glad you have it if you ever do. For more in-depth information on emergency services, you can explore resources like the Wikipedia page on Emergency telephone numbers, which details the systems in place around the world.


