


Key Takeaways
- Definition: A chrome delete is a modification that hides or removes the shiny chrome trim on a vehicle, usually replacing it with matte, satin, or gloss black.
- Methods: You can achieve this look using vinyl wrap, paint, or replacing the parts entirely.
- Cost: Prices vary widely depending on whether you do it yourself or hire a professional, ranging from $50 for DIY kits to $1,000+ for professional work.
- Benefits: It protects the original trim, offers a modern aesthetic, and can often be reversed if you lease your vehicle.
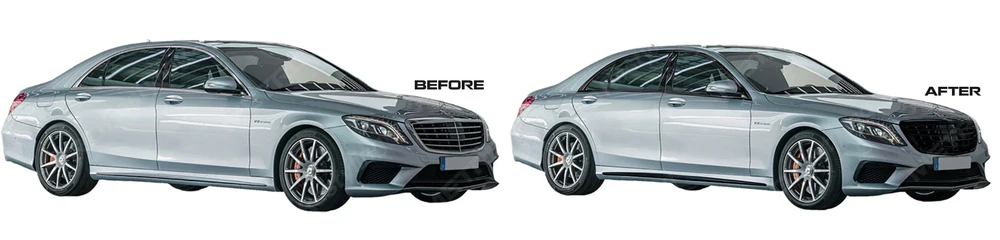
Have you ever looked at a car and thought the shiny silver parts just felt a little out of place? If you prefer a stealthy, modern, or sporty look over the traditional flashy style, you aren’t alone. This specific aesthetic preference has sparked a massive trend in the automotive world known as a chrome delete. It is one of the most popular ways to customize a vehicle today because it completely changes the character of the car without needing major mechanical surgery.
This modification is all about taking those bright, mirror-like accents found on grilles, window trims, and door handles and turning them dark. Most people opt for black, but the possibilities are endless. Whether you have a luxury sedan, a rugged truck, or a family SUV, getting rid of the chrome can make your ride look more aggressive and custom. In this guide, we will walk you through everything you need to know about deleting chrome, from the “how-to” to the “how much.”
What Exactly Is a Chrome Delete?
A chrome delete is essentially an aesthetic modification where the chrome accents on a vehicle are covered or replaced to change their color. Car manufacturers have used chrome for decades to signify luxury and style. However, trends change. In recent years, the “blacked-out” or “murdered-out” look has taken over. This style involves darkening the windows, wheels, and notably, the trim. When you perform this modification, you are effectively “deleting” the chrome from the visual appearance of the car. It is a simple concept with a huge visual impact.
The process usually targets specific areas of the car. The most common spots include the window surrounds (the trim that goes around your door glass), the front grille, side mirrors, door handles, and rear trunk emblems. By changing these from silver to black, the car often looks sleeker and more unified in its design. While black is the standard choice—available in gloss, satin, or matte finishes—some car enthusiasts choose body-colored wraps or even carbon fiber patterns. The goal is personal expression. You are taking a factory-standard vehicle and making it uniquely yours by removing the elements that don’t fit your personal taste.
Why Is the Chrome Delete Trend So Popular?
The rise of the chrome delete isn’t just a random fad; it is a shift in automotive design language. For a long time, chrome was the standard for “expensive.” If a car had chrome, it meant it was a higher trim level. But today, many luxury and performance brands offer “night packages” or “black optic” packages straight from the factory. This factory validation has made the aftermarket demand skyrocket. People realize they don’t need to buy a brand-new car to get that modern, stealthy look; they can just modify what they already have.
Another reason for its popularity is the reversible nature of the modification, especially when using vinyl wrap. Many people lease their vehicles, meaning they have to return them in stock condition after three years. Painting over chrome is permanent, but wrapping it is not. You can enjoy a customized look for the duration of your lease and then simply peel it off before turning the keys back in. This flexibility makes it a low-risk modification for almost anyone. Additionally, the vinyl acts as a protective layer. It shields the original chrome from scratches, weather, and sun damage, keeping the material underneath pristine.
Different Methods to Achieve a Chrome Delete
When you decide to go for a chrome delete, you generally have three main routes to take: vinyl wrapping, painting (often using Plastidip), or replacing the parts entirely. Each method has its own set of pros and cons depending on your budget, skill level, and desired durability. Vinyl wrapping is by far the most popular choice. It involves applying a specialized adhesive film over the chrome. It looks professional, lasts a long time, and offers the best finish options.
Painting is another route, often using rubberized spray coatings like Plasti Dip. This is a favorite among DIY enthusiasts because it is cheap and relatively easy to apply. However, the finish doesn’t always look as smooth as vinyl or factory paint, and it might not last as long. The third option is full part replacement. This means buying black trim pieces from the manufacturer or an aftermarket supplier and physically swapping out the chrome parts. This is the most durable and “factory” looking option, but it is also usually the most expensive and labor-intensive, as it often requires taking apart door panels or bumpers.
Comparison Table: Chrome Delete Methods
|
Method |
Cost |
Durability |
Difficulty (DIY) |
Reversibility |
|---|---|---|---|---|
|
Vinyl Wrap |
Moderate |
High (3-5 years) |
Medium |
High |
|
Plasti Dip/Paint |
Low |
Low to Medium |
Low |
High (if rubberized) |
|
Part Replacement |
High |
Very High |
High |
Low |
The Vinyl Wrap Process Explained
If you choose the vinyl route for your chrome delete, understanding the process can help you decide if you want to try it yourself or hire a pro. The first and most critical step is cleaning. The chrome surface must be absolutely spotless. Any wax, grease, dirt, or ceramic coating will prevent the vinyl from sticking. Installers use isopropyl alcohol and special clay bars to ensure the surface is perfectly prepped. If you skip this step, your wrap will likely peel off within weeks.
Once cleaned, the vinyl is cut to the approximate size of the trim piece. The installer peels off the backing paper and lays the vinyl over the chrome. Using a squeegee and sometimes a heat gun, they smooth the material onto the trim, working out air bubbles and stretching it around curves. This requires patience and steady hands. Finally, the excess vinyl is trimmed away using a precision knife. A great installer will tuck the edges of the vinyl behind the rubber seals of the window or the gaps in the grille so that no chrome shows through at the edges.
Choosing the Right Finish: Gloss, Satin, or Matte?
Selecting the right finish for your chrome delete is just as important as the decision to do it in the first place. The most common option is Gloss Black. This finish mimics the look of clear-coated paint and blends seamlessly with the car’s window glass and pillars. It creates a unified, shiny look that feels very “factory.” If you have a car with a glossy paint job, gloss black trim is usually the safest and most cohesive bet.
Matte Black is the complete opposite. It has zero shine and absorbs light, giving off a very rugged, flat appearance. This is often popular on trucks or off-road vehicles, or on cars that have a matte paint job. Satin Black sits right in the middle. It has a slight sheen—like silk—but isn’t as reflective as gloss. Satin is excellent for hiding fingerprints and minor scratches better than gloss, and it offers a sophisticated, high-end look. When choosing, look at the other black accents on your car. If your window pillars are matte plastic, a matte delete might look best. If they are shiny, go with gloss.
Can You DIY a Chrome Delete?
The short answer is yes, you absolutely can DIY a chrome delete, but it comes with a learning curve. There are countless kits available online that come with rolls of vinyl tape specifically sized for window trims. These kits often include the necessary tools like a squeegee and a small cutting blade. For a beginner, the cost savings are the biggest draw. You might spend $40 or $50 on materials versus hundreds at a shop.
However, it can be frustrating. Working with vinyl requires finesse. If you stretch it too much, it turns white or tears. If you don’t clean the surface well enough, it lifts. Cutting the excess vinyl without scratching your car’s paint is also a nerve-wracking experience for a novice. If you are patient and willing to watch a few tutorials, it is a very rewarding weekend project. But if you are a perfectionist who wants a flawless finish immediately, or if the parts you are wrapping are complex shapes (like a mesh grille), you might want to save yourself the headache and pay a professional.
How Much Does Professional Installation Cost?
If you decide the DIY route isn’t for you, hiring a professional shop is the next step. The cost of a professional chrome delete varies significantly based on your location, the vehicle type, and how much chrome needs to be covered. Generally speaking, a standard window trim delete on a sedan might cost between $250 and $500. If you add the grille, door handles, and emblems, the price can easily jump to $800 or even $1,200.
Luxury vehicles or cars with intricate designs often cost more because the labor time is higher. For example, removing a front bumper to properly wrap a complex grille takes time, and time is money. While the price might seem steep compared to a roll of tape, you are paying for expertise. Professionals know how to disassemble parts without breaking clips, they use high-quality cast vinyl that lasts for years, and they usually offer a warranty on their work. If the vinyl starts peeling in three months, a reputable shop will fix it for free.
Durability and Maintenance of Chrome Deletes
Once your chrome delete is installed, you need to take care of it to ensure it lasts. High-quality vinyl wraps typically have a lifespan of 3 to 5 years (sometimes up to 7) depending on how the car is stored. If your car is parked in a garage, the wrap will last much longer than if it sits out in the baking sun or freezing snow every day. UV rays are the biggest enemy of vinyl, eventually causing it to fade or crack over time.
Maintenance is relatively simple. You should hand wash the wrapped areas whenever possible. Automated car washes with stiff bristles can scratch gloss vinyl or lift the edges of the wrap. Avoid using high-pressure power washers directly on the edges of the trim, as the force can blow the vinyl off. If you chose a gloss finish, you can treat it like paint—keep it clean and you can even apply certain waxes or ceramic coatings designed for vinyl to keep it shiny and protected.
Removing a Chrome Delete: Is it Safe?
One of the biggest selling points of a vinyl chrome delete is that it is not permanent. But is removal really as easy as peeling a sticker? Generally, yes. If high-quality automotive vinyl was used (like 3M or Avery Dennison) and it hasn’t been left on the car for significantly longer than its rated lifespan, it should come off cleanly. You might need a little heat from a hairdryer or heat gun to soften the adhesive, making it easier to pull away without snapping.
However, if the vinyl was cheap or if it has been baked onto the car for a decade, removal can be a nightmare. The vinyl can become brittle, flaking off in tiny chips rather than large sheets. It might also leave behind a sticky residue that requires chemicals to remove. In rare cases, if the original chrome underneath was actually chrome-plated plastic that was already damaged or peeling, the vinyl adhesive could pull more of the chrome plating off. But for the vast majority of factory cars, the chrome underneath emerges looking brand new, having been protected by the vinyl.
Common Mistakes to Avoid
When planning a chrome delete, there are a few pitfalls that can ruin the look or durability of the project. The number one mistake is poor surface preparation. We cannot stress this enough: if there is even a speck of wax or tire shine on the trim, the vinyl will fail. Another common mistake is over-stretching the vinyl. Vinyl has a “memory.” If you stretch it too far to fit around a corner, it will eventually try to shrink back to its original shape, especially when heated by the sun. This causes the wrap to pull back and reveal the chrome underneath.
Another aesthetic mistake is mismatched blacks. If your car has gloss black pillars, putting matte black tape on the window trim right next to it can look disjointed and cheap. Always try to match the finish of the existing black accents on your car. Lastly, using the wrong tools can cause damage. Using a metal razor blade directly against the paint to trim the vinyl is a recipe for disaster. Professionals use “knifeless tape” or are extremely skilled with blades to ensure the car’s paint is never touched.
Is a Chrome Delete Right for You?
Deciding to move forward with a chrome delete is a matter of personal taste. Ask yourself what kind of “vibe” you want your car to project. If you love the classic, gleaming look of traditional luxury, keep the chrome! There is nothing wrong with it. But if you feel like your car looks a bit dated, or if you want it to look more aggressive and sporty, deleting the chrome is one of the most cost-effective transformations you can buy.
Consider your long-term plans for the car. If you are leasing, verify that you are allowed to make reversible modifications (most leases allow vinyl wrapping). If you own the car and plan to sell it soon, consider that a modified car might appeal to a narrower audience, although a clean chrome delete is generally well-received. Ultimately, car customization is about enjoying your vehicle. If looking back at your car after parking it brings a smile to your face because of that sleek black trim, then it is absolutely the right decision for you.
Tools Needed for a DIY Project
If you are feeling brave and want to tackle a chrome delete yourself, you need to gather the right supplies before you start. You don’t want to be halfway through a door handle wrap and realize you are missing a critical tool. Here is a basic checklist of what you will need:
- High-Quality Vinyl: Buy a reputable brand like 3M 2080 or Avery Dennison SW900. Do not buy the cheapest unbranded vinyl you find; it will be a nightmare to work with.
- Cleaning Supplies: Isopropyl alcohol (70% or higher), lint-free microfiber towels, and a clay bar.
- Squeegee: A felt-tipped squeegee is essential to smooth the vinyl without scratching it.
- Heat Gun: A hairdryer can work in a pinch, but a heat gun gives you the consistent temperature needed to stretch and post-heat the vinyl.
- Cutting Tools: A sharp precision knife (like an X-Acto) with plenty of spare blades. A dull blade tears vinyl. Knifeless tape is also highly recommended for cutting without risking paint damage.
What Areas Can You Chrome Delete?
While window trim is the most common target, a full chrome delete can encompass many different parts of a vehicle. The goal is usually consistency. If you blackout the windows but leave a giant chrome grille, the car might look unfinished. Here are the most popular areas to address:
- Window Trim: The strips running along the bottom and top of the side windows.
- Grille: The front grille surrounds and slats. This is often the most impactful change.
- Emblems and Badges: The manufacturer logos and model names on the trunk and grille.
- Door Handles: Often contain chrome strips or are fully chrome.
- Fog Light Bezels: The trim rings around fog lights.
- Trunk Strips: Many sedans and SUVs have a horizontal chrome bar across the trunk lid.
- Roof Rails: On SUVs, these are often silver and look great in black.
Chrome Delete on Specific Vehicles
Certain vehicles seem to be magnets for the chrome delete treatment. Tesla vehicles, for instance, used to come with heavy chrome trim. Owners wrapped them so often that Tesla eventually started offering factory “chrome delete” (black trim) as the standard on the Model 3 and Model Y. It simply looked more modern and fit the high-tech aesthetic of the brand better.
Trucks are another huge category. A Ford F-150 or Chevy Silverado with a chrome package looks like a classic work truck. But take that same truck, delete the chrome, add some black wheels, and it suddenly looks like a high-performance off-roader. Luxury sedans like BMWs and Mercedes also benefit greatly. These cars often have beautiful body lines that are distracted by bright chrome flashes. Darkening the trim allows the viewer’s eye to focus on the shape and design of the car’s bodywork rather than the shiny decorations.
Conclusion: A Modern Touch for Any Ride

In the world of automotive customization, few modifications offer as much “bang for the buck” as a chrome delete. It is a subtle change that makes a massive difference, transforming a car from looking like a standard commuter vehicle to something special and personalized. Whether you choose to spend a weekend carefully applying vinyl yourself or drop your car off at a professional shop for a transformation, the results are almost always satisfying.
Remember, the key is quality. Use good materials, prep the surface correctly, or hire a reputable installer. By doing so, you ensure that your vehicle not only looks fantastic but stays looking that way for years to come. If you are looking for more tech and style updates, perhaps check out resources like https://siliconvalleytime.co.uk/ for the latest trends. Customizing your car is a journey, and deleting the chrome is a fantastic first step into a larger world of automotive enthusiasm.
Frequently Asked Questions (FAQ)
1. Is a chrome delete permanent?
No, typically it is not permanent if you use vinyl wrap or Plasti Dip. These materials can be peeled off, restoring the original chrome underneath. However, if you paint the chrome with automotive paint, that is permanent.
2. How long does a chrome delete last?
A professionally installed vinyl chrome delete usually lasts between 3 to 5 years. Garage-kept vehicles may see it last even longer. DIY jobs vary based on the skill of the installer and material quality.
3. Does it damage the car?
No, vinyl wrap actually protects the chrome trim from UV rays, scratches, and rock chips. When removed properly, the chrome underneath should look brand new.
4. Can I go through a car wash?
Hand washing is recommended for the best longevity. However, touchless car washes are generally safe. Avoid car washes with stiff brushes, as they can scratch gloss vinyl and lift the edges of the wrap.
5. How much does it cost?
DIY kits can cost as little as $50. Professional installation ranges widely, typically from $200 for simple window trim to over $1,000 for a full vehicle package including grilles and emblems.
For further reading on the history and types of vehicle customization, you can visit this Wikipedia page which discusses the plating process that this modification seeks to cover.


