


That phantom hissing sound. The unexpected water bill spike. The constant, annoying trickle long after you’ve flushed. A running toilet is more than just a minor nuisance; it’s a silent drain on your wallet and a waste of a precious resource. Every minute it runs, it can waste gallons of water, leading to hundreds of dollars in extra utility costs over a year. The good news is that you don’t need to be a master plumber to solve this common household problem. For most, learning how to fix a running toilet is a simple, straightforward DIY project you can tackle in under an hour with just a few basic tools and a little guidance.
This comprehensive guide will walk you through everything you need to know. We’ll start by helping you understand the inner workings of your toilet tank, diagnose the specific cause of the problem, and then provide step-by-step instructions for each potential fix. By the end, you’ll feel confident in your ability to silence that running toilet for good, saving water, money, and your sanity.
Understanding the Parts Inside Your Toilet Tank
Before you can tackle how to fix a running toilet, it helps to know what you’re looking at. When you lift the tank lid, you’ll see a collection of parts working together to control the flow of water. While they might look complex at first, their functions are quite simple. Familiarizing yourself with these components is the first step toward a successful repair.
At the center of the tank is the flush valve, a large plastic or brass fitting that includes the overflow tube. This is the main gateway for water rushing from the tank into the bowl when you flush. At the base of the flush valve is the flapper (or sometimes a tank ball), a rubber seal that lifts to allow the flush and then drops back down to stop water from flowing into the bowl. On the side, you’ll find the fill valve (also known as a ballcock), which is responsible for refilling the tank with water after each flush. Connected to the fill valve is either a float ball (a ball on a long arm) or a float cup (a cup that slides up and down the fill valve shaft). This float tells the fill valve when the water has reached the correct level and it’s time to shut off. Finally, the handle and chain connect the external flush handle to the flapper, initiating the whole process. Understanding these key players will make diagnosing the issue much easier.
First Steps: Safety and Preparation
Before you dive into the tank, a little preparation will make the entire process smoother and cleaner. Taking these initial steps ensures you can work without creating a watery mess or causing any unintended damage. It’s a crucial part of learning how to fix a running toilet correctly and safely.
First, you need to shut off the water supply to the toilet. Look for a small valve, usually an oval-shaped handle, on the wall or floor behind the toilet. Turn this valve clockwise until it stops. This will prevent any more water from entering the tank while you work. Next, you need to drain the tank. Flush the toilet and hold the handle down to let as much water as possible empty into the bowl. You’ll be left with a small amount of water at the bottom, which is perfectly normal. Use a sponge or an old towel to soak up this remaining water so you have a dry workspace.
Once the tank is empty, place some old towels or a bucket on the floor around the base of the toilet. This is a precautionary measure to catch any drips or spills that might occur while you’re adjusting or replacing parts. Finally, gather your tools. For most toilet repairs, you won’t need much—perhaps a pair of adjustable pliers, scissors to trim a new chain, and a sponge. Having everything within arm’s reach will save you from making trips back and forth once you get started.
Diagnosing the Problem: Why Is My Toilet Running?
With the tank empty and your workspace prepped, it’s time to play detective. A running toilet is a symptom, and your job is to find the underlying cause. There are a few common culprits, and a simple process of elimination will help you pinpoint the exact issue. This diagnostic step is the most critical part of understanding how to fix a running toilet effectively.
The Food Coloring Test: If you’re unsure if your toilet is even running, try this simple trick. Remove the tank lid and add a few drops of dark food coloring to the tank water. Do not flush. Wait for about 15-20 minutes. If you see the colored water appearing in the toilet bowl, you have a leak, and it’s almost certainly caused by a faulty flapper or a problem with the flush valve seat. This is the most common reason for a running toilet.
Observing the Water Level: Another key diagnostic step is to observe the water level in the tank. If the water level is too high, it will be constantly spilling into the overflow tube. This creates a continuous draining and refilling cycle, causing the toilet to run intermittently. This issue points directly to a misadjusted or faulty fill valve float.
By performing these simple checks, you can quickly narrow down the possibilities and focus your repair efforts on the right component. This saves you time and ensures you’re not replacing parts that are working perfectly fine.
Fix #1: Adjusting the Fill Valve Float
One of the most frequent and easiest-to-solve reasons for a running toilet is an improperly set float. The float’s job is to tell the fill valve when to stop filling the tank. If the float is set too high, the water level will rise above the overflow tube, and the water will constantly drain away, triggering the fill valve to run continuously or intermittently. This is a classic problem, and learning to adjust the float is a fundamental skill in knowing how to fix a running toilet.
There are two main types of floats you’ll encounter: the older-style float ball on an arm and the more modern float cup that slides on the fill valve shaft.
Adjusting a Float Ball (Arm Style)
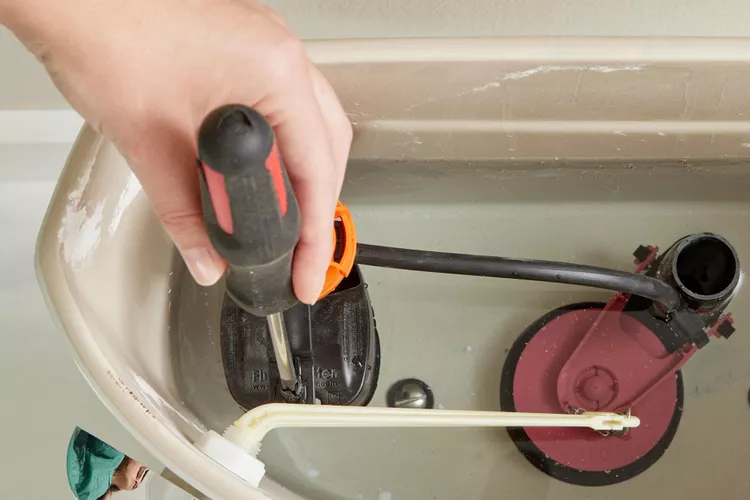
If you have a large ball floating on the end of a metal arm, the adjustment is simple. The goal is to lower the level at which the float shuts off the water. You can do this in two ways. First, look for a small adjustment screw on top of the fill valve where the arm connects. Using a screwdriver, turn the screw counter-clockwise. This will lower the float arm, causing it to shut off the water sooner. If there is no screw, you can gently bend the metal arm downwards. Apply slow, steady pressure to the middle of the arm to bend it slightly. This will have the same effect, lowering the water level in the tank.
Adjusting a Float Cup (Vertical Style)
Modern toilets often use a more compact float cup. This cup moves vertically along the fill valve. To adjust it, you’ll typically find an adjustment screw or a spring clip attached to a long, thin metal rod connected to the float. If it has a screw, turn it counter-clockwise to lower the float and the water level. If it uses a spring clip, you’ll need to pinch the clip and slide the entire float assembly down along the rod. The ideal water level should be about one inch below the top of the overflow tube. After making an adjustment, turn the water supply back on and let the tank fill to check the new level.
Fix #2: Dealing with the Flapper Chain
Another simple but very common issue that causes a running toilet is a problem with the chain connecting the flush handle to the flapper. If the chain is too short, it will hold the flapper slightly open, preventing it from creating a proper seal and allowing water to constantly leak into the bowl. If the chain is too long, it can get tangled or caught underneath the flapper, also preventing a good seal. Getting the chain length just right is a quick fix and a key part of knowing how to fix a running toilet.
To check the chain, simply look inside the tank. The chain should have just a little bit of slack—about half an inch is perfect. It shouldn’t be taut, and it shouldn’t be dangling with excessive length. If the chain is too long, you can easily adjust it. Most chains have multiple holes on the handle arm or can be unclipped and re-clipped onto a different link to shorten them. You can also use a pair of wire cutters or scissors to trim off the excess length to prevent it from getting caught.
If the chain is too short, you’ll need to readjust it to a lower link to create more slack. If there’s no more length to give, you may need to purchase a new chain, which is an inexpensive part found at any hardware store. After adjusting, give the toilet a test flush to ensure the flapper lifts fully and then drops squarely back onto the flush valve seat without any interference from the chain.
Fix #3: Replacing a Worn-Out Flapper
If the food coloring test revealed a leak and you’ve confirmed the chain is correctly adjusted, the next likely culprit is the flapper itself. Over time, the rubber or silicone on the flapper can degrade, warp, or accumulate mineral deposits. This prevents it from forming a watertight seal over the flush valve opening, leading to a slow, persistent leak into the bowl. This is arguably the most common cause of a running toilet, and replacing the flapper is a core skill for anyone wanting to learn how to fix a running toilet.
Replacing a flapper is a simple and inexpensive repair. First, make sure the water is shut off and the tank is drained. The flapper is attached to the base of the overflow tube, usually by two small “ears” that clip onto pegs on either side of the tube. Carefully unhook these ears. Then, unclip the chain from the flush handle arm. Now you can remove the old flapper.
Take the old flapper with you to the hardware store to ensure you buy the correct replacement model. Toilets come in various designs, and getting a compatible flapper is essential for a good seal. Some are specific to the toilet’s brand and model, while others are universal. Installing the new flapper is just the reverse of removing the old one. Clip the new flapper’s ears onto the pegs of the overflow tube, and then attach the new chain to the flush handle arm. Adjust the chain to have about half an inch of slack, as we discussed earlier. Turn the water back on, let the tank fill, and listen. The hissing sound should be gone.
Fix #4: Cleaning the Flush Valve Seat
You’ve replaced the flapper, but the toilet is still running. What gives? Sometimes, the problem isn’t the flapper itself, but the surface it’s supposed to seal against: the flush valve seat. This is the plastic or brass ring at the bottom of the tank that the flapper rests on. Over the years, this seat can become rough or accumulate mineral buildup and grime. Even a brand-new flapper can’t create a perfect seal on a dirty or corroded surface. Cleaning the valve seat is an often-overlooked but crucial step when you’re figuring out how to fix a running toilet.
To clean the seat, you’ll first need to shut off the water and drain the tank, then remove the flapper. Once you have clear access to the valve seat, inspect it with your fingers. Feel for any nicks, scratches, or rough patches. For simple cleaning, use a non-abrasive scouring pad or a cloth with a bit of vinegar or a gentle cleaning solution. Rub the surface of the ring firmly to remove any buildup or residue. Be careful not to use anything too harsh, like steel wool, as this could scratch a plastic valve seat and make the problem worse.
After you’ve cleaned the surface and it feels smooth to the touch, you can reinstall the flapper. Turn the water supply back on and allow the tank to refill. This simple cleaning can often be the final step needed to create that perfect, watertight seal and finally stop the leak. If the seat is severely corroded or cracked, you may need to consider replacing the entire flush valve, which is a more involved repair.
Fix #5: Replacing the Entire Fill Valve
If your toilet runs intermittently, and you’ve confirmed the flapper isn’t leaking and the water level is correct, the problem likely lies with the fill valve itself. The internal seals of a fill valve can wear out over time, causing it to fail to shut off completely or to turn on and off randomly. This is often referred to as a “phantom flush.” When this happens, adjusting it won’t work, and the entire assembly needs to be replaced. While it sounds intimidating, replacing a fill valve is a manageable task and a valuable part of mastering how to fix a running toilet.
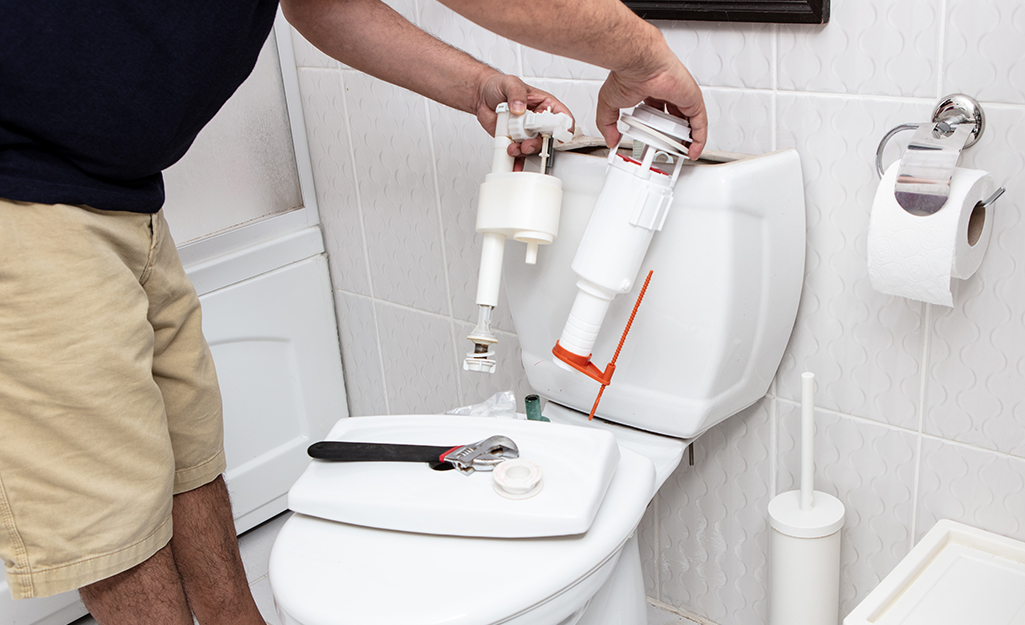
First, buy a new fill valve. Universal replacement kits are widely available and fit most standard toilets. Turn off the water supply and drain the tank completely, sponging out any remaining water. Next, you need to disconnect the old fill valve. Place a bucket or towel under the tank to catch residual water. Unscrew the water supply line from the bottom of the fill valve, located on the outside and underneath the tank. Then, unscrew the large plastic locknut that holds the fill valve in place. Once this nut is off, you can lift the old fill valve straight out of the tank.
To install the new one, simply follow the instructions that came with your kit. Generally, you’ll place the new fill valve into the hole in the tank, ensuring the included rubber washer is on the inside. From underneath the tank, hand-tighten the new locknut. Reconnect the water supply line, being careful not to over-tighten it. Finally, attach the small refill tube from the new fill valve to the overflow tube. Many modern kits, like those from innovative tech companies featured on sites like https://siliconvalleytime.co.uk/, are designed for tool-free installation. Adjust the float on the new valve to set the correct water level, turn the water on, and check for leaks.
Advanced Repairs: When to Call a Plumber
While the majority of running toilet issues can be solved with the fixes outlined above, there are times when the problem is more complex. Knowing your limits is just as important as knowing how to fix a running toilet. If you’ve tried all the basic repairs and the toilet is still running, or if you encounter a situation you’re not comfortable with, it’s time to call a professional plumber.
One such scenario is a cracked flush valve or overflow tube. If you notice a crack in the main plastic assembly at the center of the tank, this requires replacing the entire flush valve. This is a much more involved job, as it requires you to completely detach the toilet tank from the bowl. This involves draining the tank, unbolting it, replacing the part, and then re-bolting it with new gaskets to prevent leaks. If not done correctly, you could end up with a major leak around the base of the tank.
Another sign to call a pro is if you see water pooling around the base of your toilet. This could indicate a problem with the wax ring that seals the toilet to the floor, or it could be a leak from the tank bolts. These issues are separate from a running toilet but can be discovered during your investigation. Finally, if you’re simply not comfortable with any part of the repair process, there’s no shame in calling for help. A professional plumber can diagnose and fix the problem quickly and correctly, giving you peace of mind.
Table: Troubleshooting a Running Toilet
|
Symptom |
Likely Cause |
Recommended Fix |
|---|---|---|
|
Toilet runs constantly or intermittently; no water in the bowl from a food coloring test. |
Water level in the tank is too high and spilling into the overflow tube. |
Adjust the fill valve float to lower the water level. |
|
Slow, constant trickling sound; color from the food coloring test appears in the bowl. |
The flapper is not sealing properly. |
Check the flapper chain for proper length. If the chain is fine, replace the flapper. |
|
Toilet still runs after replacing the flapper. |
The flush valve seat is dirty, corroded, or damaged. |
Clean the flush valve seat with a non-abrasive pad. |
|
Toilet refills randomly for a few seconds when not in use (“phantom flush”). |
The fill valve is faulty and slowly leaking, causing the water level to drop and trigger a refill. |
Replace the entire fill valve assembly. |
|
Water is leaking from where the tank meets the bowl. |
The tank-to-bowl gasket or bolts are failing. |
This is an advanced repair. It may be best to call a plumber. |
The Cost of a Running Toilet vs. The Cost of Repair
Many people put off learning how to fix a running toilet because they assume it will be an expensive or complicated endeavor. However, the reality is that the cost of inaction far outweighs the cost of a simple DIY repair. A moderately running toilet can waste over 200 gallons of water per day. Depending on your local water rates, that can add up to $50, $70, or even over $100 in extra water costs each month. Over a year, a single running toilet could cost you hundreds, if not thousands, of dollars.
Now, let’s compare that to the cost of repair parts. A new toilet flapper, which is the most common solution, typically costs between $5 and $15. A new fill valve, a more comprehensive fix, usually runs between $15 and $30 for a universal kit. Even if you need to buy both, you’re looking at a total investment of less than $50. The tools required, like pliers or a sponge, are items many people already have around the house.
For a small, one-time investment of a few dollars and about 30 minutes of your time, you can save a significant amount of money on your utility bills month after month. The return on investment is immediate and substantial. Beyond the financial savings, you’re also conserving a massive amount of water, which is an environmentally responsible choice. The math is clear: fixing a running toilet is one of the most cost-effective home repairs you can possibly make.
Conclusion: Your Final Step to a Silent Toilet
You’ve now walked through all the common causes and solutions for that pesky running toilet. From simple adjustments of the float and chain to replacing key components like the flapper and fill valve, you are equipped with the knowledge to tackle this project confidently. The process of learning how to fix a running toilet is empowering, saving you from a costly plumbing bill and putting an end to the wasteful flow of water and money down the drain. Remember to work methodically, starting with the simplest fixes first and moving on to part replacements only when necessary. By taking the time to understand the simple mechanics inside your toilet tank, you’ve gained a valuable home maintenance skill.
A quiet bathroom is now within your reach. No more phantom hissing, no more surprise water bills, and no more wasted resources. You have successfully diagnosed and resolved one of the most common household plumbing issues all on your own. For those interested in the history and technological evolution of this essential household fixture, the Wikipedia page on the flush toilet provides a wealth of fascinating information on its development over the centuries.
Frequently Asked Questions (FAQ)
How can I tell for sure if my toilet is running?
The easiest way is the food coloring test. Add a few drops of food coloring to the water in the tank. Wait 15-20 minutes without flushing. If you see colored water appear in the toilet bowl, you have a leak from the tank to the bowl, which is the most common type of running toilet issue.
Is it hard to replace a toilet flapper?
Not at all. Replacing a toilet flapper is one of the easiest home repairs. It requires no special tools and typically takes less than 15 minutes. You just need to shut off the water, drain the tank, unhook the old flapper from the overflow tube and chain, and clip the new one in its place.
Why does my toilet run for a few seconds every hour?
This is often called a “phantom flush.” It’s caused by a very slow leak, either from the flapper or through a faulty fill valve. The water level in the tank slowly drops until it’s low enough to trigger the fill valve to turn on for a few seconds to refill it. Replacing the flapper and fill valve will usually solve this.
What tools do I need to fix a running toilet?
For most common fixes, you may not need any tools at all. However, it’s good to have a pair of adjustable pliers (for loosening tight water line connections), scissors (for trimming a new flapper chain), and a sponge and bucket for cleaning up water in the tank and on the floor.
When should I give up and call a plumber?
You should call a plumber if you’ve tried the common fixes (adjusting the float, chain, and replacing the flapper and fill valve) and the toilet still runs. You should also call a professional if you discover a crack in the porcelain or if the job requires removing the toilet tank from the bowl, as this is a more advanced repair that can cause major leaks if not done correctly.


