


Creating a space in your home dedicated to movies, music, and gaming is more than just setting up a TV. It’s about building an experience. A well-designed home entertainment center can transform your living room into a personal cinema, a concert hall, or an epic gaming arena. This guide will walk you through everything you need to know, from picking the right gear to arranging your furniture for the best possible experience. We’ll cover planning, acoustics, displays, audio, and all the little details that make a big difference. Get ready to build the entertainment hub of your dreams.
Key Takeaways
- Plan First: Measure your space, set a budget, and decide on the primary use (movies, gaming, music) before buying anything.
- Display is Key: Choose between a TV (like OLED or QLED) for bright rooms or a projector for a true cinema feel in a dark space. Match the size to your room and seating distance.
- Audio Matters: Don’t rely on TV speakers. A soundbar is a simple upgrade, while an AV receiver with surround sound speakers provides the most immersive experience.
- Tame the Clutter: Effective cable management and proper ventilation are crucial for safety, performance, and a clean look.
- Future-Proof: Invest in gear with modern standards like 4K HDR, Dolby Atmos, and Wi-Fi 6 to ensure your setup stays relevant for years.
H2: Planning Your Home Entertainment Center
Before you buy a single piece of equipment, the most important step is to plan. A great home entertainment center starts with a solid foundation built on understanding your space, needs, and budget. First, grab a tape measure and get the exact dimensions of your room. Note the wall where you plan to place the screen, the distance to your primary seating area, and the locations of windows and doors. This will determine the maximum screen size you can comfortably view and how you can arrange your speakers. Next, define the primary purpose of your setup. Will it be mostly for family movie nights, intense gaming sessions, or listening to music? Your answer will guide your choices—gamers might prioritize a TV with a high refresh rate, while cinephiles may want a projector and a top-tier surround sound system. Finally, set a realistic budget. It’s easy to get carried away, so decide on a total amount you’re willing to spend and allocate it across the main components: display, audio, furniture, and accessories.
H3: Assessing Your Room and Space
The room itself is a critical component of your home entertainment center. Its size, shape, and surfaces all impact your audio and video experience. A large, open-concept living room will have different acoustic challenges than a smaller, enclosed den. Hard surfaces like hardwood floors, large windows, and bare walls reflect sound, which can make dialogue muddy and sound effects harsh. You can improve room acoustics by adding soft materials to absorb sound. Consider an area rug, thick curtains over windows, and even acoustic panels on the walls if you’re serious about sound quality. Think about light control as well. Glare from windows or lamps can wash out the picture on a TV screen and make a projector image nearly unwatchable. Blackout curtains are a fantastic investment for any media room. Also, consider the electrical outlets. Are there enough near your planned setup? A dedicated 15-amp or 20-amp circuit is ideal for a high-powered system to prevent tripped breakers.
H2: Choosing Your Main Display: TV vs. Projector
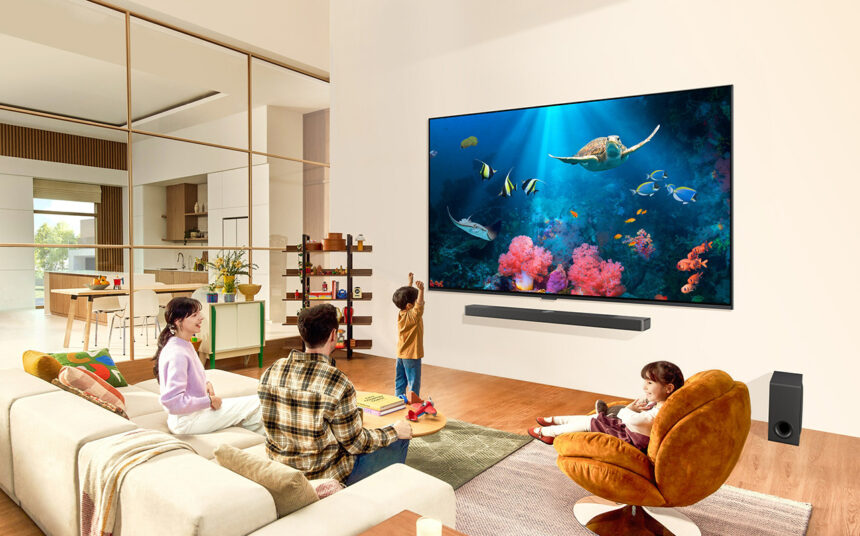
The centerpiece of any home entertainment center is the screen. The two main choices are a television or a projector, and each has its strengths. Televisions, especially modern 4K HDR models with OLED or QLED technology, offer incredible brightness, vibrant colors, and deep blacks. They are perfect for rooms with ambient light, as their bright picture can cut through glare. TVs are also simpler to set up and come in a wide range of sizes to fit almost any space and budget. They are the go-to choice for general-purpose viewing, including daytime TV watching and gaming.
On the other hand, if you want a truly cinematic, larger-than-life experience, a projector is the way to go. Projectors can create images of 100 inches, 120 inches, or even larger for a fraction of the cost of a similarly sized TV. This immersive scale is unmatched for movie nights. However, projectors require a dark room to look their best, as ambient light will wash out the image. You will also need a separate screen and a more involved installation process. For a dedicated home theater room where you can control the lighting, a projector setup offers an unparalleled experience.
H4: Understanding Screen Size and Viewing Distance
Getting the right screen size for your room is crucial for a comfortable and immersive viewing experience. A screen that’s too large for your space can cause eye strain, while one that’s too small will feel underwhelming. A simple rule of thumb is to determine your seating distance and use that to find the ideal screen size. For a 4K TV, a common recommendation is that your seating distance should be about 1 to 1.5 times the diagonal screen size. For example, if you have a 65-inch TV, you should sit between 65 and 97.5 inches (or roughly 5.5 to 8 feet) away. For a 1080p TV, you’ll want to sit a bit further back, around 1.5 to 2.5 times the screen size, to avoid seeing individual pixels. For projectors, the immersive feel is the main goal, so you can often go with a larger screen relative to your seating distance. Ultimately, personal preference plays a big role, so use these guidelines as a starting point.
|
Screen Size (Diagonal) |
Recommended 4K Viewing Distance |
Ideal Room Size |
|---|---|---|
|
55 inches |
4.5 ft – 7 ft |
Small to Medium |
|
65 inches |
5.5 ft – 8 ft |
Medium |
|
75 inches |
6 ft – 9.5 ft |
Medium to Large |
|
85 inches |
7 ft – 10.5 ft |
Large |
|
100+ inches (Projector) |
8 ft+ |
Large/Dedicated |
H2: Building Your Sound System
Great video is only half the story. To create a truly immersive home entertainment center, you need audio that matches the quality of your picture. The built-in speakers on modern flat-panel TVs are notoriously weak due to their thin design. Upgrading your sound is one of the most impactful improvements you can make. The two main paths are a soundbar or a full surround sound system with an AV receiver and separate speakers. A soundbar is the simplest solution. It’s a long, thin bar containing multiple speakers that sits below your TV. Many come with a wireless subwoofer for deep bass. Setups like Dolby Atmos soundbars can even simulate overhead sound for a more three-dimensional audio experience. They are easy to install and offer a massive upgrade over TV speakers with minimal clutter. For those who want the best possible audio, a component system is the answer. This involves an Audio/Video (AV) receiver and a set of individual speakers placed around the room.
H3: Soundbars vs. AV Receivers + Speakers
Choosing between a soundbar and an AV receiver system depends on your budget, space, and desire for audio fidelity. A soundbar is a fantastic plug-and-play solution. It’s perfect for apartments, bedrooms, or living rooms where you want better sound without running wires everywhere. High-end soundbars can be surprisingly effective at creating a wide, immersive soundstage. An AV receiver, however, is the true heart of a high-performance home entertainment center. It acts as the central hub, letting you connect all your devices—like a Blu-ray player, game consoles, and streaming boxes—and switch between them easily. It also decodes advanced audio formats like Dolby Atmos and DTS:X. Paired with a 5.1, 7.1, or even a larger speaker setup, an AV receiver delivers true surround sound, with audio coming from all around you. This component approach also allows you to upgrade individual pieces over time, such as swapping out your front speakers or adding more channels. While it requires more setup and a larger budget, the result is unparalleled audio immersion.
H5: What Is Dolby Atmos?
You’ve likely seen the Dolby Atmos logo on everything from movie theaters to headphones, but what is it? Dolby Atmos is a surround sound technology that goes beyond traditional channel-based audio (like 5.1 or 7.1). Instead of assigning sounds to specific speakers, it treats sounds as individual “objects” that can be placed and moved anywhere in a three-dimensional space. This includes overhead. For a home entertainment center, this means you can hear a helicopter flying above you or rain falling from the ceiling. To get the full Dolby Atmos effect, you need a compatible AV receiver or soundbar and speakers that can create height channels. This can be done with in-ceiling speakers or with special upward-firing speakers that bounce sound off your ceiling. The result is a soundscape that is incredibly realistic and enveloping, putting you right in the middle of the action. It adds a vertical dimension to your audio that makes movies and games feel more alive than ever before.
H2: Connecting Your Sources and Streaming Devices
Your display and speakers are nothing without content. The devices that provide your movies, shows, and games are essential sources for your home entertainment center. This can include a variety of components, and a good setup makes it easy to switch between them. Common sources include Blu-ray players (especially 4K Ultra HD Blu-ray for the absolute best picture quality), video game consoles like the PlayStation 5 and Xbox Series X, and cable or satellite boxes. The most popular source for many people today is a dedicated streaming media player. Devices like the Apple TV 4K, Roku Ultra, NVIDIA SHIELD, and Amazon Fire TV Cube offer access to all major streaming services—Netflix, Hulu, Disney+, Max, and more—often with a better interface and performance than the smart apps built into your TV. An AV receiver is great for managing these sources, allowing you to connect everything to the receiver and run just one HDMI cable to your TV.
H6: The Role of a Universal Remote
With so many different devices, you can quickly find yourself buried in a pile of remote controls. A high-quality universal remote is a small investment that can dramatically improve the usability of your home entertainment center. Instead of juggling separate remotes for your TV, soundbar, streaming box, and Blu-ray player, a universal remote can be programmed to control everything. More advanced models, like those from Logitech’s Harmony line (though discontinued, they remain popular) or other smart remotes, use activities or scenes. For example, you can have a “Watch Movie” button that automatically turns on your TV, sets it to the correct input, powers on your AV receiver, and dims your smart lights. This simplifies operation for everyone in the family and adds a touch of sophistication to your setup. Some can even be controlled with voice commands through Amazon Alexa or Google Assistant, making your entertainment experience seamless and effortless.
H2: Choosing the Right Furniture and Cabinetry
The furniture you choose for your home entertainment center does more than just hold your equipment; it defines the look and feel of your space and plays a critical role in functionality. A media console or TV stand is the most common choice. When selecting one, make sure it is wide enough to safely support your television if you aren’t wall-mounting it. Look for a unit that is sturdy and has a weight capacity well above that of your components. Functionality is key. You’ll want shelving that is deep and tall enough to accommodate your AV receiver, which can be quite large and generate a lot of heat. Open-backed shelving or cabinets with large cutouts are essential for cable management and ventilation. Enclosed cabinets with glass doors allow remote control signals to pass through while keeping dust off your gear. For a more integrated look, custom built-in cabinetry can create a stunning and seamless media wall that perfectly fits your room and equipment.
H2: Mastering Cable Management
A tangled mess of wires is the enemy of a clean and professional-looking home entertainment center. Poor cable management not only looks bad but can also be a safety hazard and make it difficult to troubleshoot problems or add new components. Planning your cable routing from the start will save you a major headache later. Use cable ties (velcro ties are great because they are reusable), zip ties, or flexible cable sleeves to bundle wires together. For example, you can group all the cables running from your sources to the AV receiver into one neat bundle. Adhesive cable clips can be used to run wires along the back of your media console or up the wall to a mounted TV. For the cleanest possible look when wall-mounting a TV, consider an in-wall cable management kit. These kits provide a channel behind the drywall to pass your HDMI and power cords through, completely hiding them from view. Labeling your cables at both ends is another pro tip that makes future upgrades a breeze.
H2: Power Protection and Safety
All the expensive electronics in your home entertainment center are vulnerable to power surges, which can be caused by lightning strikes, utility grid switching, or even powerful appliances cycling on and off in your home. A simple power strip offers no protection. You need to invest in a quality surge protector. A surge protector diverts excess voltage away from your equipment, sacrificing itself to save your TV, receiver, and game consoles. When shopping for one, look for a high joule rating (2,000 or more is good) and a connected equipment warranty. For an even higher level of protection, consider an Uninterruptible Power Supply (UPS). A UPS contains a battery that provides temporary power during a blackout. This not only gives you time to shut down your equipment safely (especially important for projectors with cooling fans) but also provides superior power filtering and surge protection. This small investment can save you from having to replace thousands of dollars worth of gear.
H3: Ensuring Proper Ventilation
High-performance electronics generate heat. An AV receiver, game console, and even some TVs can get surprisingly warm during operation. Without proper airflow, this heat can build up, leading to performance throttling, random shutdowns, and even permanent damage that can shorten the lifespan of your components. This is a critical safety and longevity consideration for your home entertainment center. Never stack components directly on top of each other. Always leave several inches of empty space above and around any device with cooling vents, especially your AV receiver. If you are placing gear inside a cabinet, make sure it has an open back or large ventilation cutouts. For enclosed cabinets, you may need to install small, quiet cooling fans to actively exhaust hot air. These are inexpensive and can be a lifesaver for your equipment, ensuring your system runs reliably for years to come.
H2: Integrating Smart Home Features
Your home entertainment center can become even more powerful and convenient when integrated with your smart home ecosystem. The most impactful smart home addition is often smart lighting. Using smart bulbs or smart switches, you can create lighting scenes that activate with a single button press or voice command. Imagine saying, “Hey Google, it’s movie time,” and having your main lights dim to 10%, your accent lights turn blue, and your TV turn on. This level of automation elevates the entire experience. You can use smart plugs to control power to devices that don’t need to be on all the time. Smart home integration can also tie into your universal remote or voice assistant to control your entire setup. As you get more advanced, you can link other devices, like smart blinds that automatically close when you start a movie. The possibilities are extensive and can add a layer of magic to your daily routine. For more ideas on how tech can transform your home, you might find interesting articles on platforms like https://siliconvalleytime.co.uk/.
####### H7: A Quick Buyer’s Checklist
Feeling ready to start shopping? Keep this checklist handy to make sure you don’t forget anything important as you build out your dream home entertainment center.
- Display: 4K HDR TV (OLED/QLED) or Projector & Screen
- Audio: Soundbar with Subwoofer or AV Receiver & Speaker Set (5.1 or more)
- Sources: 4K Blu-ray Player, Streaming Device (Apple TV, Roku, etc.), Game Console
- Furniture: Media Console or Cabinet with good ventilation
- Cables: High-Speed HDMI 2.1 cables, Speaker Wire, Subwoofer Cable
- Power: Surge Protector or UPS
- Accessories: Universal Remote, Cable Management Supplies (ties, sleeves), Wall Mount (optional)
- Lighting: Smart Bulbs or Dimmers (optional)
H2: Budgeting for Your Setup
Building a home entertainment center can range from a few hundred dollars to tens of thousands. It’s important to set a budget that works for you. You don’t have to buy everything at once. You can start with a good TV and a soundbar and then upgrade over time.
- Entry-Level (Under $1,500): Focus on a good quality 55″ or 65″ 4K LED TV from a reputable brand like TCL or Hisense. Pair it with a budget-friendly soundbar and subwoofer combo. Use the TV’s built-in smart apps for streaming.
- Mid-Range ($1,500 – $4,000): This is the sweet spot for many. You can get a high-quality 65″ or 75″ OLED or QLED TV, a capable Dolby Atmos soundbar, or an entry-level AV receiver with a 5.1 speaker package. Add a dedicated streaming box and a 4K Blu-ray player.
- High-End ($4,000+): At this level, you can look at large 77″+ OLED TVs or a 4K laser projector setup. Invest in a powerful AV receiver with a 7.1.4 Dolby Atmos speaker configuration. Consider adding acoustic treatments to your room and professional calibration for the best possible performance.
Remember to allocate about 10% of your budget for cables, mounts, and power protection.
######## H8: The Importance of Future-Proofing
Technology moves fast, and you want the home entertainment center you build today to last for years to come. “Future-proofing” means choosing components with modern standards that will remain relevant. When buying a TV or AV receiver, look for HDMI 2.1 ports. This standard is essential for high-frame-rate 4K/120Hz gaming from the latest consoles and supports features like eARC (Enhanced Audio Return Channel), which allows you to send high-quality audio like Dolby Atmos from your TV to your receiver or soundbar. For wireless connectivity, look for Wi-Fi 6 support in your streaming devices and TV for faster, more reliable streaming. In audio, Dolby Atmos and DTS:X are the current immersive formats, so ensure your audio gear supports them. While you can’t predict every future innovation, investing in these key technologies ensures your system won’t feel outdated in just a year or two.
######### H9: Soundproofing Basics for Better Audio
While room acoustics focus on how sound behaves inside your room, soundproofing is about preventing sound from getting out and annoying your family or neighbors. True soundproofing is complex and often involves construction, but there are simple steps you can take to make a difference. The first step is to seal air gaps. Sound travels through air, so use acoustic caulk to seal gaps around doors, windows, and electrical outlets. A solid-core door is much more effective at blocking sound than a standard hollow-core door. Placing a draft stopper at the bottom of the door helps too. For shared walls, a thick bookshelf filled with books can help absorb and block some noise. If you live in an apartment, placing your subwoofer on a foam isolation pad can decouple it from the floor, reducing the amount of bass that travels to your downstairs neighbors. These small adjustments can significantly improve the peace in your household.
########## H10: Wall-Mounting Your TV Safely
Wall-mounting your television is a popular choice for a modern, clean home entertainment center. It saves space and allows you to place the TV at the perfect viewing height. However, safety is paramount. First, ensure you buy a mount that is rated for your TV’s size and weight. There are different types of mounts: fixed, tilting, and full-motion. A tilting mount is a great compromise, allowing you to angle the screen down to reduce glare. When installing, it is absolutely critical to attach the mount to wall studs. Drywall alone will not support the weight of a TV. Use a stud finder to locate the studs and use the lag bolts that come with the mount to secure it firmly. Double-check that it is level before hanging the TV. If you are not confident in your DIY skills, it is well worth the money to hire a professional to mount it for you.
########### H11: The Final Touch: Lighting
Proper lighting is an often-overlooked but crucial element of a great home entertainment center. The goal is to reduce eye strain and enhance the on-screen image without causing distracting glare. The best solution is bias lighting, which is a soft, neutral light (ideally at 6500K color temperature) placed behind your TV. This light strip raises the average ambient light in the room, which makes your pupils contract slightly. This causes on-screen blacks to appear deeper and reduces the eye fatigue that comes from staring at a bright screen in a dark room. You can buy simple USB-powered LED strips for this purpose. Beyond bias lighting, consider your overall room lighting. Install dimmers on your main overhead lights so you can lower them for movie night. Use lamps with warm, soft light in the corners of the room to create a cozy atmosphere that doesn’t reflect off the screen.
############ H12: Conclusion
Building your own home entertainment center is a rewarding project that will bring countless hours of enjoyment to you, your family, and your friends. By starting with a clear plan, choosing components that fit your space and budget, and paying attention to details like cable management and lighting, you can create a setup that is both powerful and easy to use. Remember that it’s a journey, not a race. You can start small with a quality TV and soundbar and gradually build out your system over time. The key is to focus on what matters most to you, whether it’s the most immersive movie audio, the most responsive gaming experience, or simply a clean and inviting space to relax. We hope this guide has given you the confidence and knowledge to start building the entertainment hub you’ve always wanted.
Frequently Asked Questions (FAQ)
Q1: What is the most important component of a home entertainment center?
A1: While every part is important, the display (your TV or projector) and the audio system (soundbar or speakers) will have the biggest impact on your overall experience. A great picture and great sound are the foundation of any entertainment setup.
Q2: Do I need expensive HDMI cables?
A2: For most 4K setups, you don’t need to spend a lot, but you do need the right cables. Look for cables certified as “Ultra High Speed.” These are required to handle the bandwidth of 4K at 120Hz and features like eARC. Expensive branding doesn’t improve picture quality, but certification ensures performance.
Q3: How can I improve my sound without running wires everywhere?
A3: A high-quality Dolby Atmos soundbar with a wireless subwoofer and wireless rear speakers is an excellent choice. This gives you an immersive surround sound experience with minimal cable clutter compared to a traditional AV receiver setup.
Q4: Is a smart TV good enough, or do I need a separate streaming device?
A4: While most smart TVs have built-in apps, a dedicated streaming device like an Apple TV 4K or NVIDIA SHIELD often offers a faster, smoother interface, more consistent updates, and better performance. They are generally considered a worthwhile upgrade.
Q5: Can I use my computer as part of my home entertainment center?
A5: Absolutely. A Home Theater PC (HTPC) can be a powerful and flexible source, capable of playing local media files, streaming, and even gaming. You can connect it to your AV receiver or TV via HDMI and control it with a wireless keyboard and mouse.


