


Have you ever tried to watch a hummingbird in your garden? They zip by so fast that if you blink, you miss them. These tiny jewels of the bird world are incredibly fast, flapping their wings up to 80 times per second. It is no wonder that trying to film hummingbird footage feels like trying to catch lightning in a bottle. But capturing these birds on video is one of the most rewarding challenges a nature lover can face. When you finally get that perfect shot of them hovering in slow motion, sipping nectar from a flower, it feels magical.
This guide is designed to help you master the art of hummingbird videography. Whether you have a professional camera or just a smartphone, there are tricks you can use to get amazing results. We will cover everything from setting up your feeder to choosing the right shutter speed. By the end of this article, you will be ready to head outside and film hummingbird scenes that will amaze your friends and family.
Key Takeaways
- Speed is Key: Hummingbirds move incredibly fast, so you need high shutter speeds to freeze their motion.
- Patience Wins: Setting up the perfect shot takes time and observation of bird behavior.
- Lighting Matters: Bright, natural light is essential for high-speed filming without graininess.
- Gear Selection: You don’t always need expensive gear, but high frame rates help significantly.
- Stabilization: Tripods are non-negotiable for steady shots of small subjects.
Understanding Your Subject Before You Film Hummingbird
To successfully film hummingbird behavior, you first need to understand the bird itself. Hummingbirds are creatures of habit. They often visit the same flowers or feeders at specific times of the day. If you spend a little time watching your garden before you even bring out the camera, you will notice patterns. Do they prefer the red feeder in the morning? Do they fight over a specific perch? Knowing these details allows you to set up your camera in the perfect spot and wait for the action to happen, rather than chasing them around the yard.
Another important aspect is their territorial nature. Hummingbirds are surprisingly fierce. They will dive-bomb other birds and chase rivals away from their food source. This behavior can make for incredible action shots if you are ready for it. However, it also means their movements can be erratic and sudden. When you prepare to film hummingbird interactions, you need to be ready for sudden bursts of speed. Anticipating these moments is half the battle in wildlife videography.
Why Hummingbirds Are Hard to Film
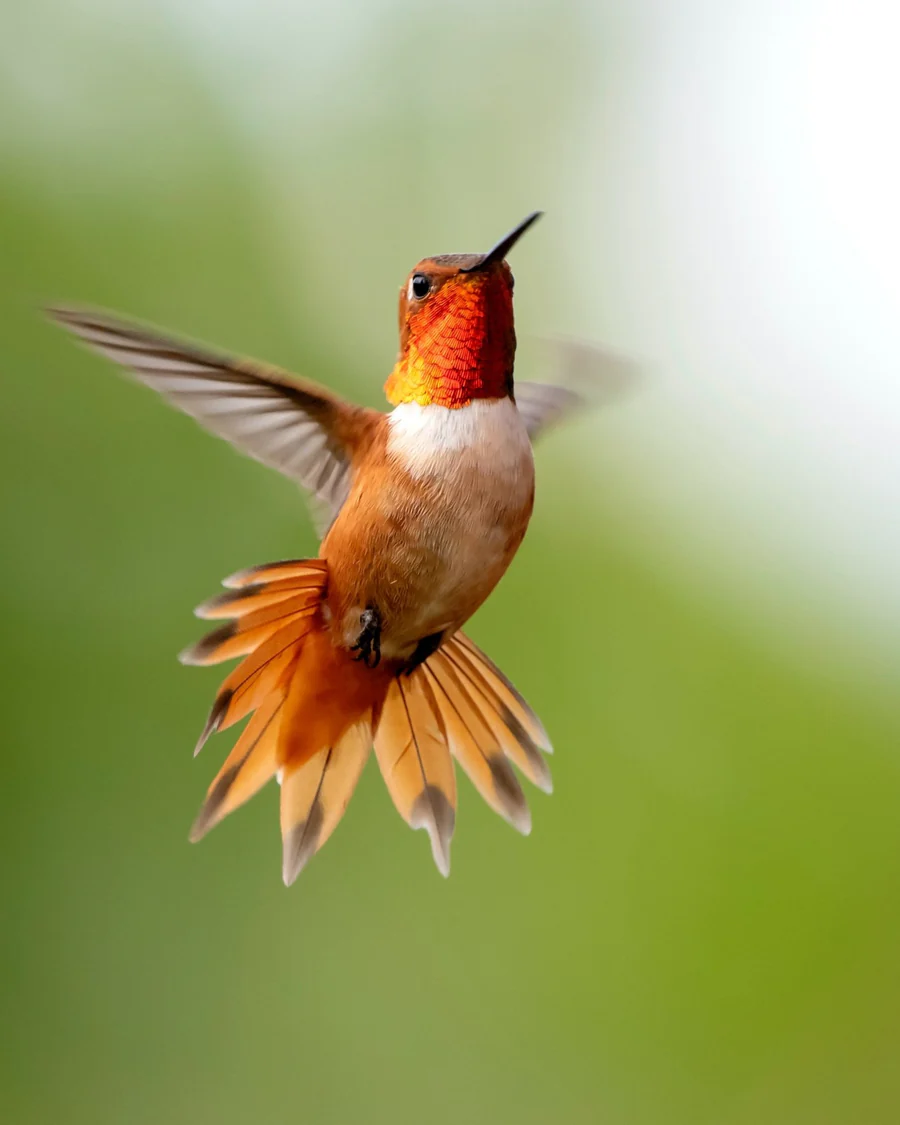
The main challenge when you film hummingbird clips is their sheer speed. Their wings move so fast that to the human eye, they are just a blur. Standard video cameras often record at 30 frames per second (fps). At this speed, a hummingbird’s wings will just look like a ghostly haze. To see the individual feathers and wingbeats, you often need to use slow-motion techniques. This requires specialized settings or cameras capable of high frame rates, which we will discuss later in this guide.
Furthermore, they are tiny. Focusing on a subject that is only a few inches long and constantly moving is difficult for any autofocus system. Most professional videographers switch to manual focus to ensure the bird stays sharp. If you rely entirely on your camera’s automatic settings, the lens might hunt back and forth, trying to find the bird, resulting in unusable footage. Learning to manually control your focus is a critical skill if you want to film hummingbird videos successfully.
Essential Gear to Film Hummingbird Videos
You might think you need a camera that costs thousands of dollars to get good footage, but that isn’t always true. While professional gear helps, many modern smartphones and entry-level cameras have excellent slow-motion capabilities. The most important feature to look for is the frame rate. If your camera can shoot at 60fps, 120fps, or even 240fps, you are in a great position to film hummingbird slow-motion shots. High frame rates allow you to slow the footage down in editing, revealing the beautiful mechanics of their flight.
Lenses are the next big consideration. Since hummingbirds are small and easily spooked, you usually can’t get very close to them physically. A telephoto lens or a camera with a good optical zoom is essential. You want to fill the frame with the bird without having to stand right next to the feeder. A lens with a focal length of at least 200mm (or equivalent) is a good starting point. This allows you to stand back a respectful distance while still getting a close-up view of the action.
Choosing the Right Tripod
Using a tripod is absolutely mandatory. Because you are zooming in so much, even the tiniest shake of your hand will look like a massive earthquake in the video. When you film hummingbird close-ups, stability is crucial for professional-looking results. A sturdy tripod keeps the frame locked in place. This is especially helpful if you are pre-focusing on a specific flower or feeder port and waiting for the bird to arrive.
Lighting Accessories
Sometimes natural light isn’t enough, especially if you are shooting at very high shutter speeds which require more light. Reflectors can help bounce sunlight onto the bird to fill in shadows. In more advanced setups, videographers use specialized high-speed flashes, but for video, continuous LED lighting is better. If you place a feeder in a shady spot, adding a small, battery-powered LED light can make the colors on the bird’s throat (the gorget) pop beautifully when you film hummingbird scenes.
Camera Settings for Success
Getting your settings right is the technical heart of the process. If you leave your camera on “Auto,” it will likely choose a slow shutter speed to let in light, which results in motion blur. To film hummingbird wings clearly, you need a fast shutter speed. A general rule in videography is the “180-degree shutter rule,” but for hummingbirds, you often break this rule to get crisper movement. You want a shutter speed that is fast enough to reduce blur but not so fast that the video looks choppy.
ISO is another setting to watch. This controls your camera’s sensitivity to light. Because you are using a fast shutter speed, less light is hitting the sensor. You might be tempted to crank up the ISO to compensate, but this introduces “noise” or grain into your image. It is a balancing act. The best approach is to film hummingbird videos in bright sunlight so you can keep your ISO low while maintaining a fast shutter speed.
Frame Rate vs. Shutter Speed
Many beginners confuse frame rate and shutter speed. Frame rate is how many images the camera takes per second (e.g., 60fps). Shutter speed is how long the shutter is open for each of those frames (e.g., 1/1000th of a second). To get smooth slow motion, you need a high frame rate. To get sharp wings without blur, you need a fast shutter speed. When you film hummingbird slow motion, you ideally want both: high fps (like 120fps) and a fast shutter (like 1/2000).
Recommended Settings Table
|
Setting |
Standard Video |
Slow Motion Video |
Notes |
|---|---|---|---|
|
Frame Rate |
24 or 30 fps |
60, 120, or 240 fps |
Higher fps = smoother slow motion. |
|
Shutter Speed |
1/50 or 1/60 |
1/1000 to 1/4000 |
Faster shutter freezes wing motion. |
|
Aperture |
f/5.6 – f/8 |
f/4 – f/5.6 |
Lower f-number lets in more light. |
|
ISO |
100-400 |
400-800 |
Keep as low as possible to avoid grain. |
|
Focus |
Manual |
Manual |
Pre-focus on the feeder for best results. |
Setting the Stage: Feeder and Flower Placement
You are the director of this movie, which means you can control the set. You don’t have to chase birds through the woods; you can bring them to you. Placing a feeder in a location with a nice background is one of the best tips to film hummingbird footage that looks professional. Avoid messy backgrounds like cars, fences, or garbage cans. Ideally, you want a background of distant green leaves or flowers that will be out of focus, creating a creamy, soft backdrop that makes the bird stand out.
You can also use natural props. While feeders are great for attracting birds, plastic red tubes don’t always look natural on camera. A pro tip is to tape a small vial of sugar water behind a real flower. The bird will come to feed from the flower, and it will look like you captured a totally wild moment in nature. This technique allows you to film hummingbird feeding behavior in a way that feels authentic and artistic, hiding the artificial food source from the viewer.
Managing Light and Backgrounds
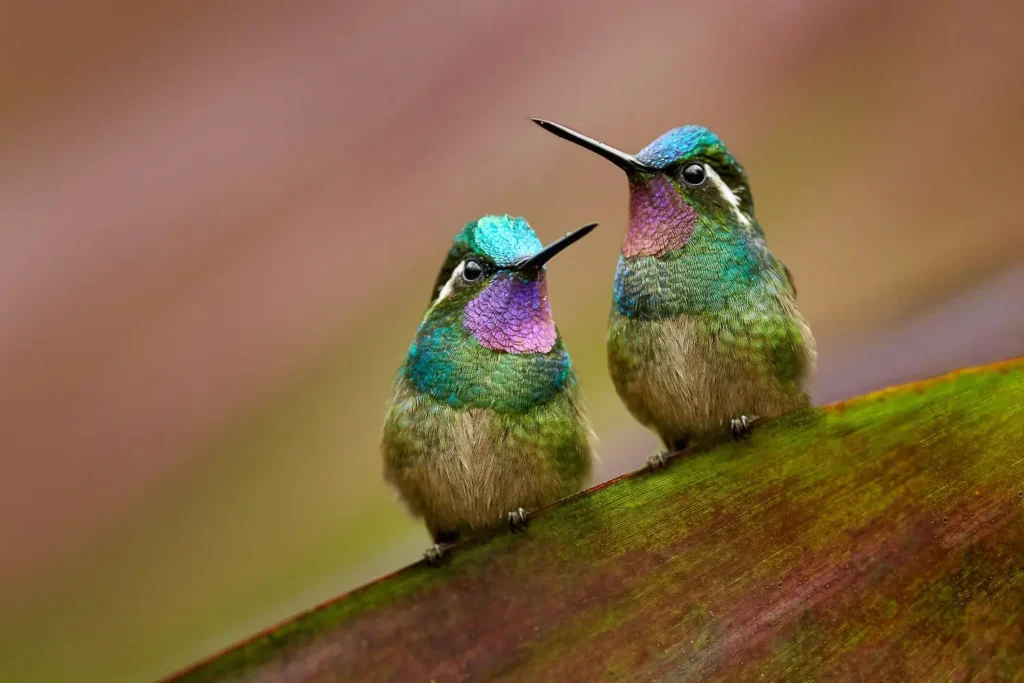
The direction of the sun is vital. Generally, you want the sun behind you or to your side, illuminating the bird. If the sun is behind the bird, you will get a silhouette. While silhouettes can be artistic, they won’t show the brilliant iridescent colors of the feathers. When you film hummingbird species like the Ruby-throated or Anna’s Hummingbird, that flash of color is what makes the shot special. Position your setup so the morning or late afternoon sun hits the bird directly.
Attracting More Birds
- Keep Feeders Clean: Change nectar every few days to prevent mold.
- Use Red: Hummingbirds are attracted to red, but dye isn’t necessary in the water.
- Plant Native: Native flowers attract insects, which hummingbirds also eat.
- Water Features: A small mister or fountain can attract them for a bath.
The Art of Patience and Observation
Wildlife filmmaking is 10% camera skills and 90% patience. You might set up your camera, get your focus perfect, and then sit there for an hour with nothing happening. This is normal. Do not get discouraged. The more consistent you are with your feeding station, the more reliable the birds will become. They will learn that your garden is a safe place to eat. Once they are comfortable, it becomes much easier to film hummingbird daily routines.
Try to wear neutral colors and avoid sudden movements when you are near the camera. Even better, use a remote trigger or an app on your phone to control the camera from a distance. This way, you aren’t standing right next to the tripod scaring them away. The less the birds notice you, the more natural their behavior will be. This allows you to film hummingbird interactions like grooming or resting, not just feeding.
Best Times of Day to Shoot
Hummingbirds have high metabolisms and need to eat constantly, but they are most active in the morning and late afternoon. Early morning light is often soft and golden, which looks beautiful on camera. Mid-day sun can be harsh and cast dark shadows. If you plan your schedule to film hummingbird activity during these “golden hours,” your footage will have a much more cinematic quality without any extra effort in editing.
Editing Your Hummingbird Masterpiece
Once you have captured your footage, the magic continues in the editing room. This is where you can take that high frame rate footage and slow it down. If you shot at 120fps and you play it back at 30fps, the footage will be four times slower than real life. This allows the viewer to see the tongue flick out to sip nectar and the individual adjustments of the tail feathers. Editing is a crucial step when you film hummingbird projects.
You can also crop the video if you filmed in 4K resolution. Since the birds are small, you might want to zoom in digitally during the editing process to make the bird fill more of the screen. Just be careful not to crop too much, or you will lose image quality. Color correction is another step; boosting the saturation slightly can help bring out the iridescent greens and reds that might have looked a bit flat in the raw footage.
Adding Sound Design
Don’t forget the audio! The sound of a hummingbird is distinctive—a loud buzzing or humming noise created by their wings. However, your camera might have picked up wind noise or cars driving by. You might need to clean up the audio or add nature sounds in post-production. A clean, crisp audio track of chirping birds and the whir of wings adds a layer of immersion when you present your film hummingbird video to an audience.
Software for Editing
You don’t need Hollywood software. Free programs like DaVinci Resolve or iMovie are powerful enough for most users. The key features you need are the ability to interpret frame rates (for slow motion) and basic color correction tools. As you get more advanced, you might explore software that helps stabilize footage if your tripod wasn’t perfectly steady.
Common Mistakes to Avoid
One of the biggest mistakes beginners make is chasing the bird with the camera. If a bird flies away, don’t jerk the camera to follow it. You will just end up with blurry, nauseating footage. Instead, frame your shot on the flower or feeder and wait. Let the bird enter your frame. It requires discipline, but the result is a stable, professional shot. When you film hummingbird flights, let the subject come to you.
Another mistake is forgetting about depth of field. If you use a very low f-stop (like f/2.8) to let in light, your area of focus will be razor-thin. If the bird moves just an inch forward or backward, it will be out of focus. It is often better to use a slightly higher f-stop (like f/5.6 or f/8) to give yourself a larger margin of error, even if it means you have to increase your ISO slightly.
Checklist for a Successful Shoot
- Fresh Nectar: Ensure the feeder is full and fresh.
- Stable Tripod: Check that your gear is locked down tight.
- Focus Check: Pre-focus on the feeding port.
- High Shutter Speed: Verify you are at 1/1000th or faster.
- Patience: Prepare to wait for the perfect moment.
Advanced Techniques for Pro Results
If you have mastered the basics and want to take it to the next level, consider setting up a multi-camera shoot. You can place one camera wide to see the garden environment and another tight on the feeder for close-ups. Cutting between these two angles makes for a much more interesting video. You might also experiment with 4K video cropping, where you shoot wide to ensure you catch the bird, and then crop in during editing. This is a safer way to film hummingbird antics without missing the shot.
Another advanced technique is using a “shutter trigger.” This is a device that uses a motion sensor or laser beam. When the bird breaks the beam, the camera starts recording automatically. This is fantastic for those who don’t want to sit by the camera for hours. It ensures you only record when there is action, saving you storage space and editing time. Automation can be a game-changer when you try to film hummingbird wildlife documentaries in your own backyard.
Utilizing Slow Motion Effectively
Slow motion is a tool, not a crutch. Don’t slow down every single clip. Sometimes, seeing the bird at real speed is impressive because it shows how energetic they are. A good edit mixes real-time speed with slow motion. Show the bird zipping in at full speed (real-time), then slow it down as it hovers and drinks, then speed it back up as it zooms away. This dynamic editing keeps the viewer engaged.
Conclusion
Learning how to film hummingbird videos is a journey that combines technical camera skills with a love for nature. It forces you to slow down and observe the small details of the world around you. While the learning curve can be steep—dealing with fast motion, lighting issues, and the unpredictable nature of wild animals—the results are worth it. There is nothing quite like capturing the iridescent flash of a throat patch or the delicate suspension of a hover on video.
Remember, you don’t need the most expensive gear to start. A good tripod, a decent zoom lens or smartphone, and a lot of patience are your best tools. Start by observing the birds in your yard, set up your stage, and experiment with your settings. With practice, you will be capturing breathtaking footage that showcases the beauty and speed of these amazing creatures. For more tech and lifestyle tips, you can always check out resources like https://siliconvalleytime.co.uk/ to stay updated.
So, grab your camera, fill up that feeder, and get out there. The hummingbirds are waiting for their close-up!
FAQs
Q: What is the best shutter speed to film a hummingbird?
A: To freeze the wings completely, you often need a shutter speed of 1/2000th of a second or faster. However, for video, a slightly slower speed like 1/1000th can look more natural while still showing detail.
Q: Can I use my iPhone to film hummingbirds?
A: Yes! Modern iPhones and Androids have excellent “Slo-Mo” modes. Put your phone on a tripod or stable surface close to the feeder, lock the focus on the feeder, and hit record when the bird arrives.
Q: Do I need lights to film hummingbirds?
A: Not strictly, but hummingbirds look best in bright light. If your feeder is in the shade, the footage might look grainy. Natural sunlight is best, but bright sunny days are ideal for high-speed filming.
Q: Why is my hummingbird footage blurry?
A: This is usually due to a slow shutter speed. If your camera is on “Auto,” it might be dropping the shutter speed to let in light. Switch to “Shutter Priority” or “Manual” mode and increase the speed.
Q: How do I get close enough without scaring them?
A: Use a zoom lens or set up your camera on a tripod near the feeder and control it remotely using a smartphone app or a long shutter release cable.
For further reading on the scientific background and history of these fascinating birds, you can find a link from https://www.wikipedia.org/ related to this keyword ” film hummingbird ” and check out their extensive entry on Hummingbirds.


