


Have you ever walked into a bakery, seen a beautiful slice of bread with a mesmerizing spiral of chocolate running through it, and wondered, “How do they do that?” You aren’t alone! There is something almost magical about slicing into a plain-looking bread to reveal a hidden artistic design inside. A vv is the perfect combination of comfort food and dessert. It pairs the soft, pillowy texture of homemade bread (or pound cake) with the rich, decadent flavor of chocolate. Whether you are looking for a special breakfast treat to impress your family or a stunning dessert to bring to a potluck, this bake is a guaranteed winner.
In this guide, we are going to dive deep into everything you need to know about creating this masterpiece. We aren’t just giving you a recipe; we are teaching you the why and how behind the swirl. We will cover the different types of dough you can use, the science of keeping the swirl distinct, and how to fix common mistakes. Get your apron on, because we are about to make your kitchen smell amazing.
Key Takeaways
- Understanding the difference between yeast breads and quick breads for your base.
- Mastering the technique of rolling and layering to create a perfect spiral.
- Learning why a loaf with a chocolate swirl sometimes separates and how to prevent it.
- Discovering variations like cinnamon, nut, or fruit additions.
- Tips for slicing and serving to maintain the structural integrity of the loaf.
Why We Love a Loaf with a Chocolate Swirl
There are countless reasons why this specific baked good holds a special place in our hearts. First and foremost, it is versatile. A loaf with a chocolate swirl straddles the line between a breakfast item (think babka or brioche) and a dessert (like a marble pound cake). This means you can justifiably eat a slice with your morning coffee, pack it in a lunchbox, or serve it warm with a scoop of vanilla ice cream after dinner. The visual appeal is another huge factor. We eat with our eyes first, and the contrast between the pale dough and the dark chocolate ribbon is visually striking.
Beyond the aesthetics, the flavor profile is balanced. Sometimes a full chocolate cake is too rich, and plain white bread is too boring. This loaf offers the best of both worlds. You get the neutral, buttery flavor of the crumb that cleanses the palate, followed immediately by a hit of bittersweet or sweet chocolate. It is a texture adventure, too. Often, the chocolate swirl involves melted chocolate, cocoa powder, or even chocolate chips, which creates a different mouthfeel compared to the soft bread surrounding it. It is a baking project that looks incredibly professional but is actually quite achievable for home bakers.
Choosing the Right Base: Yeast vs. Quick Bread
Before you even touch a bag of flour, you need to decide what kind of “loaf” you are making. The term loaf with a chocolate swirl can refer to two main categories: yeast breads (like Babka) and quick breads (like a marble cake or banana bread). Understanding the difference is crucial because the techniques for swirling are completely different for each.
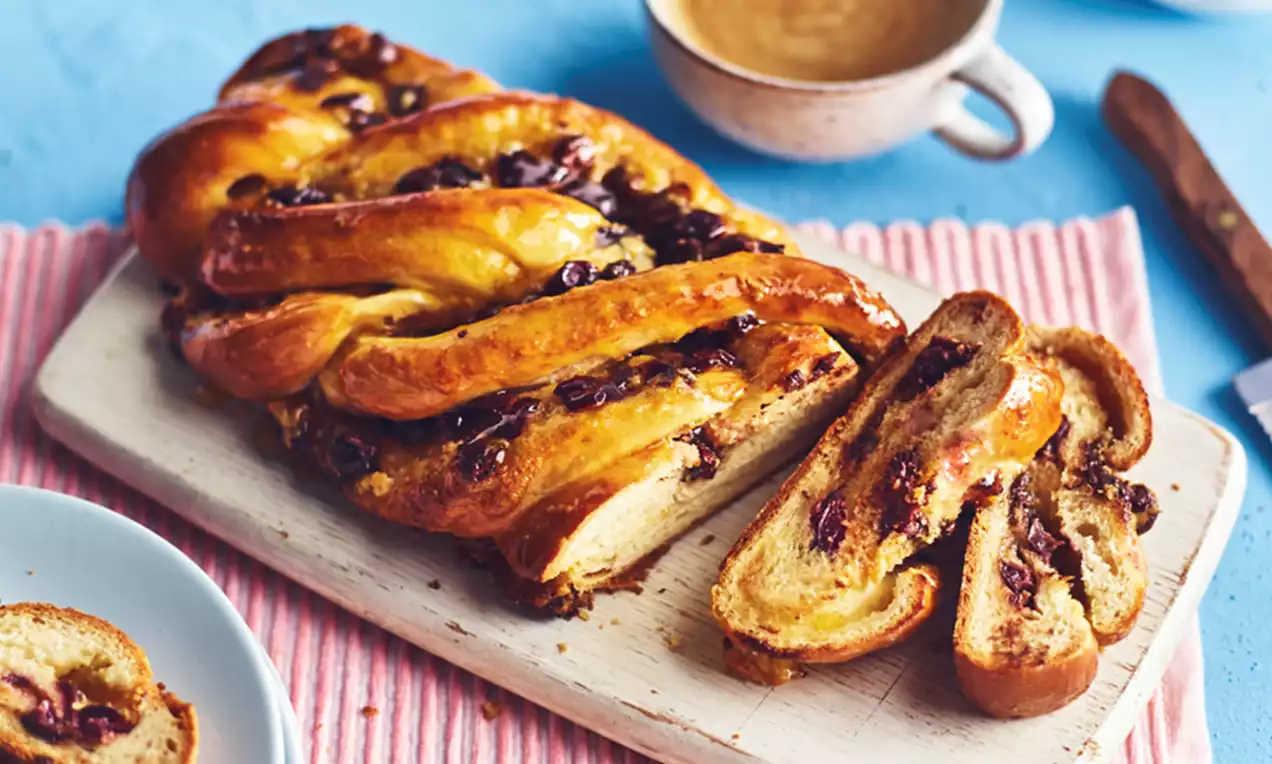
Yeast Breads (Babka Style)
Yeast breads require patience. They rely on biological leavening (yeast) to rise. This usually involves kneading the dough, letting it rise (proof), shaping it, letting it rise again, and then baking. The texture is chewy, airy, and bread-like. To get a swirl in a yeast bread, you typically roll the dough out flat, spread a chocolate filling over it, roll it up like a rug, and then twist or braid it before placing it in the pan. This creates intricate, thin layers of chocolate throughout the loaf.
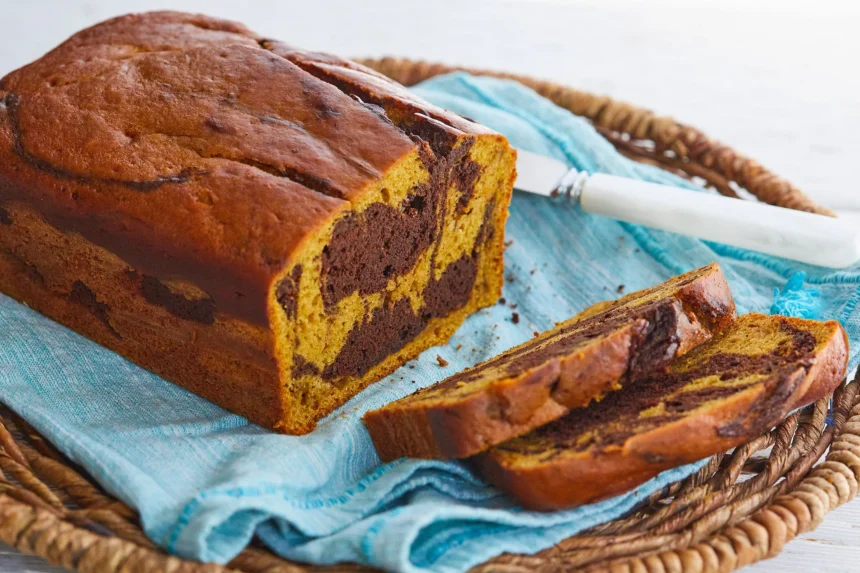
Quick Breads (Pound Cake Style)
Quick breads use chemical leavening agents like baking powder or baking soda. There is no waiting for the dough to rise; you mix it and bake it immediately. The texture is more like a cake—dense, moist, and tender. Creating a swirl here is a different ballgame. You usually divide the batter, mix chocolate into one half, and then layer dollops of plain and chocolate batter into the pan. You then take a knife or skewer and physically swirl the wet batters together. Both methods result in a tasty loaf with a chocolate swirl, but the process and end result are distinct.
Essential Ingredients for the Perfect Swirl
Great baking starts with great ingredients. You don’t need the most expensive items on the shelf, but quality does matter when you are trying to highlight specific flavors. Since this recipe relies heavily on the contrast between the dough and the chocolate, skimping on the chocolate is a bad idea.
|
Ingredient |
Role in Recipe |
Recommendation |
|---|---|---|
|
Flour |
Structure |
All-purpose for cake; Bread flour for yeast breads. |
|
Chocolate |
The Star Flavor |
High-quality semi-sweet or dark chocolate (60% cocoa). |
|
Butter |
Richness & Moisture |
Unsalted butter allows you to control salt levels. |
|
Sugar |
Sweetness & Tenderness |
Granulated for the dough; sometimes brown sugar for the filling. |
|
Eggs |
Structure & Lift |
Large eggs at room temperature work best. |
|
Cocoa Powder |
Deep Chocolate Color |
Dutch-processed cocoa gives a darker, fudgier swirl. |
When making a loaf with a chocolate swirl, pay special attention to the cocoa powder. Natural cocoa powder is acidic and lighter in color, while Dutch-processed cocoa has been treated to reduce acidity and is much darker. For a dramatic visual swirl, Dutch-processed is usually the better choice. Also, if you are melting chocolate to mix into the batter, ensure it has cooled slightly before mixing; otherwise, you might scramble the eggs in your mixture!
The Science of the Chocolate Filling
If you are making a yeast bread version, the filling is often a paste made of butter, sugar, cocoa powder, and melted chocolate. This paste needs to be spreadable but not so runny that it leaks out during baking. This is a delicate balance. If the filling is too oily, it will create a gap between the dough layers, causing the loaf to fall apart when sliced. This is often called “gapping.”
To prevent gapping in your loaf with a chocolate swirl, many bakers add a binding agent to the filling. This could be cookie crumbs, cake crumbs, or even a little bit of flour. These dry ingredients absorb the excess fat from the melting butter and chocolate, keeping the filling intact and attached to the dough. It acts almost like a glue. Another trick is to ensure your dough isn’t too dry.
A moist dough will adhere better to the filling than a dry, floury one. If you are making a quick bread, the “science” is about density. The chocolate batter should have roughly the same density as the vanilla batter. If the chocolate batter is significantly heavier (because of the added melted chocolate), it might sink to the bottom of the pan instead of swirling nicely.
Step-by-Step: Preparing the Dough
Let’s focus on a classic yeast-based dough for this section, as it creates that iconic swirled look found in artisan bakeries. The process begins with activating your yeast (if using active dry) in warm milk with a pinch of sugar. Once it gets foamy, you are ready to go.
Mixing and Kneading
Combine your flour, sugar, and salt in a large bowl or stand mixer. Add the yeast mixture and eggs. Mix until a shaggy dough forms. Then, the butter goes in. Adding soft butter gradually to the dough while kneading enriches it, creating a brioche-style texture. This makes your loaf with a chocolate swirl incredibly tender. Knead until the dough passes the “windowpane test”—meaning you can stretch a small piece of dough thin enough to see light through it without it tearing.
The First Rise
Place the dough in a greased bowl, cover it, and let it rise. This is where flavor develops. For an even better texture, some bakers let the dough rise in the fridge overnight. Cold dough is actually much easier to roll out and shape, which is a huge advantage when you are trying to create precise layers for your swirl. If you are in a rush, a warm spot in the kitchen works, too. Just ensure it doubles in size before moving to the next step.
Creating the Chocolate Paste
While your dough is napping, you can make the magic element: the chocolate filling. For a rich, dark swirl, you want to combine unsalted butter, powdered sugar, cocoa powder, and perhaps some high-quality melted chocolate.
Melt the butter and chocolate together gently. Whisk in the cocoa powder and sugar until you have a smooth, glossy mixture. It should be the consistency of a thick spread, like peanut butter. If it is too liquid, let it sit at room temperature to thicken up. If it is too hard, warm it slightly. You can also add a pinch of salt to the filling to cut through the sweetness, or a dash of cinnamon or espresso powder to enhance the chocolate flavor. Remember, this filling defines the character of your loaf with a chocolate swirl, so taste it! It should be delicious on its own.
The Technique: Rolling and Spreading
This is the moment of truth. Take your risen dough and punch it down gently to release air bubbles. Turn it out onto a lightly floured surface. Using a rolling pin, shape the dough into a large rectangle. The thinner you roll it, the more swirls you will have in the final product. However, don’t go so thin that the dough tears.
Using an offset spatula or the back of a spoon, spread your chocolate paste evenly across the entire surface of the dough, leaving a small border around the edges. This border helps seal the log later. Be generous but even. Clumps of filling can cause uneven baking. If you want to add extras like chopped hazelnuts or chocolate chips, now is the time to sprinkle them over the paste. This adds texture to your loaf with a chocolate swirl, giving it a nice crunch.
H3: Rolling It Up
Starting from the long edge, roll the dough up tightly into a log. Gravity is your friend here, but you also need to use your fingers to tuck the dough in as you go. A tight roll ensures a beautiful spiral pattern when sliced. Once you have a log, pinch the seam shut to seal the chocolate goodness inside.
Shaping the Loaf for Maximum Swirl
You have a log of dough filled with chocolate. You could just bake it like this, but for that professional bakery look, we take it a step further. We are going to shape it.
The Twist Method
Cut the log in half lengthwise using a sharp knife. You will now have two long strands with the layers of chocolate and dough exposed. It will look messy, but trust the process. Pinch the top ends of the two strands together, then twist them over each other to form a two-strand braid or “twist.” Pinch the bottom ends together. This technique exposes the inner layers of the loaf with a chocolate swirl, making the outside look just as good as the inside. Carefully lift this twisted braid and place it into your prepared loaf pan.
The Second Rise (Proofing)
Patience is a virtue in baking. Once your shaped dough is in the pan, it needs to rise again. This is called proofing. During this time, the yeast gets back to work, filling the dough with air bubbles and helping the loaf expand to fill the pan.
Cover the pan loosely with plastic wrap or a clean kitchen towel. Let it sit in a warm, draft-free place. You will know it is ready when the dough has puffed up significantly and looks soft and wobbly. If you poke it gently with your finger, the indentation should spring back slowly. If it springs back instantly, it needs more time. If the indentation stays and the dough collapses, it is over-proofed. Proper proofing ensures your loaf with a chocolate swirl is light and fluffy, not dense and brick-like.
Baking to Perfection
Preheat your oven thoroughly. A steady temperature is vital for an even bake. Place your loaf pan in the center of the oven. As the loaf bakes, your kitchen will fill with the intoxicating aroma of bread and chocolate.
Managing Oven Temperature
If you notice the top of your loaf with a chocolate swirl is browning too quickly but the inside is still raw (you can test this with a thermometer or skewer), tent a piece of aluminum foil loosely over the top. This protects the crust from burning while allowing the heat to penetrate the center. Yeast breads enriched with butter and sugar tend to brown faster than lean doughs, so keep an eye on it.
Testing for Doneness
The most accurate way to check if your bread is done is to use a digital thermometer. The internal temperature should read between 190°F and 200°F (88°C – 93°C). If you are baking a quick bread (cake-style), insert a toothpick into the center; it should come out clean or with just a few moist crumbs attached, but no wet batter.
The Sugar Syrup Glaze (Optional but Recommended)
For yeast breads like Babka, there is often a final step that takes the loaf from “good” to “unbelievable.” While the bread is baking, make a simple syrup by boiling equal parts water and sugar until the sugar dissolves.
As soon as you pull the hot loaf with a chocolate swirl out of the oven, brush this syrup generously over the crust. It might seem like too much liquid, but the hot bread will drink it up. This syrup does two things: it adds a lovely shine to the crust, making it look professional, and it helps preserve the bread, keeping it moist for days longer than it would last otherwise. It also adds a sweet crunch to the crust that contrasts beautifully with the soft interior.
Cooling and Slicing
This is the hardest part of the entire recipe: waiting. It is incredibly tempting to slice into hot bread, but you must resist. When bread is hot, the starch molecules are still gelatinized and unstable. Slicing it now will mash the layers together, ruining your beautiful design and making the texture gummy.
Let the loaf with a chocolate swirl cool in the pan for about 10-15 minutes, then transfer it to a wire rack to cool completely. This air circulation prevents the bottom from getting soggy. Once it is room temperature, grab a serrated bread knife. Use a gentle sawing motion to slice through the crust without squashing the loaf. Now, you can finally admire your handiwork—that perfect, hypnotic chocolate spiral.
Common Mistakes and How to Fix Them
Even experienced bakers run into trouble sometimes. Here are some common issues with swirling and how to solve them.
- The “Gap”: As mentioned earlier, a gap between the filling and the dough is common. Fix: ensure your filling has a binder (like crumbs) and wrap the dough tightly.
- The “Sinking Swirl”: In quick breads, the chocolate batter sinks. Fix: Ensure your chocolate batter isn’t too heavy. Add a teaspoon of flour to the chocolate portion if needed to match the density of the vanilla batter.
- Raw Center: The outside is burnt, inside is doughy. Fix: Lower your oven temperature by 25 degrees and bake longer, tenting with foil.
- Messy Design: The swirl looks muddy. Fix: Don’t over-swirl! In quick breads, just a few figure-eight motions with a knife are enough. Too much mixing blends the colors into a light brown mush.
Dietary Variations: Gluten-Free and Vegan Options
Everyone deserves to enjoy a loaf with a chocolate swirl. Fortunately, this recipe is adaptable.
Gluten-Free
For a gluten-free version, swap the all-purpose or bread flour for a high-quality 1-to-1 gluten-free baking flour blend that contains xanthan gum. You may need to add a little extra moisture (like an extra egg or tablespoon of milk) as GF flours are thirsty. Note that GF yeast doughs only require one rise, not two, as the structure is more fragile.
Vegan
To make it vegan, replace dairy butter with a good vegan butter block (not a spread from a tub, which has too much water). Use plant-based milk like oat or soy milk. For the egg replacement, flax eggs (1 tbsp ground flaxseed meal + 3 tbsp water) work well in quick breads. In yeast breads, you might need a commercial egg replacer to get the right lift. Ensure your chocolate is dairy-free as well.
Serving Suggestions
A slice of loaf with a chocolate swirl is perfect on its own, but you can dress it up.
- French Toast: Use stale slices to make the most decadent chocolate French toast you have ever tasted.
- Bread Pudding: Cube up leftovers and bake them into a custard for a rich dessert.
- Toasted: Lightly toast a slice and slather it with salted butter or cream cheese. The saltiness cuts the sweetness perfectly.
- Dessert Sandwich: Place a scoop of strawberry ice cream between two slices for a gourmet ice cream sandwich.
Storing and Freezing Your Loaf
Because of the fat content in the chocolate and butter, this loaf keeps reasonably well. Store it in an airtight container at room temperature for up to 3 days.
If you want to keep it longer, freezing is a great option. You can freeze the whole loaf or slice it first. Wrap individual slices tightly in plastic wrap and then place them in a freezer bag. This way, you can pull out a single slice of loaf with a chocolate swirl whenever a craving strikes. It can be thawed on the counter or popped straight into the toaster.
Troubleshooting FAQ
Q: Can I use chocolate chips instead of melting chocolate?
A: Yes, you can! In quick breads, tossing chocolate chips in flour prevents them from sinking. In yeast breads, mini chips work best so they don’t tear the dough when rolling.
Q: Why is my chocolate filling grainy?
A: This usually happens if the sugar didn’t dissolve properly or if the chocolate seized (got moisture in it while melting). Ensure your bowl and utensils are bone dry when melting chocolate.
Q: Can I use white chocolate?
A: Absolutely. A loaf with a chocolate swirl can be made with white, milk, or dark chocolate. White chocolate is sweeter, so you might want to reduce the sugar in the dough slightly.
Q: My yeast dough didn’t rise. What happened?
A: Your yeast might be dead (old) or your liquid was too hot and killed it. Liquid should be warm to the touch, like baby bathwater, not scalding hot.
Q: How do I get that shiny crust?
A: For yeast breads, an egg wash (one egg beaten with a splash of water) brushed on before baking gives a shine. The sugar syrup method after baking gives a glossy, sticky finish.
Conclusion
Baking a loaf with a chocolate swirl is a journey that rewards you with both visual beauty and incredible flavor. It takes a simple concept—bread and chocolate—and elevates it into something sophisticated. Whether you choose the quick bread route for instant gratification or the yeast bread route for a therapeutic weekend project, the result is a treat that speaks the universal language of comfort.
Don’t be intimidated by the steps or the techniques. Even a “messy” swirl tastes delicious. The key is to have fun with the process, experiment with fillings, and enjoy the delicious aroma filling your home. So, gather your ingredients, clear off your counter, and get ready to bake something truly spectacular. For more tech and lifestyle inspiration, you can always visit Silicon Valley Time.
Ultimately, the best loaf is the one shared with friends and family. As you slice into your creation and reveal that hidden spiral, take pride in your baking skills. It is edible art, made by you. If you are interested in the history of sweet breads and their origins, you can find a link from https://www.wikipedia.org/ related to this keyword “loaf with a chocolate swirl” and add it to your reading list; specifically, check out the entry on Babka to see where many of these swirling techniques originated.


